


What you say correspond s to my experience
All the Russian openings: For Begginers
-
You should introduce a special course on sleight-of-hands to roll “1” most of the time. :wink:
Even in desperate situations, I often found that some Russian attack with Infantry only can do miracles.
-
Haha thanks guys! I swear everytime I reread these posts, I notice a million spelling and grammar errors. I’ve slowly been trying to clean it up a bit to enhance the readability, so I’ll keep coming back to see if I can improve things. Oh Baron, that’s actually a good idea and brings up something that should definitely be highlighted in the Russia thread!
It also ties back to where I started rather nicely…Infantry: Total Power!
Here’s an interesting fact that might not be immediately apparent to new players…
2 attacking infantry vs 1 defending infantry: is better than 66.6% odds (more than a two thirds chance) to the attacker.
1 attacking tank vs 1 defending infantry: is just a little over 50% odds (half and half chance) to the attacker.At first glance this probably seems crazy! ‘How could a pair of units that only hits at a 1, be better than a unit that hits at a 3?’ :evil:
This battle demonstrates the value of hitpoints and fodder on attack, when compared to just the attack value alone. Even though the tank has a stronger attack value, it can only take a single hit before the battle is over! 2 infantry have a weaker attack value, but they have the chance to prolong the battle, and absorb a hit before they go down, with more chances to roll that lucky 1.
If you are willing to send 2 infantry vs 1 infantry, there is a strong chance you will prevail, and in total unit value this is the same cost as sending a single tank. What does this mean for the Russians? Well for starters, it serves as a counterpoint to my first posts in this thread, where I was arguing for greater attack/movement in the first round purchase, over hitpoints and defense. This simple example of 2 infantry vs 1 infantry, really highlights the power of infantry overall. “Naked” infantry, infantry alone, without a heavy hitting attacker or defender to back them up, are still fairly strong, and infantry is cheap at 3 ipcs - the cheapest unit in the roster! Absent the movement advantage, 2 infantry is basically always better for the money than a single Tank, at least when you are just considering small battles like the one under consideration above.
In previous posts I have discussed these kinds of effects as “magnified” or I’d say a phrase like “the magnified build” of such and such unit. What I mean by that is the way a unit of a given type gains certain combat advantages when it is grouped together with other units of that same type (and especially if you continue to “magnify” for several rounds, by purchasing the same type of unit over and over.)
We should just get it out there right now, the most powerful “magnified” build of all, is the magnified Infantry build!
There is a purchasing phenomenon known as the infantry focus, or Infantry spam, or the overall infantry advantage. The sort of “heavy infantry” building strategy that facilitates a move known as the infantry push, or stack push, or the “infantry push mechanic” in Classic, a type of gameplay described in other articles which you can read on this site. http://www.axisandallies.org/p/infantry_push_mechanic_alive_and_well_or_dead_and_buried/
I guess if we need to update the thinking, what we have now is more like an Infantry+Artillery push dynamic. Where you’re still buying predominantly infantry, but now adding artillery into the mix (optimally at 1:1 or at least 2:1 inf per artillery piece.) But the main buy is still infantry here.
Just like Odysseus at Troy, we take our best machinations and mechanics in A&A, and try to put them to use during the War of plastic army men, for total cardboard world domination! The inf push is basically still around, even if altered somewhat by artillery, and the infantry push is acknowledged to be a potent general building strategy. The advantage of infantry, not just on defense, but in hitpoints specifically is huge for Russia. One could say that the whole Russian playstyle or design is geared to highlight this potency of the infantry unit. Russia doesn’t have a lot of money, so by default they are forced to discover the power of infantry. Or at least, that’s one way you can look at it. Trying to put a positive spin on Russia’s lack of cash.
:-DIf you are able to out-stack your opponent, and especially if you can stack a huge wall of Russian infantry at Moscow, that is basically optimal purchasing and positioning for the Soviets. The higher you stack the more potent you will be on defense, but there are also some cases where you will need to attack, to maintain at least some kind of income parity, or take a key territory in order to block German or Japanese tanks from blitzing you! Sometimes you have a fighter or two to spare. Sometimes not! If you take my recommendation and add a Russian bomber to the set up, you will at least be able to run 3 battles per round with air support if you want. But frequently there is not enough aircraft available, and in situations like that, always keep this simple rule in mind… Infantry are still ok on attack. And artillery for just a slight bit more invested makes these infantry even better. But infantry alone can get the job done, if you need them too in a pinch.
2 infantry units has a stronger cumulative attack value than a single tank in small engagements. If you double the numbers the effect becomes even more potent, so 4 infantry is much stronger than 2 tanks, in small engagements. The real advantage of buying basically any unit other than infantry or artillery, is just movement. Movement is huge though. In a turn based game, sometimes movement can be everything! The whole game! Because sometimes getting somewhere “next round” or a “few rounds from now” just isn’t good enough. Sometimes you need the units there “right now!”
More than any other player nation, the Russians will have to confront this problem right away. Movement into Moscow, out of Moscow, or against Moscow by the Axis, will all highlight the delicate balance this games strikes between movement and hitpoints/attack/defense for the cost. What you pay the most for in the end is usually movement. Transports move ground across the water, and all other ships basically just exist to protect them. So when players like US/UK/Japan invest in ships, they are really investing in movement across the water. Tanks are movement across the ground, and Fighters and Bombers over the land and sea. But when movement isn’t a huge consideration, Infantry will always be best for the cost. That’s why so many people say things like “don’t forget to buy infantry!” or “the dude who purchases the most infantry will usually win” etc. Russia is unique in that they can remain reasonably effective well into the game, without having to move very far from home. Their core is rich relative to their periphery, and they can just sort of hang out in the zone immediately surrounding their capital and still collect enough to be a threat. So its worth thinking about, when all is said and done, how many infantry units do the Russians really need to stay alive into the endgame?
I’d say if you are playing for keeps, the goal is achieve a stack upwards of 60 or more total units on Moscow.
Lets say about 1/3rd of that force should be heavy hitters, like tanks or fighters, the other 2/3rds is mostly infantry with artillery supporting it when possible. There is just something about that 60 stack, its like a magic number, once you achieve it you’r ability to be effective with a limited number of territories under your control becomes pretty out-sized compared to the Axis. The Axis have to push their units across a much greater distance from their main centers of production, where as you can just hang out in Moscow and stack and stack! This forces Axis to invest in movement, since its harder for them to match you hit point for hit point on the center otherwise. So even a single infantry unit produced by Russia during the late game, is really worth twice or three times its cost to the Russians, given what the Axis enemy has to spend to bring a unit in range that can destroy.Once you achieve super stack status, whether on Moscow, or on any territory really, the power of infantry really becomes clear. All you have to do is buy a few dudes a round, and your teammates can fly in the rest to help you. (The same principles can also apply to Berlin, or in a territory like Western Europe D-Day.) When you super stack, the idea is to put more hit-points a territory than the other side can match over time, until eventually you have them driven back. You push the defensive value of your infantry out from these core stack zones, and win the war of attrition by putting up more defensive infantry strength (across several territories) than your opponent could reasonably attack in a single round. That’s you push out from the core, but the core itself is usually your capital territory (whatever nation you are playing.) You want a wall of infantry either to defend that core, or to march out from it eventually to mess with the other guys core. That’s how Russia fights Germany on this board anyway. So its good to remember, as Baron said that sleight of hand! Or pulling a Houdini, and escaping from the capital cage and running wild! That can be fun too. If your stack is big enough, you might not even need to hold Moscow to be a pain for Axis. If your wall is giant enough, it can just start lumbering around in Eurasia while the western Allies try to figure something out haha.
-
And that one’s out of here!
LMFAO reading that Black Elk! A few of my favorites “a huge wall of Russian infantry”, “Once you achieve super stack status”, “if your wall is giant enough”, “total cardboard world domination”!
That is too good! But yea, I try and keep Russia less than 2:1 infantry, artillery myself. I hate to waste the extra buck(being the cheap *&%$#@! that I am) but it’s way worth it.
Good Stuff Man! -
Black Elk - 42.2 arrived today so I had a quick look for advice on the forum and found this post from you.
Having only just benefitted from all your time and help regarding 1941 strategy I am quite simply gobsmacked by your deep knowledge and your willingness to share.
You are a star Black Elk!
:-D
-
Enjoy your new game, Private Panic.
-
Thanks wittman!
BTW - sent you an instant message - did you get it? Not showing in my outbox.
Cheers
PP -
You need to tick the box at the bottom of the message. On the left, I think.
-
@wittmann:
You need to tick the box at the bottom of the message. On the left, I think.
Messages still send successfully even if you haven’t saved it to your own outbox.
-
Thanks :-)
-
Hi private panick! Nice to see you in the 1942.2 section :-D
I’m busy with work this weekend, but plan to return to this thread soon with some thoughts on sz16, since I think the decision of whether to keep it open or close it off, has a definite impact on the Russian situation. Meantime, hopefully you can find some cool threads in this forum to keep you busy with strategy planning.
Catch you guys soon!
best Elk -
(Pulled from another thread for safe keeping)
Still thinking about general strategies for the five player nations on this board, and building up to a German strategy guide little by little in my mind, but I wanted to pause this morning and just describe one Allied move that I’m rather fond of on this board with USA.
I’ve referred to it in the past as “the Iceland fighter transit”, or “the fighter launch” from sz 11 to Moscow in 2 moves.
Usually I will plan this move as a round 3 set up for USA, in KGF focused games. It is my favorite use for the starting US Pacific carrier in sz 53 (should this survive J1), if you want to move that Carrier from the Pacific to the Atlantic to support a European campaign. There are a number of purchases you can make during the first 3 rounds to support this play, I like to buy a destroyer and a carrier for sz 11 on USA1, but I just want to describe the situation here in terms of the starting units first.
The sz 53 fighter flies off the Carrier deck to land in W. Australia on USA1, then flies to India on USA2 for Calcutta defense.
The sz 53 fleet itself moves to sz 41, to guard the British as they make their way around South America (New Zealand evac). These ships are joined by the 1 fighter from Hawaii on USA1. This American fleet will move from sz 41 to sz 22 Brazil on USA2. The fighter can detach from the carrier on the second round, or stay with the deck in sz 22, it’s up to you. But I like to detach and fly from sz 41 either to W. Australia or Equatorial Africa/Congo so it can reach India the following round. Note if you take the Africa route for this fighter from sz 41, your flight path in round 3 is through Sudan, so it can land in India for defense.
Sz 41 is the fastest way to get the Hawaiian fighter to the Center/India that I’ve been able to find. It takes the same amount of moves as going any other direction. So I just go to sz 41 on USA1 with the Hawaiin fighter, and launch the fighter from there on USA2, with plans to land it in India on USA3. This is a better play I think, than going to Eastern Australia, or Central USA, or Alaska with the fighter from Hawaii on USA1.
The sz 56 fleet moves to sz 19 Panama on USA1, and on to sz 11 East Coast on USA2.
On round 3 you will purchase 2 USA fighters, to set up the Iceland transit in earnest. Whatever starting naval forces you purchased in the Atlantic up until this point, will converge with the British in sz 13 Morocco, to begin Operation Torch against North Africa. During this same 3rd round, your Pacific carrier will move to sz 11 on Non Com, where it will remain for the next several rounds to receive newly purchased fighters placed directly into sz 11. From this point on, the carrier deck will serve as a launching pad for newly purchased fighters on their way to Moscow/W.Russia via Iceland.The rest of your USA Atlantic forces are free to roam about and threaten amphibious landings, but this one carrier deck will remain in sz 11, to do its main job of fighter launching.
By the 3rd round USA will still be collecting into the high 30’s, usually between 36-38 ipcs. 20 of these ipcs will be dedicated to fighter purchases from round 3 on, which leaves a safe 16-18 ipcs for ground purchases (eventually more if USA can recover the lost income from China elsewhere on the map). What this means is that by round 3 you will want at least 3 transports, to move about 16-18 ipcs worth of ground out of North America every turn. If your starting transports somehow survive the initial German u-boat attack (or if Germany goes after the British instead) then you will begin play at advantage, if not these transports need to be replaced ASAP, for the purposes of moving ground towards fortress Europa.
The basic idea is this: on the 3rd round (and for many rounds thereafter) the USA will be purchasing 2 fighters a round, dropping them in sz 11, then flying to Iceland and from there directly to Moscow. This means 2 USA fighters in Iceland on round 4, which can land in Moscow/W. Russia on round 5. Or a fighter launch off your sz 11 carrier that is two rounds out from Moscow, for all newly purchased fighters from that point on (optimally 2 fighters, but at least 1 fighter per round, as income allows.)
Round 4, is when USA will take over the “Fighter Wall” purchasing role from UK, and provide direct fighter aid to Russia via the Iceland transit. This allows the British to begin purchasing Atlantic naval units, or to begin using the fighters they have purchased up until that point, for purposes beyond simple Moscow defense. In other words, the UK will make 3 rounds of Spitfire purchases to prop up Russia initially, after round 4 and beyond, it will be USA that takes over the job of sending fighters.
It is usually exactly around this time, that the UK’s total income will start to diminish to the point where fighter purchases are no longer viable for them. And it is also around this time that the German drive against Moscow will begin to make the UK to W. Russia/Archangel fighter transit less tenable. At precisely the point when the UK will have to start making serious compromises during their purchase units phase (e.g. when they need to start preparing for amphibious assaults vs Europe instead of Fighters to aid Russia) the USA will arrive from Iceland to take over and keep the center from collapsing.
It is possible to do this same move with a newly purchased USA carrier, instead of the Pacific sz 53 carrier. Or alternatively to use 2 carriers together in sz 11, to try and magnify the fighter launch, but I find that USA doesn’t have enough cash to make the most of a double deck launch in sz 11 (since that requires a minimum of 30 ipcs spent on 3 fighters to activate.) 1 carrier is usually enough, and the sz 53 Pacific carrier, is conveniently 3 rounds out from sz 11, giving USA two game rounds of purchasing to help set up the play. It is also possible to set an Iceland transit from the second round instead of the third, if you want to launch your 2 starting fighters off a newly purchased sz 11 carrier (bought on USA1), but this can stall your Torch options by a full round. It depends how urgent USA fighter support is to the defense of Moscow, but sometimes I will consider that play too.
On USA1 purchase, assuming Germany sank your starting transports, I enjoy 1 carrier (to be stacked with existing fighters) 1 destroyer, 2 transports. This is your “roaming carrier” the one that will be used for early Torch operations, and the two fighters that land on it will not be part of it the Iceland transit, but instead “glued” to this roaming deck for defense vs German air until later rounds. This leaves USA with a remainder of 6 ipcs. If Germany sank your transports with two U-boats surviving in sz 11, or if U-boats went for the double hit and destroyed the British in sz 10 as well, you might wish to spend that 6 ipcs on an additional Atlantic sub (for an extra fodder hit, which can be helpful in clearing the Atlantic.) Otherwise you can save that 6 ipcs for purchasing during the second round.
On USA2 purchase, I like 1 additional transport, 1 ground unit, and as many bombers as you can afford. This will give you a total of 4 loaded transports, or 2 alternating transports which can be used to launch at least 4 ground a round out of E. USA/Central USA into Africa. Some people call this a “Shuck.” If you plan a round in advance, this allows you to place 4 ground in W. USA for Japan defense, then move them to Central USA the following round, where they can load into sz 11.
The bombers, purchased in round 2, can rush to Moscow or India by round 4 to provide additional defensive fodder (wherever it is most needed). I like to make this bomber purchase early, as it will help to support subsequent fighter purchases on the Iceland transit, giving them more cumulative attack power. 20 ipcs a round will be dedicated to Iceland fighter launching, with the remainder spent on shucking ground into Africa, until you have secured the center/Moscow, and allowed the UK Atlantic fleet to become fully operational against Germany. At this point, you switch can switch from dedicated Iceland fighter purchases, to setting up the main expeditionary force for the Atlantic crossing (ie 1 less fighter per round, and more ground/transports to threaten amphibious.)
Optimally this will be between 3-6 newly purchased UK fighters (plus the starting fighters) to aid Russia/India in the first 3 rounds of game play. And then an additional 4-6 US fighters for that same purpose, during the next 3 rounds. Basically 6 rounds of dedicated fighter purchasing from the Allies to prop up the Russian capital and hold the Indian VC for as long as possible, while securing Africa/Suez in the process. In round 7, once the Moscow fighter wall is established (with two more US Iceland fighters on the way), you can start purchasing heavy ground rather than fighters for the main Atlantic crossing to set up the eventual hit on Berlin, and release the carrier from sz 11. A dozen or more Western Air units in Russia by the 7th round, to prevent the Axis from cracking the center, making an early Moscow crush an extremely bloody proposition for Germany. By maintaining control of the Center and Suez, the game changes from one that hinges entirely on the Russian capital to one that hinges on control of Berlin. Taking Berlin will secure the Allied endgame, regardless of whether Japan takes Moscow, so that is the race you will be playing, in proper KGF fashion.
The reason I like the Iceland fighter transit, is that it focuses on the movement advantage and overall power of the fighter unit, and gives you the fastest possible route to put USA fighters into Moscow: 2 rounds from sz 11. All the other transits to the Russian capital require a stop over in territories that Axis can threaten, or onto carriers in sea zones that Axis can threaten with air attacks. Iceland on the other hand is relatively secure. Iceland makes little sense for a UK Fighter transit, since you end up wasting too many movement points at too little advantage, but for a US fighter transit it is ideal. 4 spaces from sz 11 to Iceland, and another 4 spaces from Iceland to Moscow. So all you need to set it up is a carrier in sz 11.
One more tool in the toolbox! I don’t use it in every game, but it can be a lot of fun if you want to go fighter heavy with USA.
:-D -
For more ideas like these you can also check out the general strategy guide I tried to put together for 1942.2
http://www.axisandallies.org/forums/index.php?topic=35703.0Or the German openers thread, which is still being developed with discussions.
http://www.axisandallies.org/forums/index.php?topic=35951.0Have fun and good game all!
:-D -
Another Russian opener, which has not yet been properly considered in this thread. The tricky Tank on Non Com! haha
:-DEarlier we spent some time discussing the strong advantages of stacking W. Russia (especially to deadzone the Karelia factory). I also briefly mentioned some ways different ways that Caucasus can be handled on R1, most of those focused on baits and on tank trapping, ie light defenses of Caucasus. Well, another way to handle things is to hold 1 tank in reserve for non-combat. The concept here is to use your lone tank for a positional advantage against Japan on R2, while still being able to return to the optimal locations against Germany on R3, when it will be needed most.
Ex. 1 Tank launches to Szech on Non-Combat to cover the Flying Tiger through the first round, and then returns to Caucasus in the second. This frees up the Kazakh infantry to help defend Caucasus, instead of going on Flying Tiger protection. The advantage of using a tank instead of the infantry unit is two-fold. First you get a better defense value at 3 (instead of 2) but you also gain a two round movement advantage as well, since the Tank move out and back in two 2 turns, whereas the infantry takes 3.
or another option is 1 tank held in reserve, launches to Evenki on Non-Combat, then returns to W. Russia on R2.
or 1 tank held back, then launched to Yakut or Sinkiang on Non-Combat and then returns to Moscow on R2.
Those are the other most common variants I’ve seen, but the 1 tank to Szech play is probably the strongest of the these.With this sort of opening, you usually want a strong armor advantage build, at least 1 tank purchased, 2 or even 3! in order to back the Germans off you during the second round.
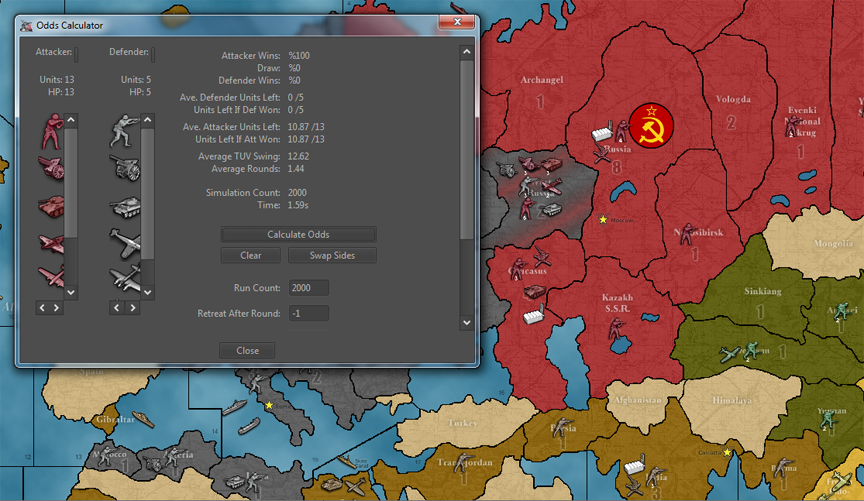
Once you get up to about 13 total hitpoints in the W. Russia battle (ie. you are bringing most of your armor and all of your artillery to the fight) there is statistically not much difference between bringing 13 total hitpoints or 19 total hitpoints into the fight. Unless you are willing to bring 20 hitpoints (all 12 infantry in range) The Germans still have an average shot of picking off 3 units.
If for example, you take say…
5 infantry, 3 artillery, 3 tanks, and 2 fighters into the W. Russia battle, that’s 13 units in the fight against Germany’s 5.
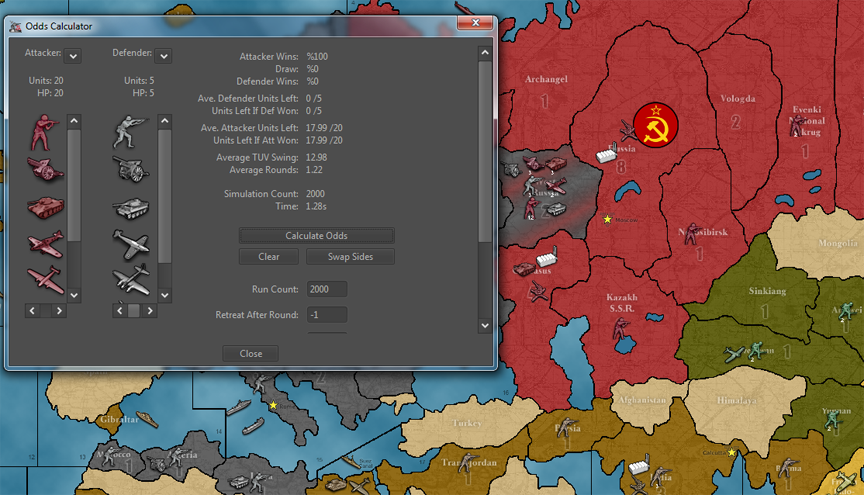
100% odds to the attacker, with an average of 10.85 units remaining out of 136 infantry instead, an average of 11.85 units remaining out of 14
7 infantry, an average of 12.9 units remaining out of 15.
8 infantry, an average 13.95 units remaining out of 16.
9 infantry its an average of 14.9 units remaining out of 17.
10 infantry its an average of 15.95 units remaining out of 18.
11 infantry its an average of 16.95 units remaining out of 19.
12 infantry its an average of basically 18 units remaining out of 20.The point is, if you’re holding 1 tank in reserve, it doesn’t really matter how many infantry you bring to the W. Russia fight beyond 5, because unless you bring all 20, you’re still not going to break that threshold of facing 3 hits on average. So what this means, is that you could also hold that infantry in reserve, if for some reason you’d like to try something tricky on Non-Com defenses, you’re not really losing out all that much on average units remaining, at least when you’re trying to keep the 4th tank in reserve.
Consider the difference between what people are usually willing to risk in W. Russia when they go for a multi-attack opening, and you can see how bringing the fighters and 3 tanks into W. Russia can really help to ice that fight. If things go very well, you take few hits and then have a couple extra infantry units at the ready to attempt a defense somewhere. If things go poorly you can always send these reserve units along with the Tank to W. Russia on non com as reinforcements.
If the Soviets in W. Russia get hammered (3 or more hits put up by the German defense) then you send both AAguns and all available units to W. Russia. On the other hand, if the Soviets do well in W. Russia (like 2 or less hits put up by the German defense) then you can send these units elsewhere and still feel confident that W. Russia will hold without them.
This sort of play can often wipe the Germans in W. Russia, and still leave you with extra infantry in range of other places (like Caucasus say if you want to mount a minor defense.) If an Allied bid is allowed, this advantage can increase yet further. Leaving you enough HP and power to get the job done against Germany for the first round, while still proving the W. Allies that added back-up in Szech, on the 2 turn “race around” with the 4th Russian tank. This tank can really come in handy if the British are unable to send fighter support from sz 35 to keep the Chinese flying tiger alive, and it can jet back to the Eastern Front with G the following round, without really missing a beat. ;)
5 deep.png_thumb
12 deep.png_thumb
5 deep.png_thumb
12 deep.png_thumb
5 deep.png_thumb
12 deep.png_thumb
5 deep.png_thumb
12 deep.png_thumb
5 deep.png_thumb
12 deep.png_thumb
5 deep.png_thumb
12 deep.png_thumb
5 deep.png_thumb
12 deep.png_thumb
5 deep.png_thumb
12 deep.png_thumb
5 deep.png_thumb
12 deep.png_thumb
5 deep.png_thumb
12 deep.png_thumb
5 deep.png_thumb
12 deep.png_thumb
5 deep.png_thumb
12 deep.png_thumb
5 deep.png_thumb
12 deep.png_thumb
5 deep.png_thumb
12 deep.png_thumb
5 deep.png_thumb
12 deep.png_thumb
5 deep.png_thumb
12 deep.png_thumb
5 deep.png_thumb
12 deep.png_thumb
5 deep.png_thumb
12 deep.png_thumb
5 deep.png_thumb
12 deep.png_thumb
5 deep.png_thumb
12 deep.png_thumb
5 deep.png_thumb
12 deep.png_thumb
5 deep.png_thumb
12 deep.png_thumb
5 deep.png_thumb
12 deep.png_thumb
5 deep.png_thumb
12 deep.png_thumb
5 deep.png_thumb
12 deep.png_thumb
5 deep.png_thumb
12 deep.png_thumb
5 deep.png_thumb
12 deep.png_thumb
5 deep.png_thumb
12 deep.png_thumb
5 deep.png_thumb
12 deep.png_thumb
5 deep.png_thumb
12 deep.png_thumb
5 deep.png_thumb
12 deep.png_thumb
5 deep.png_thumb
12 deep.png_thumb
5 deep.png_thumb
12 deep.png_thumb
5 deep.png_thumb
12 deep.png_thumb
5 deep.png_thumb
12 deep.png_thumb
5 deep.png_thumb
12 deep.png_thumb
5 deep.png_thumb
12 deep.png_thumb
5 deep.png_thumb
12 deep.png_thumb
5 deep.png_thumb
12 deep.png_thumb
5 deep.png_thumb
12 deep.png_thumb
5 deep.png_thumb
12 deep.png_thumb
5 deep.png_thumb
12 deep.png_thumb
5 deep.png_thumb
12 deep.png_thumb
5 deep.png_thumb
12 deep.png_thumb
5 deep.png_thumb
12 deep.png_thumb
5 deep.png_thumb
12 deep.png_thumb
5 deep.png_thumb
12 deep.png_thumb
5 deep.png_thumb
12 deep.png_thumb
5 deep.png_thumb
12 deep.png_thumb
5 deep.png_thumb
12 deep.png_thumb
5 deep.png_thumb
12 deep.png_thumb
5 deep.png_thumb
12 deep.png_thumb
5 deep.png_thumb
12 deep.png_thumb
5 deep.png_thumb
12 deep.png_thumb
5 deep.png_thumb
12 deep.png_thumb
5 deep.png_thumb
12 deep.png_thumb
5 deep.png_thumb
12 deep.png_thumb
5 deep.png_thumb
12 deep.png_thumb
5 deep.png_thumb
12 deep.png_thumb
5 deep.png_thumb
12 deep.png_thumb
5 deep.png_thumb
12 deep.png_thumb
5 deep.png_thumb
12 deep.png_thumb
5 deep.png_thumb
12 deep.png_thumb
5 deep.png_thumb
12 deep.png_thumb
5 deep.png_thumb
12 deep.png_thumb
5 deep.png_thumb
12 deep.png_thumb
5 deep.png_thumb
12 deep.png_thumb
5 deep.png_thumb
12 deep.png_thumb
5 deep.png_thumb
12 deep.png_thumb
5 deep.png_thumb
12 deep.png_thumb
5 deep.png_thumb
12 deep.png_thumb
5 deep.png_thumb
12 deep.png_thumb
5 deep.png_thumb
12 deep.png_thumb
5 deep.png_thumb
12 deep.png_thumb
5 deep.png_thumb
12 deep.png_thumb
5 deep.png_thumb
12 deep.png_thumb
5 deep.png_thumb
12 deep.png_thumb
5 deep.png_thumb
12 deep.png_thumb
5 deep.png_thumb
12 deep.png_thumb
5 deep.png_thumb
12 deep.png_thumb
5 deep.png_thumb
12 deep.png_thumb
5 deep.png_thumb
12 deep.png_thumb
5 deep.png_thumb
12 deep.png_thumb
5 deep.png_thumb
12 deep.png_thumb
5 deep.png_thumb
12 deep.png_thumb
5 deep.png_thumb
12 deep.png_thumb
5 deep.png_thumb
12 deep.png_thumb
5 deep.png_thumb
12 deep.png_thumb
5 deep.png_thumb
12 deep.png_thumb
5 deep.png_thumb
12 deep.png_thumb
5 deep.png_thumb
12 deep.png_thumb
5 deep.png_thumb
12 deep.png_thumb
5 deep.png_thumb
12 deep.png_thumb
5 deep.png_thumb
12 deep.png_thumb
5 deep.png_thumb
12 deep.png_thumb
5 deep.png_thumb
12 deep.png_thumb
5 deep.png_thumb
12 deep.png_thumb
5 deep.png_thumb
12 deep.png_thumb
5 deep.png_thumb
12 deep.png_thumb
5 deep.png_thumb
12 deep.png_thumb
5 deep.png_thumb
12 deep.png_thumb
5 deep.png_thumb
12 deep.png_thumb
5 deep.png_thumb
12 deep.png_thumb
5 deep.png_thumb
12 deep.png_thumb
5 deep.png_thumb
12 deep.png_thumb
5 deep.png_thumb
12 deep.png_thumb
5 deep.png_thumb
12 deep.png_thumb
5 deep.png_thumb
12 deep.png_thumb
5 deep.png_thumb
12 deep.png_thumb
5 deep.png_thumb
12 deep.png_thumb
5 deep.png_thumb
12 deep.png_thumb
5 deep.png_thumb
12 deep.png_thumb
5 deep.png_thumb
12 deep.png_thumb
5 deep.png_thumb
12 deep.png_thumb
5 deep.png_thumb
12 deep.png_thumb
5 deep.png_thumb
12 deep.png_thumb
5 deep.png_thumb
12 deep.png_thumb
5 deep.png_thumb
12 deep.png_thumb
5 deep.png_thumb
12 deep.png_thumb
5 deep.png_thumb
12 deep.png_thumb
5 deep.png_thumb
12 deep.png_thumb
5 deep.png_thumb
12 deep.png_thumb
5 deep.png_thumb
12 deep.png_thumb
5 deep.png_thumb
12 deep.png_thumb
5 deep.png_thumb
12 deep.png_thumb
5 deep.png_thumb
12 deep.png_thumb
5 deep.png_thumb
12 deep.png_thumb
5 deep.png_thumb
12 deep.png_thumb
5 deep.png_thumb
12 deep.png_thumb
5 deep.png_thumb
12 deep.png_thumb
5 deep.png_thumb
12 deep.png_thumb
5 deep.png_thumb
12 deep.png_thumb
5 deep.png_thumb
12 deep.png_thumb
5 deep.png_thumb
12 deep.png_thumb
5 deep.png_thumb
12 deep.png_thumb
5 deep.png_thumb
12 deep.png_thumb
5 deep.png_thumb
12 deep.png_thumb
5 deep.png_thumb
12 deep.png_thumb
5 deep.png_thumb
12 deep.png_thumb
5 deep.png_thumb
12 deep.png_thumb
5 deep.png_thumb
12 deep.png_thumb
5 deep.png_thumb
12 deep.png_thumb
5 deep.png_thumb
12 deep.png_thumb
5 deep.png_thumb
12 deep.png_thumb
5 deep.png_thumb
12 deep.png_thumb
5 deep.png_thumb
12 deep.png_thumb -
Ruminating further on the previous post, a question occurs to me now…
If you don’t want to attack Ukraine on R1, is there any good way to reliably defend Caucasus against an all out G1 attack?
I don’t see many strong options here, that don’t at the same time give Germany a way to reliably stack Karelia. If you go full force into W. Russia on the opening attack, and then try landing your fighters in Caucasus to mount a full defense of the southern factory runs the risk of inviting a German assault with the transport in sz16 (even at a rather poor exchange, they might do this just to destroy the Red Airforce immediately.) On the other hand if you try to just trade West Russia instead of stacking it, so that you’ll have enough HPs to deter any possibility of a German attack on Caucasus, then this would seem to leave Karelia vulnerable to the G1 stack north. Basically defending the south doesn’t do you a whole lot for the investment, and it doesn’t really mess with Axis warplan. In the process you screw yourself out of the best fighter transits from UK.
So my suggestion, as highlighted earlier would always be to stack W. Russia, even acknowledging that it is technically possible to go full southern defense if you wanted too, I just think its easier to defend it lightly on R1 and put of the focus on R2 instead ;)
-
I’m having trouble seeing why defending Caucasus and preventing a German Karelia stack without attacking Ukraine would even be hard, if that’s what you really want to do.
Caucasus starts with 3 inf, 1 art, 1 tnk, 1 AAA. Of those units, you really want to bring the artillery north for the attack on West Russia, but you can leave the rest in place, and then reinforce them with the Kazakh infantry, 2 Russian infantry, the Russian AAA, two fighters, and a build of 4 infantry, leaving you with 10 inf, 1 tnk, 2 ftr, 2 AAA in Caucasus. At most, Germany can hit that with 4 inf, 1 art, 3 tnk, 4 ftr, 1 bmbr, 1 BB. My battle calculator shows that as a solid win for Russia.
Meanwhile, you still have 7 inf, 3 art, 3 tnk, 2 ftr that can attack West Russia on R1. You should expect to lose about 2 inf on that attack, but you can bring 2 infantry to Archangel as reinforcements from Evenki, and build 2 tanks in Russia, leaving you with a force of at least 7 inf, 3 art, 5 tnk, 2 ftr to re-take Karelia on R2. Isn’t that enough?
-
Its tricky, I think against a very cautious German player that sort of defense might work, but against bloodthirsty numbers cruncher, it invites an immediate German attack.
Using the scenario outlined above, the risk would be to W. Russia rather than Caucasus. Say for example that you take the expected 2 hits in Western Russia exchange, under the numbers proposed that leaves you with what?
5 infantry 3 artillery and 3 tanks parked in W. Russia for defense on G1 right?
If Germany sends all their ground in range (including the units you didn’t destroy in Belo/Ukraine) and a reasonable amount of air, say something like…
6 inf 1 artillery 4 tanks, 3 fighters and 1 bomber. Germany has a 99% chance to destroy the W. Russia stack with like 7/8 units remaining (basically all their air and armor have a good chance to survive.) Sure they might die on counter if the Russians attack out of Caucasus/Moscow on R2, but that still leaves Germany with 6 infantry and 2 tanks to stack Karelia after the soviets are destroyed in W. Russia.
Sending the AA to defend in W. Russia can drop this by a few percentage points, but even then G can still crack you.
If the Soviets still try to attack Karelia on R2, with the 2 inf from Archangel, 2 tanks (purchased at Moscow), with the 2 fighters from Caucasus vs Germany’s 6 infantry and 2 tanks, that is only a 13% chance of victory for the Russians (there 3rd tank would be out of range in Caucasus, since W. Russia is likely to be recaptured. So basically, if G goes balls to the Wall on G1 in response to the Caucasus defense plan, they can crush your Soviet armor and artillery in W. Russia and still stack Karelia and Belo (the ideal landing spot for fighters) for solid G2 positioning on the Eastern Front.
Caucasus will hold through G1 and likely G2 for sure, but the Russian line against Karelia for R2 counter attack will basically be screwed in the exchange. Its also much harder for UK to transit fighters on UK1 with W. Russia in German hands and arch under threat on G2. I think often its very hard in 1942.2 to gauge how many troops are really required to put up a proper defense in W. Russia vs the all out G1 assault. As the soviets, without running any R1 attacks, to deplete the number of Germans arrayed against you, its really necessary to stack W. Russia much deeper than you might think.
Russia is in a definite bind. There lack of ground units at the outset, is one of the main reasons why the Allied air wall at the center is so necessary to face down that German crunch, and they’re factories are in terrible locations haha. Its funny to imagine units being produced out of the Caucasus during the middle of the battle of Stalingrad, I think Volograd would have made more sense.
One interesting alternative to an Allied bid, is allowing the Allies to remove 1 of their factories, as a way to achieve better balance for their side. The obvious choices would be Karelia (perhaps even Caucasus or India for some strategies), getting rid of any of those starting factories can actually help the Allies more than it hurts them, since the factories cannot be used by the Axis unless Axis actually purchase the production. In my HR games I sometimes allow the Allies to move one of their starting factories as a set up change. For example moving the Karelia factory to Volodga for free, just as a set up change before the game begins.
-
Thanks for the explanation! That makes a lot of sense. I guess it’s much more important to deny Germany the ability to produce in the Caucasus than it is to keep Russia’s ability to produce in the Caucuses. Russia’s not strapped for build slots – even if you make it up to 30 or 32 IPCs, you can place them all in Russia very comfortably by building, e.g., 1 fighter per turn. Russia wants to produce in Karelia if possible because it’s significantly closer to the front, but the only territory adjacent to Caucasus that isn’t adjacent to Moscow is Ukraine, and Ukraine is adjacent to West Russia – so there’s only one, very narrow situation when you’d have any real need to produce in Caucasus: if you’re short on infantry in West Russia and need to urgently attack the Ukraine. That doesn’t come up much at any time, and I can’t see it ever coming up on R2.
Now you’ve got me wondering what happens if you attack West Russia with one tank and all available infantry, artillery, and fighters, ignore the Ukraine, and evacuate both Karelia and the Caucasus. I’m thinking that if you’re willing to trade both Karelia and the Caucasus, you could probably spare 2, maybe even 3 tanks to send to Szechuan on R1. You might be able to force Germany to make an inappropriately strong attack on the Caucasus to force you to bring the tanks back west, because otherwise the tanks can hang out in east Asia and slow down Japan by at least a full turn.
-
That’s actually an idea I toyed with for a while, as a possible way to set up a more effective KJF game. I haven’t quite found one that works in an optimal way for me yet, where G doesn’t stomp, but it somehow seems like something that should be possible.
Another idea I had for a set up change, back when we were first exploring set-up changes for Russia instead of open bids for the Allies, was to re-orient Russia’s production behind the Urals.
The Karelia factory moves to Vologda
And the Caucasus factory moves to KazakhI felt that this more accurately modeled the situation in the real War. Since Leningrad and Stalingrad were contested by Germany, it feels kind of weird that the Russians are forced to defend these front line factories, instead of producing stuff behind the Urals like they did historically. Moving these factories nerfs the Axis production position on the center (improving balance by sides), although it also had the effect of encouraging the JTDTM, since Japan is under a lot more pressure to slam Russia from the rear. The Japanese definitely have a harder time of it though, because Russia can project more power towards the Asian side.
Basically it tended to move the whole eastern front defensive “line” for the Russians, even further east. Archangel, Evenki and the territories of western China became even more critical.I actually thought it worked quite well, though I had a hard time persuading others of its merits, which is why I just started to give the Russians a bomber, since that was easier to explain while adding some excitement. I still really like the factory tweak idea though, over an open bid (which everyone just uses to break the Med, or sz 37.) More fun in my view to give the Russians a better fighting chance, with a more dynamic production spread.
:-D -
Moving the factories east one step is a very interesting idea. The problem with a factory in Vologda is that it’s useless for fighting Germany – it doesn’t border any territories to the west that aren’t bordered by Moscow itself.
Also, I’m not convinced that putting a Russian factory in Kazakh will make things harder for the Japanese – it could wind up just moving the Japanese’s first captured factory that much closer to the Japanese home islands. As Japan, if I had the chance to capture a factory in Kazakh, I would largely ignore India (holding a loaded transport nearby to keep it honest) and just charge straight for Kazakh. On J1, stack all available units (including units from Tokyo and Philippines via ferry) in Anhwei and Yunnan on J1 and build three tanks and a transport in Tokyo. On J2, converge inf/art in Szechuan on J2 while landing tanks in Yunnan, and build 2 bombers. On J3, attack Kazakh with something like 9 inf, 4 art, 3 tnk, 4 ftr, 3 bmbr. Even if Russia builds 2 inf in Kazakh on R1, R2, R3 and leaves them there, and reinforces with the 4 inf in Evenki, Yakut, and Novosibirsk, and leaves the starting 1 inf in Kazakh, and sends in an AA gun and 2 fighters for extra defense, Russia still only has 11 inf, 2 ftr, 1 AAA – not nearly enough to stand up to the invasion force. Japan takes the territory with 2 inf, 4 art, 3 tnk remaining. Russia could theoretically retake it with all available troop reserves, but then Germany walks into Moscow on turn 5. Basically, Russia has to send massive reinforcements from the western front on turns 1, 2, and 3 to stabilize Kazakh, or it becomes a Japanese factory on turn 3.
If i were redoing the setup, I would say put the factories in Archangel, Moscow, and the Caucasus, with the Turkish Straits permanently closed to sea traffic, and give Russia a starting cruiser, destroyer, and transport in the White Sea instead of a submarine. This sets up a fun ferrying competition, where the Germans can hold the Baltic and ferry to Karelia, while the Russians hold the White Sea and ferry with bombardment from Archangel right back into Karelia.
A factory in Archangel helps the Russians reinforce China/Evenki as needed and is more likely to stay under Russian control. A factory in the Caucasus, with the Turkish straits closed, can now be protected affordably, and maintains a credible southern option against Germany.
I do agree with you about both the history and the excitement, though – better to move factories than to break the Med or SZ 37, and much of Russian production was behind the Urals by 1942. I’m really not even sure what the SZ 37 battle is supposed to symbolize – I’m not aware of the Japanese leaving their capital ships unescorted anywhere near that place or time in history, and if I recall correctly, the main reason why the Japanese couldn’t project naval influence further west toward India and Madagascar was problems of fuel, logistics, and resupply: they just couldn’t get enough oii to steam that far west! I never heard that the Australian and British Indian Ocean navies were in danger of linking up for a joint attack.
-
It’s true, the two minor factories still serve as a Russian Achilles heal, and like you, when I tested it, Japan gunned for Kazakh (which is my usual 1942.2 attack route for Japan anyway), but the advantage for Russia is that it stretches the German logistics. So Russia can trade with less fear of G immediately stacking the captured factories. Kazakh is kind of interesting too because Indian tanks can reach it in 1 move, and bombers from UK can likewise reach it in 1 move. It’s also possible for the Soviets to put more pressure on Japan in the first round, since Russian tanks built here can reach Kwang on the blitz, while still covering W. Russia or Ukraine. This advantage diminished with each round that elapses, since Japan can shuck so easy, but it might be fun for teasing out new round 1 plays vs Japan. The Kazakh factory is also a permanent blocker, which can come in handy if getting pressed by Japanese tanks and you need to do a full evac.
It took me a while to realize how important Kazakh is to the Russian position at the center in 1942.2, (the China design is different from earlier A&A boards where this territory, while important, was somewhat less critical in Classic or Revised.) Often in 1942.2 I’ve seen the Russian player let Japan snag it uncontested, which invariably causes the center to fold faster than it might otherwise. The sz61 push to Yunnan allows the Japanese to reach Kazakh very quickly with reinforcements from the home island, and a Japanese held Kazakh is usually in range of German air too, which means that sometimes the Allied player gets tripped up here. They will pull out of Kazakh thinking they can trade the territory with ease, only to get caught with their pants down and lose it permanently to Axis, with no real chance of recovery, as Japan just keeps funneling ground there each round. Here the proposed starting factory draws a big red bulls eye on the territory, making it pretty clear to both sides, that this territory should not be given up without a fight.
:-DAlso, by removing the Caucasus factory, you really alter the German player’s priorities at the center of the gameboard. They can still park units in Caucasus or Karelia to threaten the center, but they can’t reinforce that stack as easily, which makes the move somewhat less attractive. I rather envision that the trading which occurs in Caucasus and Karelia between G and Russia, is like the Siege of Leningrad or the battle of Stalingrad, with control shifting back and forth, ownership representing when one side or the other has gained the upper hand, but without allowing for immediate spams of infantry. Instead ground has to be moved into the city first haha.
Vologda is less useful, of course, but it can help to control the north vs an Axis link up, and gives you a but more reach into the Soviet Far east. Its hard to justify building units here at the outset, but this factory is 1 space closer to Japan, so perhaps useful in a KJF type scenario where you want to hold the north against an early blast, or rush some defenders towards the far East, so you don’t have to watch all that red land turn yellow with no contest.
Archangel is an interesting alternative candidate. It’s only worth 1 ipc on this map, which would be somewhat limiting for Russia, though also limiting for Axis when captured, and it would be a permanent blocker. I like the concept of 1 ipc factories, though I get the impression others might feel that 1 ipc is too low for a starting factory on this board.
Kazakh and Vologda aren’t quite perfect, but I find that the Russians can be pretty effective out of Moscow, if they don’t have to worry as much about Germany stacking Caucasus with a free factory. Now if G wants to build out of Karelia or Caucasus they’d have to spend 15 ipcs first and face a one round delay, which can make a big difference at about round 6 or 7 when Axis can usually stack the south with ease. Less pressure for UK in India, can also help free up British units to cover Suez or the Russian capital, if Japan goes balls out against China.
I agree with you about sz37, the set up there is a bit odd. I suppose there is nothing to prevent you from giving the Russians the extra bomber too, in addition to the factory change, if it seems like the Soviets are still too weak.
:-DI posted the factory change idea with a gamesave in the HR section, in case anyone wants to try it.
http://www.axisandallies.org/forums/index.php?topic=36172.0Part of the reason I like this tweak, is because it encourages to the Russian player to actually fight against Japan, instead of just ceding control of the East as soon as Japan arrives. Kazakh is not quite as hard to stack/hold as might seem to be the case at the outset. After a few rounds of building, even Evenki and Yakut can hold, provided you’re willing to trade a bit against Japan early on. I think the issue OOB is that Russia is under huge pressure to stay fixated on Karelia and Caucasus for fear of early German stacking, which means they have basically no free units/opportunities to send against Japan. The challenge I think, under the set up I proposed, is that the lack of a starting Factory in Caucasus (no permanent blocker there) changes the way the Allies can “can-open” at the center. You have to be more on guard against a potential Axis blitz route, and remember to leave a blocking unit if you pull out of the territory as Russia, since the factory is not their to serve this function.
I think there are some other potential factories tweaks you could make too, if you don’t like the Vologda/Kazakh idea.
One solution might be to move the starting factory in Karelia to W. Russia (German occupied at the outset, but easy for the Soviets to recover on R1) and just keep the Caucasus factory in place. This does the double duty, of denying Germany their easy Lendingrad factory capture, while giving the Russians +2 production in a critical space. The danger there is of Germany taking and stacking W. Russia right next to Moscow, but that just means that the factory can still serve as a swing territory available to either side over the course of play.
Another idea suggest above is to move the Karelia factory to safe territory that is only worth 1 ipc, to make it less valuable as a target. Arch, Evenki, or Novos could be interesting.
This stuff is of course all just musing on bid alternatives, and not necessary for beginners. But I think its fun to have some suggestions for different ideas to try, when the game gets a bit old, and you want to attempt something new on your 1942.2 board.
My favorite tweak is probably still just the Russian bomber at Moscow, if you need a quick fix. I like how the sculpt is so damned huge!
Also, it’s not inconceivable, that, when provided with an extra bomber from the outset, the Russian player might even get to point where they decide “Well, ����-it! I’m just going to buy second big bomber!” Drop 12 ipcs just the one time, to unleash the dread Red Air armada haha! A pair of fighters, and pair of bombers! The double duo in the skies! A death defying dual with Germany in the light trading game. Plus you get some extra reach on the air evac, in case Stalin has to fly away during the endgame heheh.
:-D
Suggested Topics

