• So I was looking at printing out a map with all the augmentations and upgrades of photoshop to correct several things, as well as the lack of seems.  I just have a few questions about this process.

    1.  What dimensions should I print this map with?  If I print it too large, won’t the image begin to look bad?

    2.  What DPI should I print it at?

    3.  What material should I print it on?

    4.  Is it annoying or beneficial to have a piece of plexiglass on top of the map, I have seen it done on several tables, and I was just wondering if it was annoying have it raised from the surface of the map.

    Thank you guys so much for your help!  :-)


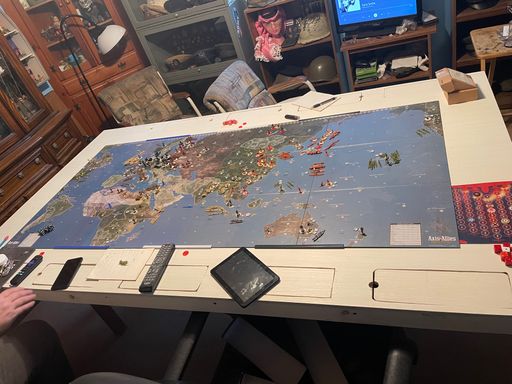
  • I’ve never printed out a map, so I can’t help with questions 2 and 3, but I can offer some thoughts on 1 and 4 based on what I’ve done at home with the OOB Global 1940 map.  You can see pictures of my particular setup in the first post of this thread: http://www.axisandallies.org/forums/index.php?topic=20658.0

    In terms of printout size, you may want to “make the map fit your space” rather than the other way around.  Choose the room in which you’ll be playing and make some measurements to decide how much space you want to allocate to the map table, to space for the players to stand (and/or sit) around the table, to playing aids like dedicated dice-rolling areas, to free surfaces on which trays of sculpts and chips and battle boards and other supplies can be kept, and so forth.  (My table has a central map portion and two “wings” for use as all-purpose working surfaces.)  Also plan for an area in the room where drinks and snacks can be kept – but this should be on a separate table located well away from your map table because it’s no fun to accidentally tip over a beer and have it wash away your armies and stain your map.

    Once you’ve worked out your room parameters, start looking for a suitably sized table (or tables) that will fit the space you’ve identified.  Your choice would be dictated in part on whether you want your setup to be permanent or not.  If you have a room that you can dedicate full-time to wargaming, and if you don’t anticipate moving from your residence anytime soon (if ever), you can go for a large and solid table.  If however you want (or need) to dismantle your setup from time to time, then a modular approach is better; in that case, you might buy several identical modestly-priced card tables with folding legs and set them up in a row (which is what I did).  If you use that approach, you may want to put something large and rigid over the tables like a sheet of plywood to provide a smooth and level surface on which the game map can rest (which is especially important if the map is made of paper or vinyl rather than stiff cardboard).

    Once you’ve got those infrastructure details worked out, you can then decide how large a map would be practical to print out. The priorities to keep in mind are to make sure that your table fully supports the entire map surface (the map shouldn’t dribble over the edges) and to make sure the players have ample room to move around the map while playing.

    Regarding the plexiglass top, I’m quite happy with mine.  It protects the game map from damage (scratches, spills, etc.) and it covers the fold creases in the OOB map boards to provide a smooth playing surface.  Custom-printed maps don’t have fold creases, of course, but they do tend to curl up at the edges – so a plexiglass sheet helps to hold them down.

    The material I used for my table is something called non-glare Acrylite P-99, originally sized by the manufacturer at 48" x 96" x 1/16" thickness.  The local plastics company from which I bought it cut the sheet to the size I wanted, which is 36" x 96", so they just had to cut a slice from the width because the length was already correct.  They then shipped it to me by delivery truck, rolled up into a tube about two feet in diameter as I recall (the rolling made possible by the fact that the plastic was just 1/16" thick).  To give you a rough cost estimate, the price (in Canadian dollars) was $60 for the plastic itself, plus $10 for the cutting, plus $30 for delivery, plus another $15 or so for sales tax.

    One bonus of having a plexiglass cover sheet is that it lets you customize the map to create special start-up variations (for instance a 1939 map configuration as opposed to a 1940 map configuration).  You remove the plexiglass, put roundels of the appropriate type on the appropriate countries to reflect the political situation as it existed at such-and-such a date, then put the plexiglass back on the map.  The map customizations are therefore under the plexiglass playing surface rather than above it, so there’s no confusion created between the roundels which are added during the game as the result of play and the ones that were put under the plexiglass to create the custom setup.


  • I printed and play on a Global 1940 2e map I heavily edited from an export of the TripleA 1940 map. I have it sitting under a piece of plastic identical in material to the post above, an anti-glare P-99. It works REALLY REALLY well for our group. Some pics are below. I can supply you a link to a huge psd Photoshop file if you like, or a png image file if you can’t use the Photoshop file.

    • My plastic sheet is 95" x 48".
    • My Global map is 94" x 47".
    • I ordered my print from “http://www.bigphotohelp.com/”. I chose the “Standard Matte” material, 7 mil, and the total price was $135.15 with shipping.
    • My plastic sheet is about 1/4" thick, was purchased locally for ~$100, and I transported with a van.
    • Whatever you do, maintain the X/Y ratio when resizing any map you plan on printing, otherwise you’ll get odd looking skew effect.
    • This P-99 anti-glare plastic sheeting MUST be placed on the correct side facing down or you will get LOTS of reflections. The anti-glare only works if the sheet is placed with the correct side down.
    • The little metal thingies you see in the pic below are neodymium magnets, holding the plastic down. They aren’t needed to keep the plastic in place but I keep them there to use for other game boards. You should be able to see a sheet of sheetmetal under my map. I have that there to adhere items to my table, like A&A victory city flags, or terrain for RPGs.


  • I’m actually a bigger fan of the standard board look, with the terrain and stuff.  Would 94" x 47" be a good size for that do you think?  Like large enough I could fit all the starting units and include plastic factories?

  • '18 '17 '16 '15 Customizer

    @Zallomallo:

    I’m actually a bigger fan of the standard board look, with the terrain and stuff.  Would 94" x 47" be a good size for that do you think?  Like large enough I could fit all the starting units and include plastic factories?

    Might want to PM YoungGrasshopper or check out his thread here:  http://www.axisandallies.org/forums/index.php?topic=31554.0

    He seems to be working on something similar to what you are looking for. Not sure if he is re-sizing or not.

  • '18 '17 '16 '15 Customizer

    @P-Unit:

    I printed and play on a Global 1940 2e map I heavily edited from an export of the TripleA 1940 map. I have it sitting under a piece of plastic identical in material to the post above, an anti-glare P-99. It works REALLY REALLY well for our group. Some pics are below. I can supply you a link to a huge psd Photoshop file if you like, or a png image file if you can’t use the Photoshop file.

    I think this is pretty cool… I, for one, would love a link for this file. Nice job P-Unit.


  • @Zallomallo:

    I’m actually a bigger fan of the standard board look, with the terrain and stuff.  Would 94" x 47" be a good size for that do you think?  Like large enough I could fit all the starting units and include plastic factories?

    That’s almost exactly the size of my setup,  in which a 96" x 48"  acrylic sheet rests on top of a foundation of the same size, with the map board sandwiched in between them.  (The foundation consists of three large framed painting canvasses bought from an art supply store and covered in black fabric.  They combine rigidity and flatness with light weight, but because the foundation is in three parts it’s not as smooth and straight as I’d like it to be.  In retrospect, a single sheet of painted plywood would have been a better choice.)  The whole assembly – foundation, map board and plexiglass – rests on top of four card tables lined up in a row.

    One point to note, however, is that the main part of my map doesn’t extend the full 96" width of the assembly – unlike P-Unit’s setup, which is nearly identical in size but uses a map that is much wider than mine.  My setup uses a conventional four-panel Global 1940 1st edition map, placed so that its right-side edge is flush with the right edge of the foundation.  On the opposite side, flush with the left edge of the foundation, is an extra right-side panel from a second copy of Pacific 1940.  In between this extra panel and the normal four-panel map is a gap through which the black fabric of the foundation can be seen.  When I was preparing my setup, I placed all the map boards on the fabric-covered foundation, marked various points on the fabric next to the map edges on each side of the gap, removed the maps, then connected the marked points with lengths of black electrician’s tape (some horizontal and some diagonal).  I then put the map boards back in place, then put the plexiglass over the map.

    The purpose of this arrangement is to show connector lines between the west (left) side of the Europe 1940 map and the right (east) side of the extra Pacific 1940 map panel.  If those two map sections had been on the same scale I would have put the two panels right next to each other.  They don’t fully line up, however, so I decided to use connectors to show where you end up when you move from one map panel to the other.  (My connectors don’t all agree with the crossovers specified in the rules; I did some customizing in that regard, out of personal preference.)  Because the connector lines are made with black tape stuck to black fabric, they’re easy to see when you want to use them and easy to ignore the rest of the time.  (Originally I used white sewing thread, but I later switched to electrician’s tape.  The tape sticks well to the fabric and stays straighter than thread.)

    Another purpose for the extra panel is that it lets me visualize more easily how North America relates to the Pacific Ocean without having to mentally “wrap around” to the other side of the table.  I just find that more satisfying.  But an unexpected bonus of the arrangement is that the left side of the map assembly provides an extra working surface for use during the game (for supplies and sculpts and so forth).  The actual game takes part on the conventional four-panel part of the map, so the left-side extra panel is free for other uses.  (To emphasize that the left panel isn’t supposed to have units placed on it, I covered all of the roundels on the panel with adhesive black dots.)

    One thing I’ve noticed about my 48" x 96" assembly is that the size is close to the maximum height that allows me to stand at the bottom edge of the map and reach over to place pieces near the top edge of the map without having to walk around the table.  So a height of about 48" is good choice from that point of view.

  • Customizer

    P-unit and others,

    ––Nice work on the map!  :-D
    I like your graphics, like the enhanced “Convoy” symbols. Is this an original creation of yours?

    ––In approximately a month I plan on establishing my Railroad & Military History Museum. Part of that will include building an improved map board for G-40 or G-39 games of an even larger size than we currently use,…say 72" x 162". I’d like to ask Q’s and utilize your experience and skills towards the building of mine in the near future. Anyway, it shouldn’t be long till things’ start happenin’!

    “Tall Paul”


  • @Tall:

    Part of that will include building an improved map board for G-40 or G-39 games of an even larger size than we currently use,….say 72" x 162".

    A game map 6 feet by 13.5 feet is quite epic in scale.  Looking forward to seeing the finished product, and a few in-progress construction shots would be great to see too.

  • Customizer

    @CWO:

    @Tall:

    Part of that will include building an improved map board for G-40 or G-39 games of an even larger size than we currently use,….say 72" x 162".

    A game map 6 feet by 13.5 feet is quite epic in scale.  Looking forward to seeing the finished product, and a few in-progress construction shots would be great to see too.

    ––Through experience gained with model railroad layout design it’s been determined that 30" is about the max for being able to reach anything from the edge. If we had our naval and army units magnetized and on “fleet sheets” (copywrited") we might extend our “reach” another six inches or so.
    ----Like I said, it will be about a month before any serious work will begin on this project,…but I would certainly encourage/request everyone’s assistance on making it the best we can.
    ----And having the map and detailed/painted units is only a step in allowing some games with friends,…old and NEW ones. Once I get everything organized I hope to envite everyone over for some WARS! I hope you’ll come, too.

    “Tall Paul”


  • @LHoffman:

    @P-Unit:

    I printed and play on a Global 1940 2e map I heavily edited from an export of the TripleA 1940 map. I have it sitting under a piece of plastic identical in material to the post above, an anti-glare P-99. It works REALLY REALLY well for our group. Some pics are below. I can supply you a link to a huge psd Photoshop file if you like, or a png image file if you can’t use the Photoshop file.

    I think this is pretty cool… I, for one, would love a link for this file. Nice job P-Unit.

    Thanks, I’ll post it after I correct a couple of minor items.

  • '18 '17 '16 '15 Customizer

    @P-Unit:

    @LHoffman:

    I think this is pretty cool… I, for one, would love a link for this file. Nice job P-Unit.

    Thanks, I’ll post it after I correct a couple of minor items.

    Excellent! And thanks in advance.

  • Sponsor

    I prefer to print on a vinyl poster material that is mate laminated. I then go to a building supply store and purchase a sheet of 1/4 thin ply wood 72"X32"… I use a can of 3M spray adhesive and paste the poster sheet flush to the ply wood. I then drop it into my custom table which is 8’X4’. The reason I print the standard size of 72"X33" is that I fits great in a 8’X4’ table, and any larger… it gets difficult to reach the full width of the game board. I don’t use any type of glass to cover it, I find that the laminated vinyl is easy to wipe down with a Lysol wipe and is pretty tough. I will be getting a print done this week and will be posting some images soon. Cheers.

  • Sponsor

    @Young:

    I prefer to print on a vinyl poster material that is mate laminated. I then go to a building supply store and purchase a sheet of 1/4 thin ply wood 72"X32"… I use a can of 3M spray adhesive and paste the poster sheet flush to the ply wood. I then drop it into my custom table which is 8’X4’. The reason I print the standard size of 72"X33" is that I fits great in a 8’X4’ table, and any larger… it gets difficult to reach the full width of the game board. I don’t use any type of glass to cover it, I find that the laminated vinyl is easy to wipe down with a Lysol wipe and is pretty tough. I will be getting a print done this week and will be posting some images soon. Cheers.

    I would like to take back this statement as I have been having a nightmarish time working with this method… I am currently working on a better application and will post my findings when I get all the info.

  • '18 '17 '16 '15 Customizer

    @Young:

    @Young:

    I prefer to print on a vinyl poster material that is mate laminated. I then go to a building supply store and purchase a sheet of 1/4 thin ply wood 72"X32"… I use a can of 3M spray adhesive and paste the poster sheet flush to the ply wood. I then drop it into my custom table which is 8’X4’. The reason I print the standard size of 72"X33" is that I fits great in a 8’X4’ table, and any larger… it gets difficult to reach the full width of the game board. I don’t use any type of glass to cover it, I find that the laminated vinyl is easy to wipe down with a Lysol wipe and is pretty tough. I will be getting a print done this week and will be posting some images soon. Cheers.

    I would like to take back this statement as I have been having a nightmarish time working with this method… I am currently working on a better application and will post my findings when I get all the info.

    Thanks for blazing the trail YG. If I ever do this myself I will say a silent prayer of thanks for your experience and your money.  :wink:

  • Sponsor

    Thanks LHoffman,

    Your appreciation is my inspiration… because I refuse to use a sheet of glass, my research has lead me to a material called styrene (google it) which is a type of plastic sheet that can be directly printed on. All indications point to this method being the last alternative to glass and although it cost around $240, it looks to be my best option. Even after flushing $300 so far in a crappy print, and installation complications, I’m happy with this new direction if it turns out the way I’ve been told it will. Basically it’s flexible plastic, so it should lie flat without air pockets getting trapped, and because it doesn’t get laminated, the colors should be slightly brighter. If it is sensitive to scratching than there is a clear film sheet by 3M I can look into, that’s where I’m at right now.

Suggested Topics

Axis & Allies Boardgaming Custom Painted Miniatures

35

Online

17.0k

Users

39.3k

Topics

1.7m

Posts