


Map and charts for sale. Everything has been kept in great shape. Just want to see it go to a good home. Asking $250, and I’ll cover shipping.
HBG - Axis & Allies Parts/Accessories and Custom Piece Sets Store!
-
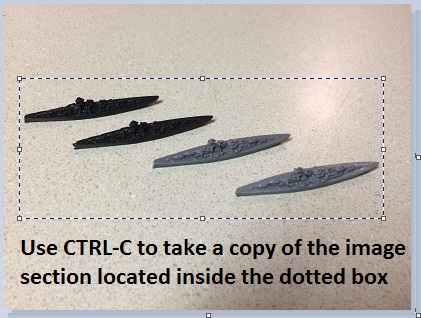
Here are pictures 7 and 8.

-
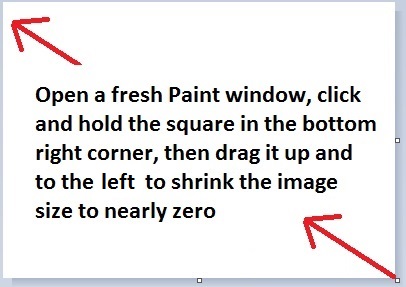
Here’s picture 9, the end result.

-
Thanks CWO Marc. I will try to look at this, after work, tonight. Thanks again.
John
-
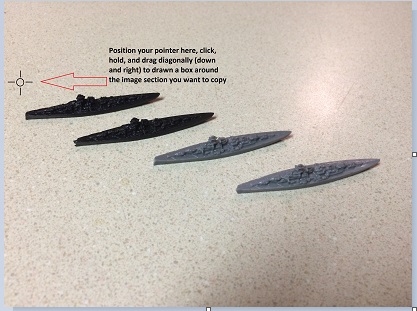
Good luck. When you put your pointer on those little squares, it should turn into a double arrow (either up/down or left/right), and this will tell you that you’re correctly positioned to move the margin. Just click, hold, and drag to do so. Also note that there’s a similar little square in the bottom right corner of the window; if you grab that one (your pointer will turn into a diagonal double arrow) you can adjust simultaneously the bottom and right margins, which is a small time-saver compared to adjusting them separately.
-
Thanks CWO Marc, for the tip. if I don’t get this, I may have to find friend that is familiar with paint to show me what I’m doing wrong, but I will attempt it myself, tonight and see how it goes.
I really appreciate you taking your time to help me.
That is why I love this community. Everyone is willing to lend a hand to members, as well as guests. :-)
John
-
If the method above doesn’t work, try the alternative below (steps A to H).
-
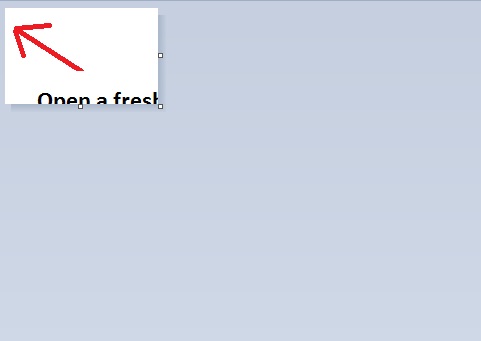
Steps C-D.
-
Steps E-F.
-
Steps G-H.


-
Marc, you deserve a medal for all that.
-
Marc, you deserve a medal for all that.
Thanks, but it may have been a case of attacking the problem from the wrong direction because I’ve finally realized (which I should have done sooner) why John has been running into problems. My guess is that he’s been viewing his images in Paint in one of the large-magnification modes rather than one of the smaller ones. Paint has multiple image display modes, which are controlled by the magnifying glass button. You can either display a small image of your entire picture, or a large image of part of your picture. Actually there are more than just two magnification levels, but the point is that some show you a full picture and some show you a partial picture. In the large-magnification partial-picture display modes, the bottom and right margins (the ones with the little squares that I keep talking about) are beyond the edges of the window (because Paint always positions you in the top left corner), so you can’t see them unless you either scroll down and over to them (which is clumsy) or you change the magnification size (which is much easier).
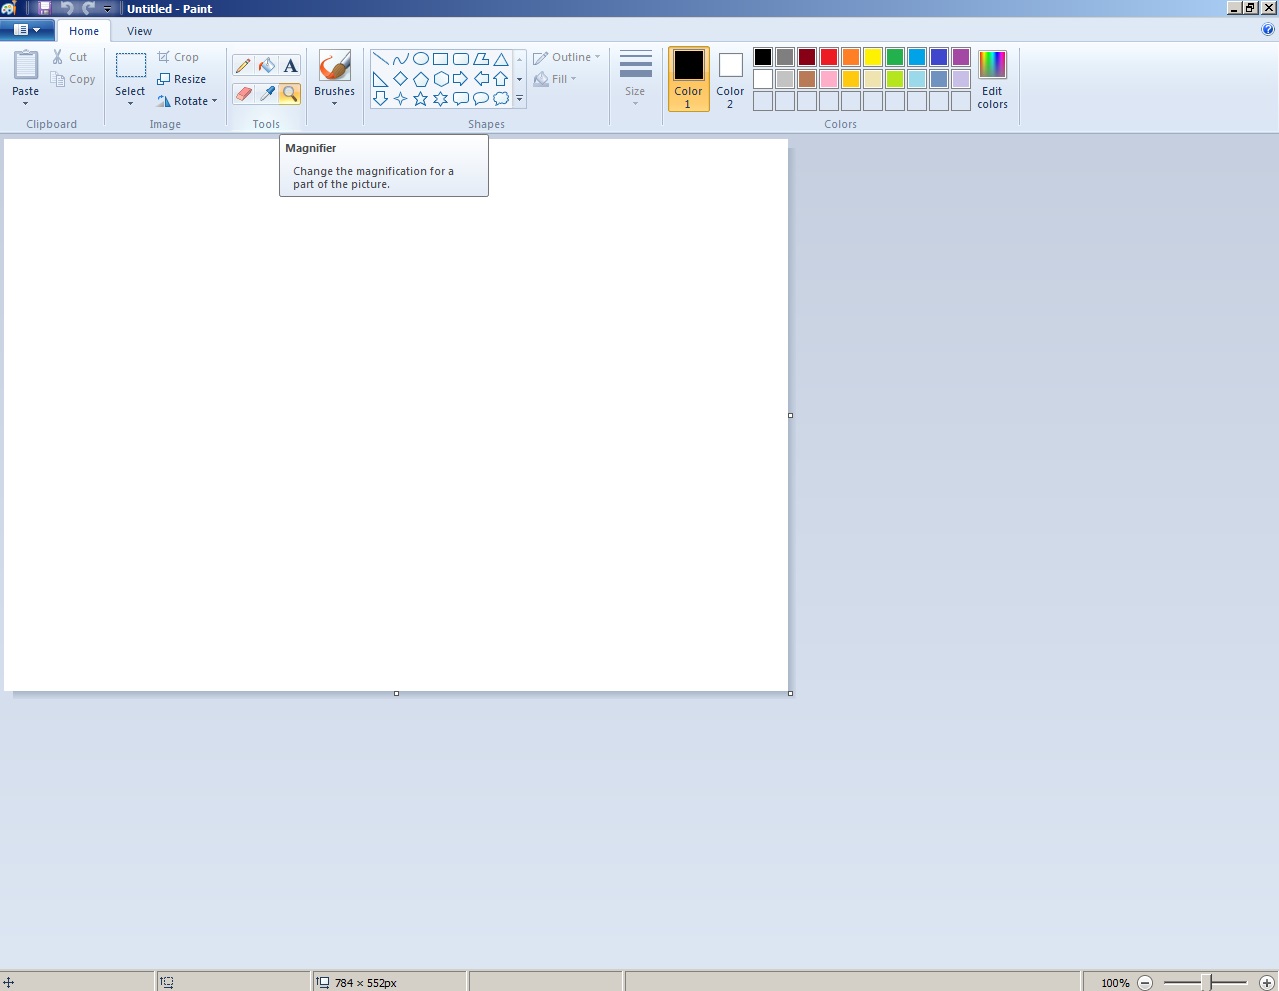
To change the magnification size: click on the magnifying glass, then click on the picture. Right-clicking makes the picture smaller; left-clicking makes the picture bigger. The correct magnification level to aim for is one (as in the picture below) in which the size of the displayed image is smaller than the Paint window. At that magnification level, the little squares on the bottom and right margins should be clearly visible.
Note that changing the magnification level doesn’t change the actual size (in bytes or content or anything else) of the actual image file; it simply changes how much of the picture you can see on your screen at any given moment while you’re working on it in Paint.
-
Hey CWO Marc, I spent 3 hours last night, trying, to no avail, to follow your instructions to reduce the size of the pictures. No matter what I did, it wouldn’t reduce them.
I’m sorry about being computer illiterate. I just am, but i do try to learn. You did teach me how to use the arrows to reduce the picture and that was cool, but i tried to paste and copy and didn’t work for me.
The first thing I do is right click the photo and open with paint, then I clicked the select all. I saw the little squares and arrows, you talked about, and now know how to drag them, to reduce the size of the picture.
I never figured how to open another paint without their being a picture. Your screen shows it all white, but I don’t know how you did that or just didn’t understand how to do it.
Sorry for being so much trouble. I’m really trying, just don’t have enough experience with computer programs or much computer experience at all.
-
Hey CWO Marc, I spent 3 hours last night, trying, to no avail, to follow your instructions to reduce the size of the pictures. No matter what I did, it wouldn’t reduce them.
[…]
I never figured how to open another paint without their being a picture. Your screen shows it all white, but I don’t know how you did that or just didn’t understand how to do it.How do you normally open your Paint program? Do you activate it from your Start button (or whatever gives you acceess to your list of Windows accessories)? If so, it should open as a blank Paint document. And if so, you can open a second blank Paint document in the same way, by using your Start button (or whatever). You can actually have several Paint documents going simultaneously (as many a six or seven, I think), though for your purposes two should suffice. And in fact, you only need one Paint document to use the first method I explained; the two-document method is just an alternative, and in fact it’s clumsier than the one-document method, so don’t pay any further attention to it.
At this point, I think your best option would really be to ask someone to show you in person how to apply the techniques I was describing (or better ones, if they know any). Sometimes there’s no substitute for the in-person approach, as opposed to trying to follow instructions in print or instructions in pictures. You shouldn’t have to spend three hours experimenting without success; either there’s something wonky about the version of Paint you’re using, or there’s something that I’m failing to grasp about the way you’re using Paint as opposed to the way I use it. Having an experienced Paint user eyeball your situation in person would be the surest way to get at the heart of the problem.
If you don’t know anybody who uses Paint, then here’s a fall-back solution. It’s not ideal, because you’ll lose picture quality, but it’s the best I can offer at this point. Forget about the whole idea of trimming the wasted space from your pictures, and instead simply use the Resize function to shrink the image. I’m not talking about the Magnify function, which has no effect on your image file (it simply controls how much of it you see in Paint). I’m talking about the Resize button, which calls up a box that reads (in my version) Horizontal 100 Vertical 100. Type 50 over the 100s to replace them and hit OK. Your picture file will be shrunk by 50%. (So will your picture quality, but that’s unavoidable.) Then re-save your picture, under a new file name so that you don’t shrink the original.
-
I plug in my I phone, and from their I right click the pictures, and then open with paint. I figured, it would be beneficial, if someone can show me in person what I need to do.
I still appreciate everything you’ve done for me.
Thanks again, CWO Marc. :-)
John
-
You’re welcome. Sorry I couldn’t be of more help. One definite recommendation I’d make would be for you to do your image processing in Paint on either a desktop computer or a laptop, with a decently-sized screen and a mouse. I can’t conceive of using Paint on an Iphone, working with just a teeny tiny screen and fingertip controls; it’s as mind-boggling to me as the joke in the first Muppet Movie in which Kermit asks Fozzie where he learned how to drive and Fozzie answers “I took a correspondence course.”
-
No problem CWO Marc. I think you did as much as anyone could. I just think it would be easier to see how it is done, first hand.
I am using a desktop computer.
Sorry for the confusion.
I was transferring pictures to my computer. The apple phones, come with a cord that I can plug into my desktop.
I forget, what you call it. USB, or something of that nature.
I had a flip phone, before I got the apple iphone 5, just goes to show you, how far behind I am, lol. :-D
-
Hey Guys,
Thanks for posting the pics John Brown. I know it’s a pain loading such large pics but you sure get a good look at the detail. I should be getting my pre-order tomorrow according to the postal tracking.
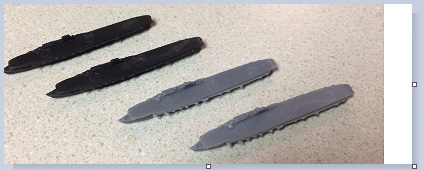
Maybe it’s just me, but the Bismarck doesn’t seem all that bad. The main thing I noticed was on the dark grey pieces the bow seems to be chopped off. Perhaps the gun barrels are a little long. Most of the rest seems to look okay to me. Am I missing something? Perhaps I’m not seeing something even with such close up pictures.
Still curious about the light cruiser. I don’t incorporate light cruisers into my games yet so I wasn’t too worried about that particular piece, although I still like to have one for Germany.
The pocket battleships look really nice. I’m really excited for that piece. -
No problem, knp7765. I was so excited to finally get these. As far as the battleship. It is very playable. At a distance, you can’t tell that there is anything wrong with it.
When hold it in your hand, and looking from the top of it, it is very rough looking, but as far as playing with them, it shouldn’t be a problem.
I’m eventually going to paint a couple, despite the flaws.
I’m still going to buy the 3D versions when they come out of the Bismarck and the light cruiser.
I’m excited about the Greatcoats and the Stukas. I also love the transport ships and destroyers. They turned out really well.
I hope you get yours soon. :-D
John
-
…so what happened to the last German set ?
-
Hey guys,
I got my pre-order Wednesday. I love them. I think they look great in both colors but I’m partial to the dark grey.The Bismarck is a disappointment. Most of it looks pretty good to me except for the bow being chopped off. HBG said that the Leipzig light cruisers were messed up too but I can’t see it. They look good to me, although I admit that I am not very familiar with the Leipzig class. So am I missing something?
I really like the Me109 fighters. They look great. In fact, all the planes look really good. At first I wasn’t crazy about the Stukas having the cannons but they look great too.
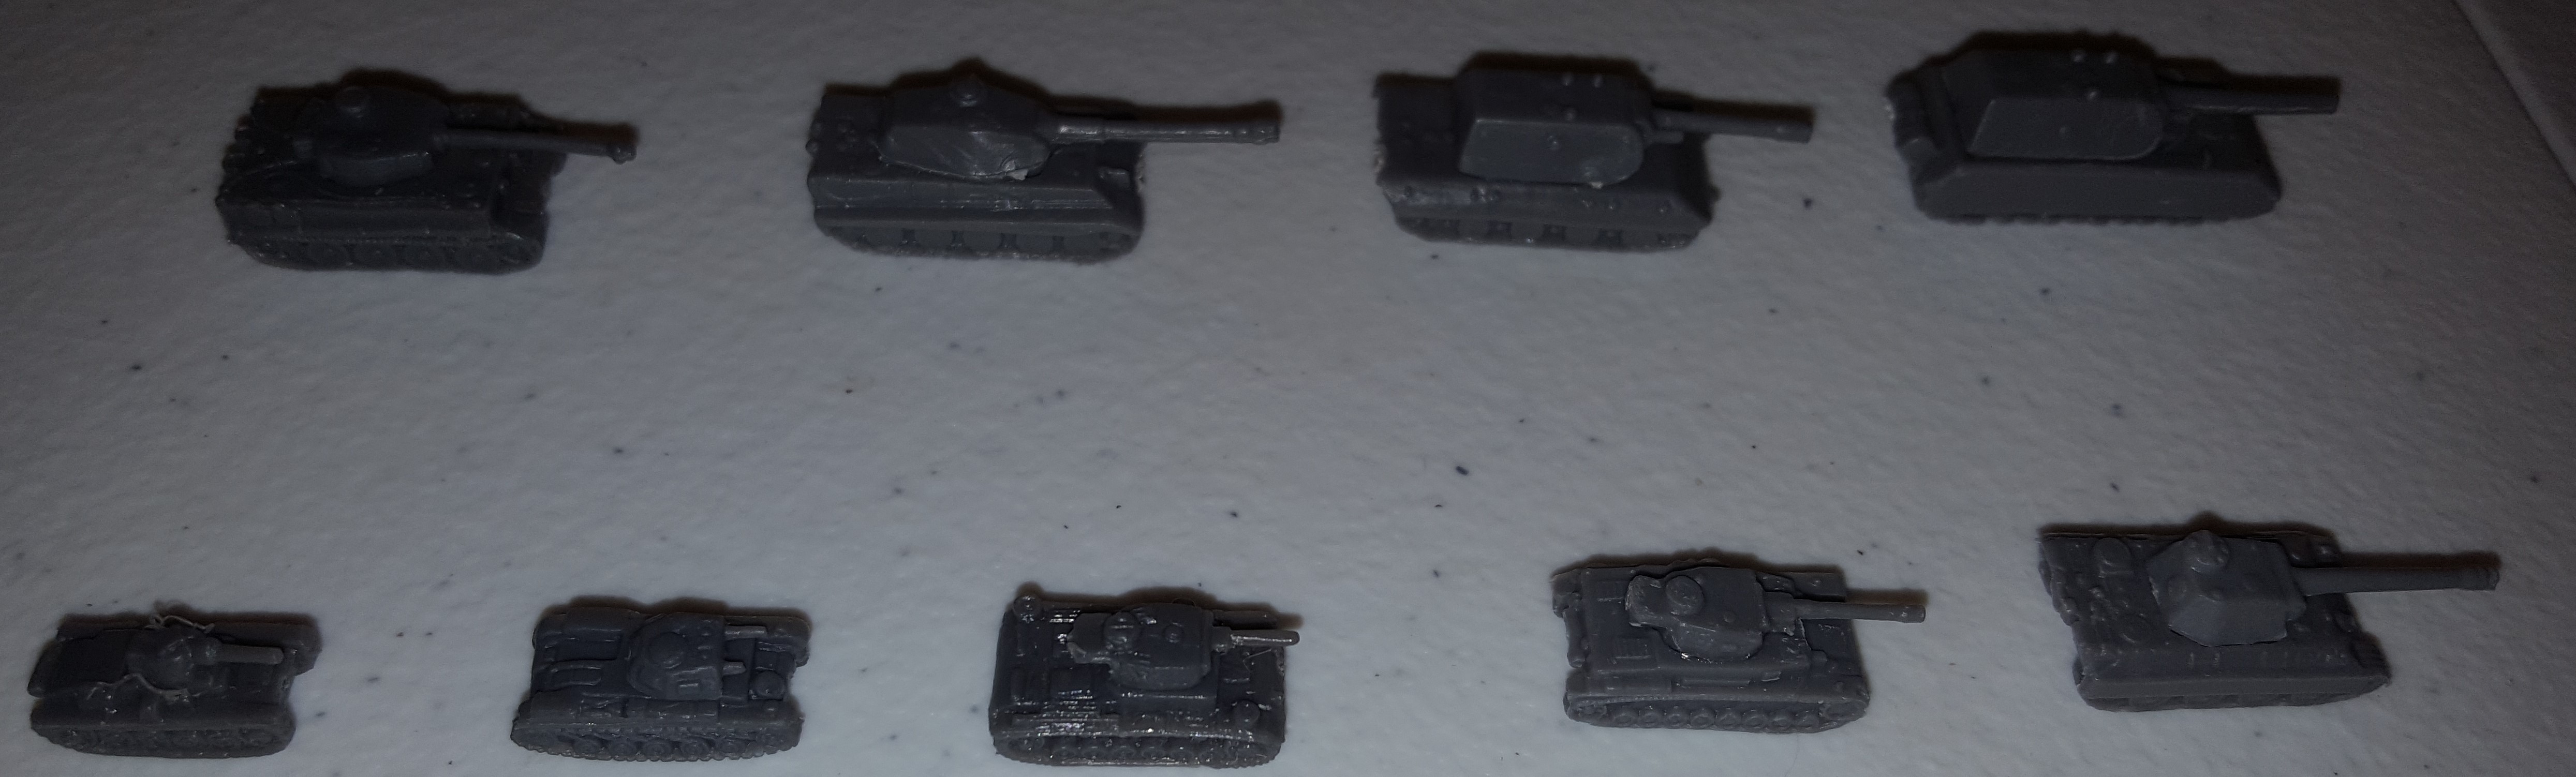
The tanks are great. Do you guys realize that through HBG we now have sculpts for all the German tanks used (or planned) for WW2 (excepting for Panzer 1)?
Panzer 38(t) = Axis Minors Set 1
Panzer II = German Expansion Set
Panzer III = Axis Minors Set 1
Panzer IV = Germany 3 Set
Panzer V (Panther) = Germany 3 Set
Panzer VI (Tiger) = German Expansion Set
Panzer VI-2 (King Tiger) = Amerika Expansion Set
Panzer VII (E-100) = Amerika Regular game pieces
Panzer VIII (Maus) = Amerika Expansion SetThis is pretty cool I think. I would include a picture but my phone takes too big of pictures memory-wise to post here and I haven’t figured out how to resize it yet.
I really like the great coat infantry too. They look pretty cool. I want to try them out in the Battle of the Bulge game. Between this new German set, the German Expansion set, the US Expansion set and the UK Supplement set, HBG has provided enough sculpts to replace all the OOB pieces for that game. It would be cool to compare the setups with OOB and HBG pieces.
Suggested Topics

