


That’ll do it - and after you have used your playing pieces for a while, you’ll see if you need to spray a new layer of matt varnish.
2-3 layers - each layer thinly sprayed - and dry 24 hours between each layer.
You units will last a lifetime:+1:
_If you are coming to this thread by way of the A&A.org homepage, welcome! I’m so glad you found it. I hope that the article, and the information contained in it helps current or aspiring painters. Please feel free to ask questions about anything and everything, request tutorials, or comment on how you do things.
Hello everyone!
I have been on this site for about 2 years now, partly for strategy talks, partly for painting ideas and resources. There are a lot of great painted pieces out there (I have mainly looked at Allworkandnoclay’s and Viracocha’s), but I have not stumbled upon a thread that includes a tutorial or explanation of HOW to paint pieces. Hopefully this thread can be a resource for anyone interested in painting their own sets or for anyone who has any questions regarding painting.
I have been painting since I got my first 1942 set 2 years ago; I finished that and have moved onto my global set. My work has progressed from my first crude brown and maroon T-34s to my newly finished AVG Flying Tiger with shark camo and Chinese roundels :-) I would call myself experienced, but not an expert or professional. I find time between school and my job to paint, so it gets done based on how much time I have.
Feel free to ask any questions you may have! And constructive criticism is appreciated as well.
I’d like to start with the tools and paints I use. I’ll be posting some pictures and advice soon._
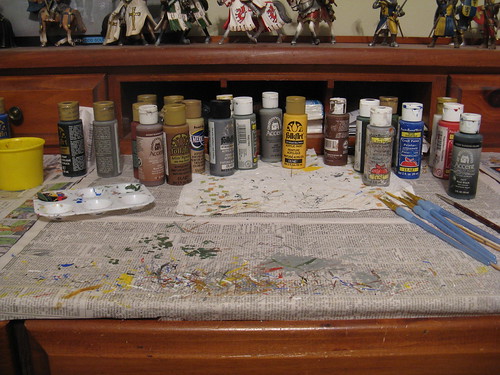
First, my setup. I use acrylic paints (oils would be a nightmare, and I don’t think they would work). You can get them at your local Hobby Lobby or Michaels for about $.90 to $1.30, depending on which brand you use. You will need a good variety of paints…probably anywhere from 15-30. Here is a picture of the paints I use.

As you can see, I don’t stick to one brand- if you’re willing to shell out the dough, I’ve heard Vallejo paints are good too. I find that the paints I have suit me just fine.
Here is a list of colors I think you will need to start.
White
Black
Royal Blue
Bright Red (but not orangey…be careful)
Silver
Yellow
A dark forest green
A lighter army green
A burgundy maroon color (optional)
A nice raw sienna (brown but slightly orange)
A burnt sienna…basically a standard brown
A light grey
A dark grey
Maybe a gunmetal color…like a silvery black
And one or two shades of sandy camel color.
Any other color you might need you can mix from these colors. All in all you should be up to about $15-20 right now. I already had many of these at my house for some reason, but if you are just starting, this should get you going.
You also need some good tools. I once again went to Michaels and bought the smallest size brushes they had, and then to Publix for some thin wood skewers. With that and a needle, you’ll be good. Here is a pic of my tools.
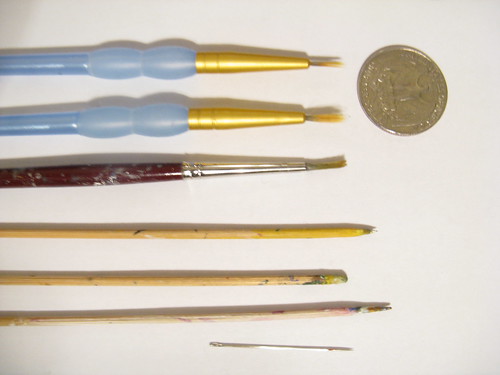
Basically I use the brushes for basecoating and doing any thick camo stripes or drybrushing, but almost all my fine detail work is done with a skewer and/or needle. Just take one of the skewers and whittle it to a slightly finer point… experiment till you get a few. This is better than a brush because 1. the point is smaller, and 2. it is rigid and won’t bend when it hits the surface of the piece, giving you better stability and detail. Then a needle for really fine stuff…like roundels and squadron letters.
Grab a pallet thingy, a cup with some water, and a section of an egg carton (the section WITHOUT tiny little holes in the bottom… I figured that out the hard way :x) for any inkwashing. Then just set up your workstation with a newspaper and some paper towels, and you’re set!

Let me know what you think!!
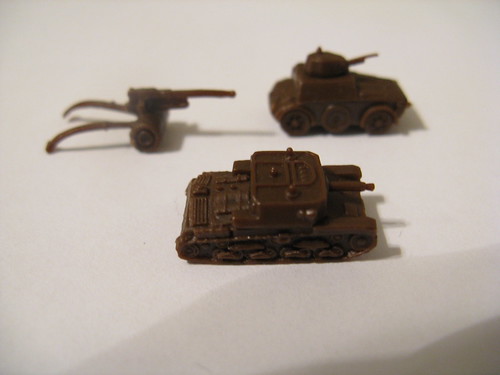
I will be painting a few different kinds of pieces to cover the various techniques I use. First, I’m painting the Chinese infantry. Then I will do part of the US Navy, then I will finish the RAF with some naval fighters and tac bombers, and finish up with the FMG Italian ground units (arty, mech infantry [armored car], and a tank). By the way, both the FMG units and the HBG US Supplement set are very nice. I ordered some individual FMG pieces [not the whole Italian set] and the US Supplement set from HBG and they arrived promptly and were relatively cheap.

Just giving you some kudos here. I dont do any painting myself, still have it on my wish list to sometime get around too, but I love to read this and look at your pictures just to get an idea of what comes to it. Thanks.
Just giving you some kudos here. I don’t do any painting myself, still have it on my wish list to sometime get around too, but I love to read this and look at your pictures just to get an idea of what comes to it. Thanks.
Thanks! Glad to do it… I paint anyways, so I might as well post some pics and advice :lol:
Sorry I haven’t been able to post for a few days- I’ve been pretty busy.
A side note. Painting your pieces requires some practice, depending on how good you want them to look. For me, I “practiced” on a Spring 1942 set…in all actuality I thought they were good, but then I got progressively better and realized my original pieces were awful. Just have fun experimenting and painting and you’ll improve.
All right, Chinese infantry. To start out, infantry is probably the most time consuming type of piece to paint, but it is one of my favorites. There are a few basic components to each infantry piece.
**The base-**Everyone does their bases differently. I have seen infantry with a base that is all one color, infantry with a base that is one color on top but a different color on the side (which is how I do it), bases with roundels painted on them, or even bases that are textured to look like the ground with moss, sand, etc. I like to paint the base 2 different colors because it gives more options for nations as well as giving it contrast, which can be pleasing to the eye.
The uniform- The uniform usually consists of pants or shorts, a shirt or coat, boots/shoes with socks, and a helmet or cap. Often you can paint boots over the socks if you like that better, or extend the shorts into pants…like I said, experiment with it to see what you like. I find that it helps to make the shirt and pants a different color for contrast.
The equipment- The equipment is usually a gun, (well, I would hope they would always have a gun :lol:) a canteen or pouch of some sort, and possibly a belt, strap, or sash looking thing. Its up to you to decide what you paint and what colors you use. Sometimes painting everything can make the piece look a little cluttered, but it can also be a nice touch. Obviously you paint the gun though.
The person/flesh- This is one of my favorite parts because I feel like it makes the piece look 10x better when it has a skin color; once again, it not only provides contrast, but gives a human look instead of plastic. Different soldiers have different skin colors, but its all pretty much a flesh tone base.
To start, I always paint the base…at least the top of it. It’s a lot easier to paint the base before the boots because you can be sloppy with your brush. Some people like to do an approach similar to how you put on your clothes. First you paint the skin, then the pants, then the shirt, socks, shoes, hat, and equipment. personally I find that it’s the best for me to paint the base, then the shirt, pants, hat, gun, accessories, skin, and then boots, and lastly the side of the base. The side of the base comes last because I usually hold the piece by the base or the head to provide easy rotation and a firm grip. But choose your method.
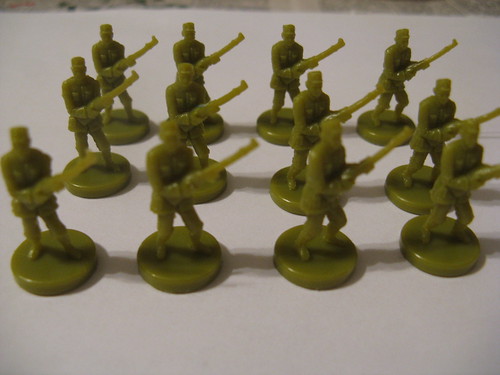
In Axis and Allies Pacific/Global there are 30 infantry pieces. I usually do 2 schemes for a nation, but for the UK and USA I will probably do 3 or 4 since you get double the standard 20-25 pieces. That being said, I am only showing you the first scheme right now (15 pieces) If I ever paint the other scheme, I’ll post pictures.
Now, to start out, you have to decide if you want to clean the pieces with dish soap, warm water, and a toothbrush. the advantage to doing this is that often it helps the paint apply more easily because the oils from the factory will be off. It takes about 30 mins or so. You just get a pot or cup of warm to hot water (not hot enough to mold the plastic though…just tap water hot), add dish soap, and scrub! Make sure to get in all the nooks and crannies. I didn’t do it for these pieces because I was feeling lazy- in the long run I haven’t noticed too much of a difference in the painting process…but it’s up to you.
Now I painted the bases on my 15 infantry. It’s China, so I’m working with a light blue, bright green, white…those sort of colors. I decided to paint the top a light blue (not the royal blue) and the sides a bright green; not white because blue and white are what my American pieces have) Pick colors that will help you and anyone playing identify what nation they are. (Germany:black, red, gray; Italy:brown, green, white; UK: yellow, blue, red, white)
Next I mixed my color for the base. I wanted a lighter blue, so I mixed on drop or glob of white paint with 2 drops of royal blue, and then proceeded to stir with a skewer. Shake the paints very well so it’s not too thick or too thin. Make sure you mix it enough so it is evenly distributed: often when mixing you will have pockets or streaks of a certain color that will look funny when you put it on the piece. See the top right of the photo

The reason I did a collage is so I can fit more pictures on to flickr so I can upload them here…if I did them each individually I would run out of my monthly limit.
Then apply the paint to the base…don’t worry about being sloppy because you’re coming back over it later. Just make it a uniform texture (no globs, etc). It will probably take 2 or 3 coats to completely cover all parts sticking through.
In the bottom left of the photo you can see the base, as well as the color I am going to paint the coats of the soldiers. I am doing a two layer coat…basically a base coat (no pun intended :lol:) and then a darker color drybrushed/smeared on top to give it depth and variety. easy concept, and makes your piece look a lot better! That color is an “avacado” green (3 drops) with one drop of white.
When applying your paint, especially on infantry and ships, don’t put too much on or make it too thick because it can cover up or fill the details in the figure. So 2 coats is better than one really thick one. Just apply the paint uniformly and make sure you check all over the figure by rotating it and turning it upside down. There is nothing more frustrating then finishing a piece and finding a spot you missed- trust me! :x Places to check: the part where the left arm merges with the gun…it’s a part of plastic that connects them that doesn’t really exist in real life. Sorry if that’s confusing. Also check under the shirt or coat where it meets the pants, under the arm, and the cuffs on the shirt.
2nd post coming in a second
Next I applied a second coat to the infantry of a darker color (1 drop of dark green, 1 drop of light green). Its sort of a drybrushing technique…but not really. You basically get your brush with some paint on it, wipe of the paint a little but on a paper towel or newspaper, then dab or pull it across the piece so it leaves streaks or patches of that color on the piece. It sounds like it would ruin your piece, but it makes it look good and shadowed. On something like a ship or tank treads-basically something with clearly defined raised surfaces- it helps to pull the brush perpendicular to the surface. So on a tank tread, pull it left to right or right to left as opposed to up and down. That way you only paint the raised surfaces and it highlights those parts…more realistic and cool :wink: That technique worked very well for my Russian T34s. You can see the treads were painted that way, but there are also subtle light brown dry-brush highlights on clearly visible on the barrel and engine of the tank. 
When drybrushing, periodically rinse your brush in the water so it doesn’t dry out and get ruined from paint…it will lose its tip and become a poofy bunch of fibers that isn’t useful any more. I don’t know if you can tell from the lighting, but the left piece (top left pic) is not drybrushed, while the right piece is. This is very clearly visivle on ships…if you do a silver or gunmetal gray drybrush on the conning towers and such, it looks really cool!
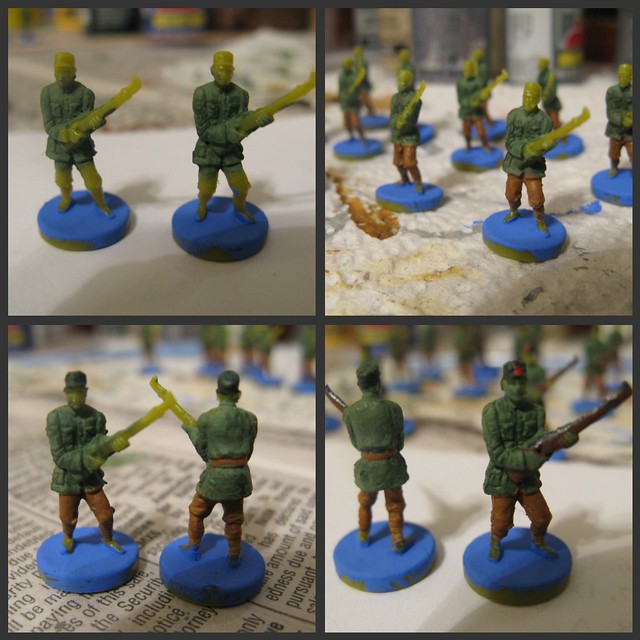
Then I painted the pants- I originally painted them a sandy tan color, but it looked dumb, so i painted a raw sienna over it. In the picture the pieces look a little spotty, but I paint over any spots I see while I’m painting. By the end they are all tidy.
Next I gave them dark green caps and painted the pieces’ belts brown. The belt was done with a skewer…everything else so far has been a fine brush.
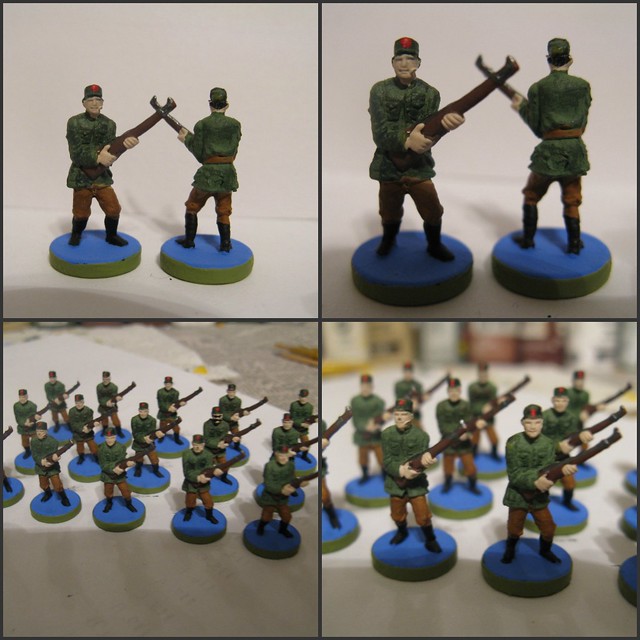
Finally, I gave them a gun and a red dot on their caps (i’m making half of them Communist, half of them Nationalist…just for the heck of it. HISTORY!) The gun is a brown with a gunmetal grey as the guns metal parts. basically i painted the rings on the guns barrel, the gunsight on the end, and then I ran a line down the top to look like a metal barrel.
I just have to do the boots, some tidying up of their uniforms, and then their skin and hair! I’ll post that all when I am finished painting them. Which I’m not sure when that will be. We’ll see- probably by the end of this week. maybe in one or two days.
Thanks for your interest! Again, any questions or comments are welcome. I’ll post some other pictures of my pieces with comments on the techniques I used.
Spitfire! Love what you’re doing here :-D - have wanted to do the same but time restraints has always foiled my plan.
Spitfire,
Nice artwork and dedication. The only reasning for myself to paint was when AA50 came out, to make sure we all knew who the Italian’s were, and difs between cruisers and distroyers, tac bomber’s.
Now old news cos when the AA 40 two games came out, we were used to knowing.
However, I have a few questions for you or any others who have put there heart into the game piece’s:
When you get round to your next game, with all your hard work and dedication, does the paint stay on, meaning from hot hands for example, or if dropped on hard floor, clumbseyness happens!
Would you be on edge if you have non caring players who treat the new upgraded hard work like if it was the borring original colour?
Do you store the pieces in the original boxies with no extra padding or bags?
Would you be extra careful and make changes and rules when playing, just to look after all piece’s?
I suppose that is the dedication and risk you have to take.
Bravehart
Spitfire! Love what you’re doing here :-D - have wanted to do the same but time restraints has always foiled my plan.
Thanks! I’ve used your pieces for ideas for various pieces, so you have a piece of the credit…haha :-)
Spitfire,
Nice artwork and dedication. The only reasning for myself to paint was when AA50 came out, to make sure we all knew who the Italian’s were, and difs between cruisers and distroyers, tac bomber’s.
Now old news cos when the AA 40 two games came out, we were used to knowing.However, I have a few questions for you or any others who have put there heart into the game piece’s:
When you get round to your next game, with all your hard work and dedication, does the paint stay on, meaning from hot hands for example, or if dropped on hard floor, clumbseyness happens!
Well, if I didn’t take care of them, the paint would easily come off from hot hands becuase it’s acrylic. However, when I am done I always spray them with a matte enamel spray that hardens and leaves them very well protected. The only way to chip them then is to scrape it with your nail or step on it or something. I’ll cover that later in the thread
Would you be on edge if you have non caring players who treat the new upgraded hard work like if it was the borring original colour?
weeelllll…about that. The spray covers the pieces very well, but I still never have peace of mind. The one guy I play with most often is very appreciative of my work and has even helped me at times, so no problem there. But it can be annoying if someone handles them roughly when we play as a group. But usually they are unharmed even with rough handling.
Do you store the pieces in the original boxies with no extra padding or bags?
I’ve actually created my own storage boxes…well finished one of them. I use basic storage boxes from Target, some colored felt for each nation, balsa wood for dividers, and some hot glue. I’ll post a picture of them later. It doesn’t make for very good transport, but I rarely take it anywhere, and when I do, you just need an extra pair of hands. (2 nations fit in a box as of now)
Would you be extra careful and make changes and rules when playing, just to look after all piece’s?
Like I said earlier, it’s not really a problem after they’re sprayed. I still take care of them, but you don’t need to be walking on pins and needles. You can grab a handful of artillery and place them without chipping them. So, no I would never change the rules just for my pieces.I suppose that is the dedication and risk you have to take.
Bravehart
Nice to see this happening, i may learn a few new tricks :-D From my own experience the biggest quality needed is time, patience…… and a steady hand… i have trouble with them these days and i have to wear glasses, didn’t have these problems when i painted my classic set many many moons ago. All good, on with the show :-)
Nice to see this happening, i may learn a few new tricks :-D From my own experience the biggest quality needed is time, patience…… and a steady hand… i have trouble with them these days and i have to wear glasses, didn’t have these problems when i painted my classic set many many moons ago. All good, on with the show :-)
Yes, patience and a steady hand are definitely key! I find a magnifying glass is great, but I seem to lose depth perception looking through one, so i can’t tell when I’ll touch the piece…so I can’t do any detail work with one.
You finished a classic set? That would be cool to see the original pieces painted :-)
Hey all! Sorry I haven’t posted in a while- I just finished the Chinese infantry last night, so I should be able to get pics up sometime soon. They will be here! :lol:
You finished a classic set? That would be cool to see the original pieces painted :-)
Hopefully the link works, i didn’t paint the infantry, wasn’t till i found this site and seen allwork and virococha’s painted sets that i gave the infantry a try….
http://www.mediafire.com/?f6suo1dcadamm
I notice you don’t use a primer first.
I would personally highly recommend, after washing the pieces and letting them dry, using a Krylon Fusion, flat spray paint (black is my preference, though white would be fine as well) as a primer before painting.
The Krylon Fusion brand adheres to plastics and using a flat primer/paint beforehand provides a better surface for your acrylics to stick to (less chance of them rubbing off/chiping later on).
Hopefully the link works, i didn’t paint the infantry, wasn’t till i found this site and seen allwork and virococha’s painted sets that i gave the infantry a try….
http://www.mediafire.com/?f6suo1dcadamm
Nice work! I like it.
I notice you don’t use a primer first.
I would personally highly recommend, after washing the pieces and letting them dry, using a Krylon Fusion, flat spray paint (black is my preference, though white would be fine as well) as a primer before painting.
The Krylon Fusion brand adheres to plastics and using a flat primer/paint beforehand provides a better surface for your acrylics to stick to (less chance of them rubbing off/chiping later on).
I’ve thought about it before…do you think it gives a better product in the the end, and does it make the paint job easier or more professional? If it’s just for protection in the end I probably won’t, but let me know what you think of it because I’ve seriously considered it before!
All right guys! I finished the Chinese infantry.
I finished the boots with a straight black. I used a thin point brush to get in between the legs on the inside of the boots. Afterwards I had to go back over the base a little bit to cover up any stray lines from painting the boots. That’s why it’s important to make sure you can replicate a pretty similar shade again when you first mix the base.
Then I just fixed up the uniforms with a straight dark green (that’s another bonus of using 2 coats of different colors… you can touch up with one straight color without mixing it and it doesn’t look bad)
For the base, I needed a green, but more of a bright, pastel colored green, not a dark forest or army green. So I mixed some blue and yellow (come on, back to the basic color wheel- 1st grade :lol:) until I found a shade I liked. Then you just apply it to the base and wick off any extra that sticks over the top of the side of the base with your finger.
Then you wait for it to dry, sit back, survey your pieces, make any changes you want, and be proud of yourself! :-D
Here are the pics of the final infantry.
One of those guys has a face defect-poor guy. must be hard missing half your jaw.
Every once in a while you have to have some fun as well. So here is an infantry piece with some “accesories”… Taliban infantry, Chinese Rambo…take your pick. haha. He looks a little messy, but I fixed him up later, don’t worry!
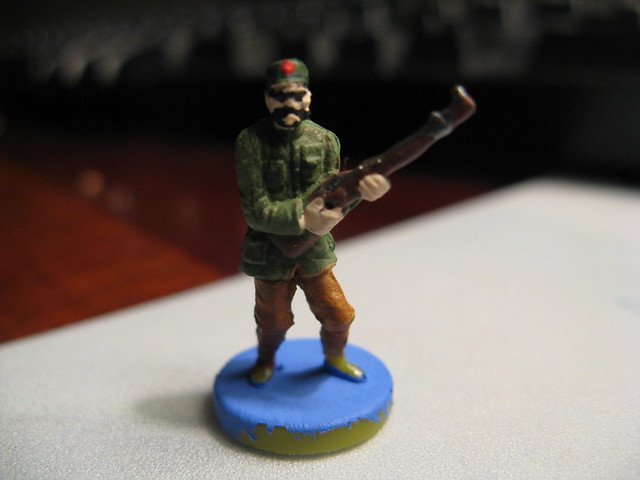
Hope you guys found this helpful! I’ll be doing some more pieces in the near future.
I added a poll at the top of the page on which pieces you would like to see painted. Let me know!
Great job there man :-) Keep up the good work
Really nice work!
And IMHO it’s very important to have FUN, too! A reference to you “Rambo-san”.
Keep up the good work.
“Tall Paul”
I’ve thought about it before…do you think it gives a better product in the the end, and does it make the paint job easier or more professional? If it’s just for protection in the end I probably won’t, but let me know what you think of it because I’ve seriously considered it before!
I definately think using a flat base coat makes the paint job a little bit easier, in addition to making the paint a little bit more durable… It gives you a better surface to work with instead of the semi-slick plastic (or slick gloss paint if you make that mistake like I did the first time when doing a base coat!) and I find the paint goes on better.
For the small cost (I buy Krylon Fusion flat spray paint … used an off white for my AA50 pieces) of about $7 you can do your entire set and then some. Just if you do, make sure you do 2 light coats rather than 1 heavy coat or you’ll lose all the detail and end up with a mess.
I also strongly recommend a clear coat on top when you’re finished to protect the paint job. Any matte varnish spray can will do the job (or satin/gloss if you don’t like the matte/flat look).

