


Also slowly working on making my own pieces and designs for my new resin printer. I’m going to open up an online store for new pieces, boards, rules, and other items in the near future.
-A Painting Tutorial and Resource for A&A Global-
-
@Tall:
Spitfire38,
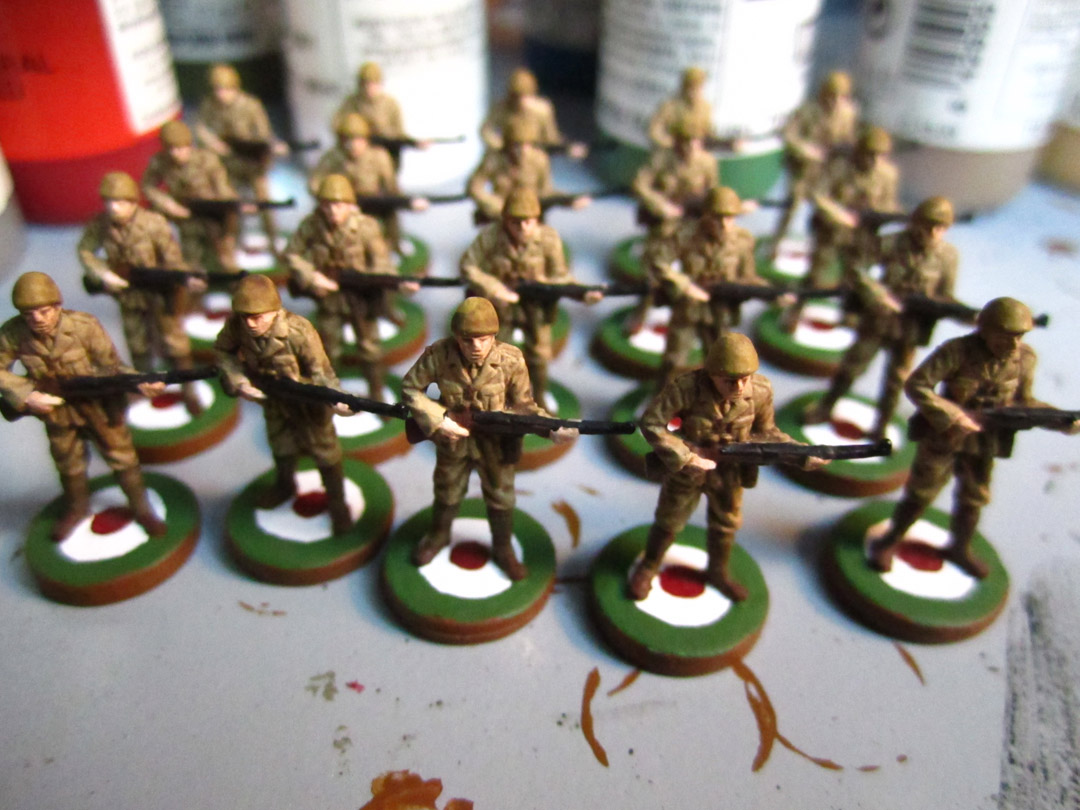
I couldn’t help but notice you had left the entire bases for your Nationalist Chinese Infantry a solid blue. Were you going to eventually paint the
N.C. insignia on their bases? Here’s a pic of the ones that “Allworkandnoclay” painted for me. I hope it might assist you in your painting. Keep up the good work.“Tall Paul”
Yes, I’ve looked at his work extensively. I’m thinking of trying the roundel bases on a few infantry for each nation… I don’t know if I have the skill, but it should come with practice. I’ll let you know if I ever do that.
I’ve thought about it before…do you think it gives a better product in the the end, and does it make the paint job easier or more professional? If it’s just for protection in the end I probably won’t, but let me know what you think of it because I’ve seriously considered it before!
I definately think using a flat base coat makes the paint job a little bit easier, in addition to making the paint a little bit more durable…Â It gives you a better surface to work with instead of the semi-slick plastic (or slick gloss paint if you make that mistake like I did the first time when doing a base coat!) and I find the paint goes on better.
For the small cost (I buy Krylon Fusion flat spray paint … used an off white for my AA50 pieces) of about $7 you can do your entire set and then some. Just if you do, make sure you do 2 light coats rather than 1 heavy coat or you’ll lose all the detail and end up with a mess.
I also strongly recommend a clear coat on top when you’re finished to protect the paint job. Any matte varnish spray can will do the job (or satin/gloss if you don’t like the matte/flat look).
Wow, $7 for a whole set! I’ll look into it- sounds like it’s worth it. Thanks for the advice.
Don’t forget to vote on what you see painted at the top of the page.
Remember, that’s $7 for one spray can of Krylon Fusion (at least that’s the price at the WalMart here). You still have the other paints, and then a clear coat on top. But yes, one can should prime your entire set. Or pretty close to it.
I already have the paints and I already use a matte spray on them when they are done, so yes, just the primer is left. I’ll be sure to pick some up!
Great job Spitfire! Really cool idea and i love the pics. Just a couple things I have learned painting. I also use the acrylics and I have found that after washing the pieces a light primer coat helps a lot. My pieces get a lot of handling and peeling was always an issue. I don’t use the infantry pieces from the game so when I buy unique infantry sets to paint sometimes I get variations in the plastic used so a primer coat is a must. I also use a matte clear coat to protect. (sometimes 2 coats) I have found Krylon is the best. I love to use the pieces when we play but some people don’t like them when we play. They say its to hard to distinguish the different powers. So when planning a paint scheme maybe take this into consideration. I don’t always go for the authentic look. I like to have a scheme that is easily recognizable and cool to look at. And most of all have fun doing it!! I also run into problems with storage. As of now I store all my painted pieces with the regular ones in the boxes from Global. I have the boxes compartmentalized into unit type but I find that the outer extremities of the infantry (guns, arm, hands etc) tend to peel more easily. Any suggestions for storage I am all ears. Keep up the good work!
Well you’re the 2nd person recommending primer, so I’ll have to try it! The guy I play with most often knows exactly which pieces are which because I share them with him as I’m painting and he knows what they look like, but with other people I can imagine it becomes a pain. My painted pieces are more just a personal project of mine because I don’t really have anyone to play with that often, but yes, I take that into consideration and try to make things color coded with insignias.As for storage and protection, I find that spraying them with an matte enamel spray afterwards helps the most. There isn’t much you can do to prevent chipping and such, especially on the infantry. I will post pictures of my storage boxes I made later. Its basically a box(es) from Target lined with felt and divided with balsa wood; not practical for transportation, but again, I don’t transport them much and it makes the storage look professional.
Thanks for the feedback all!
-
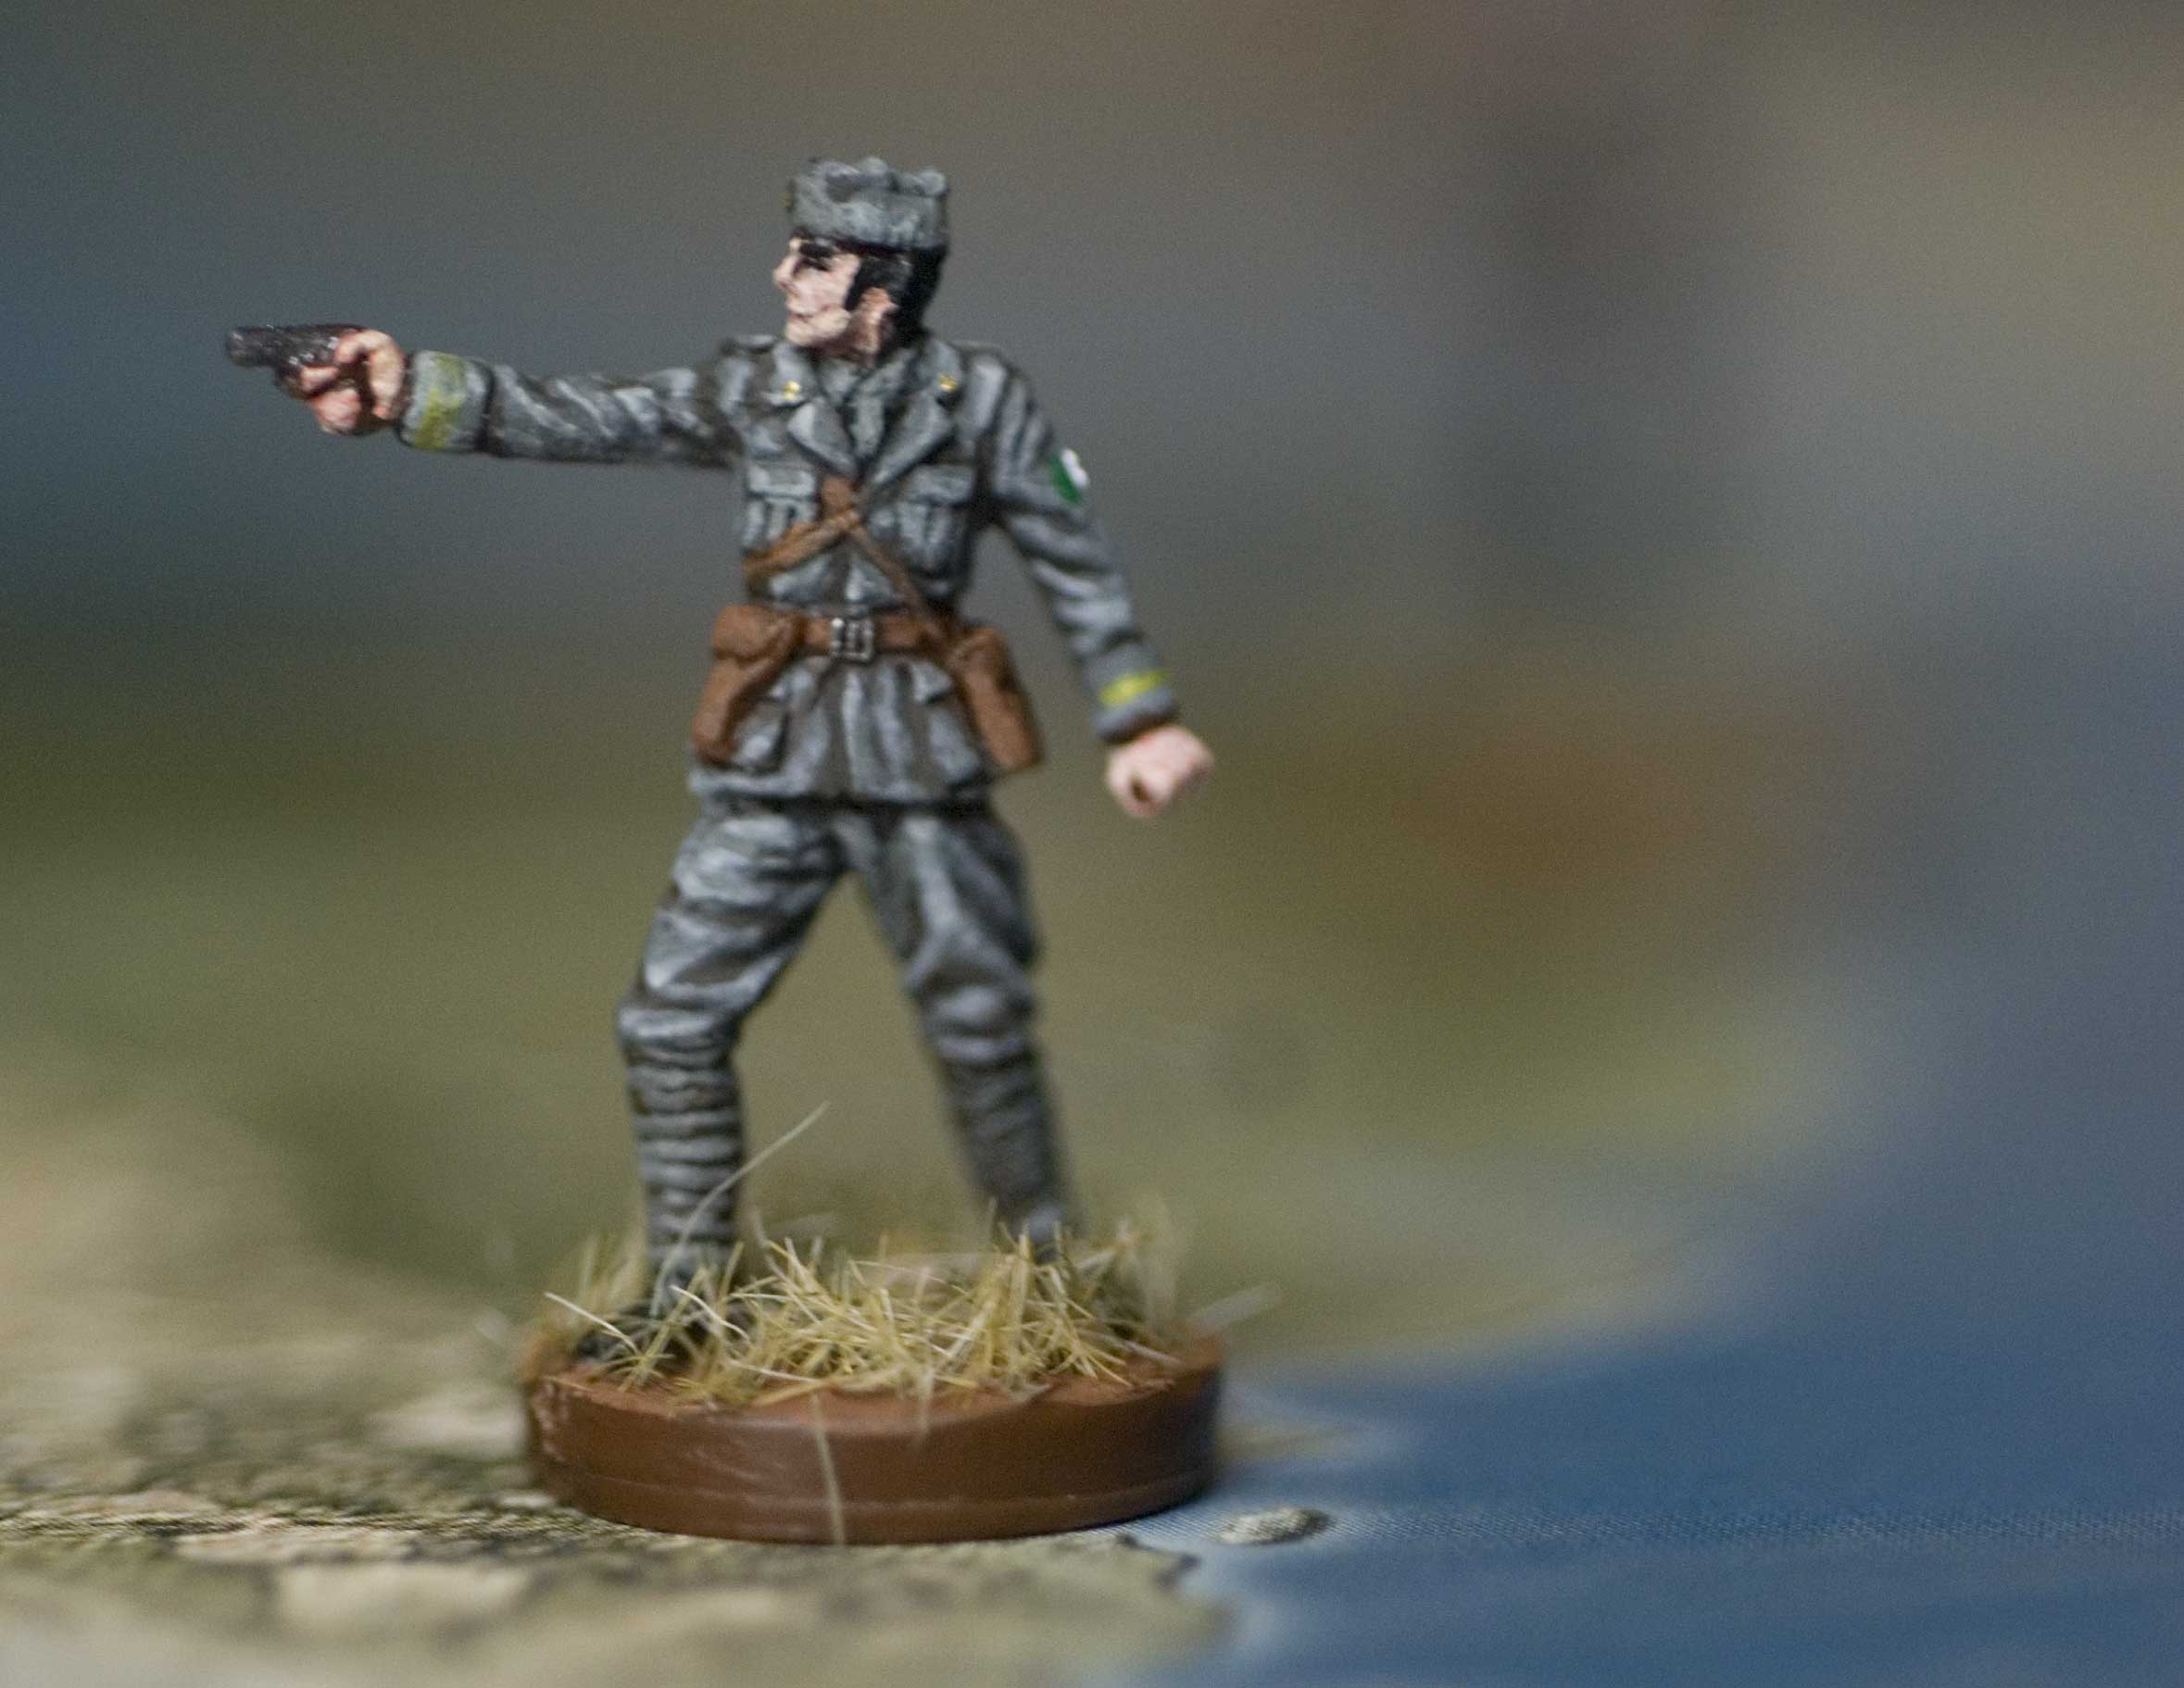
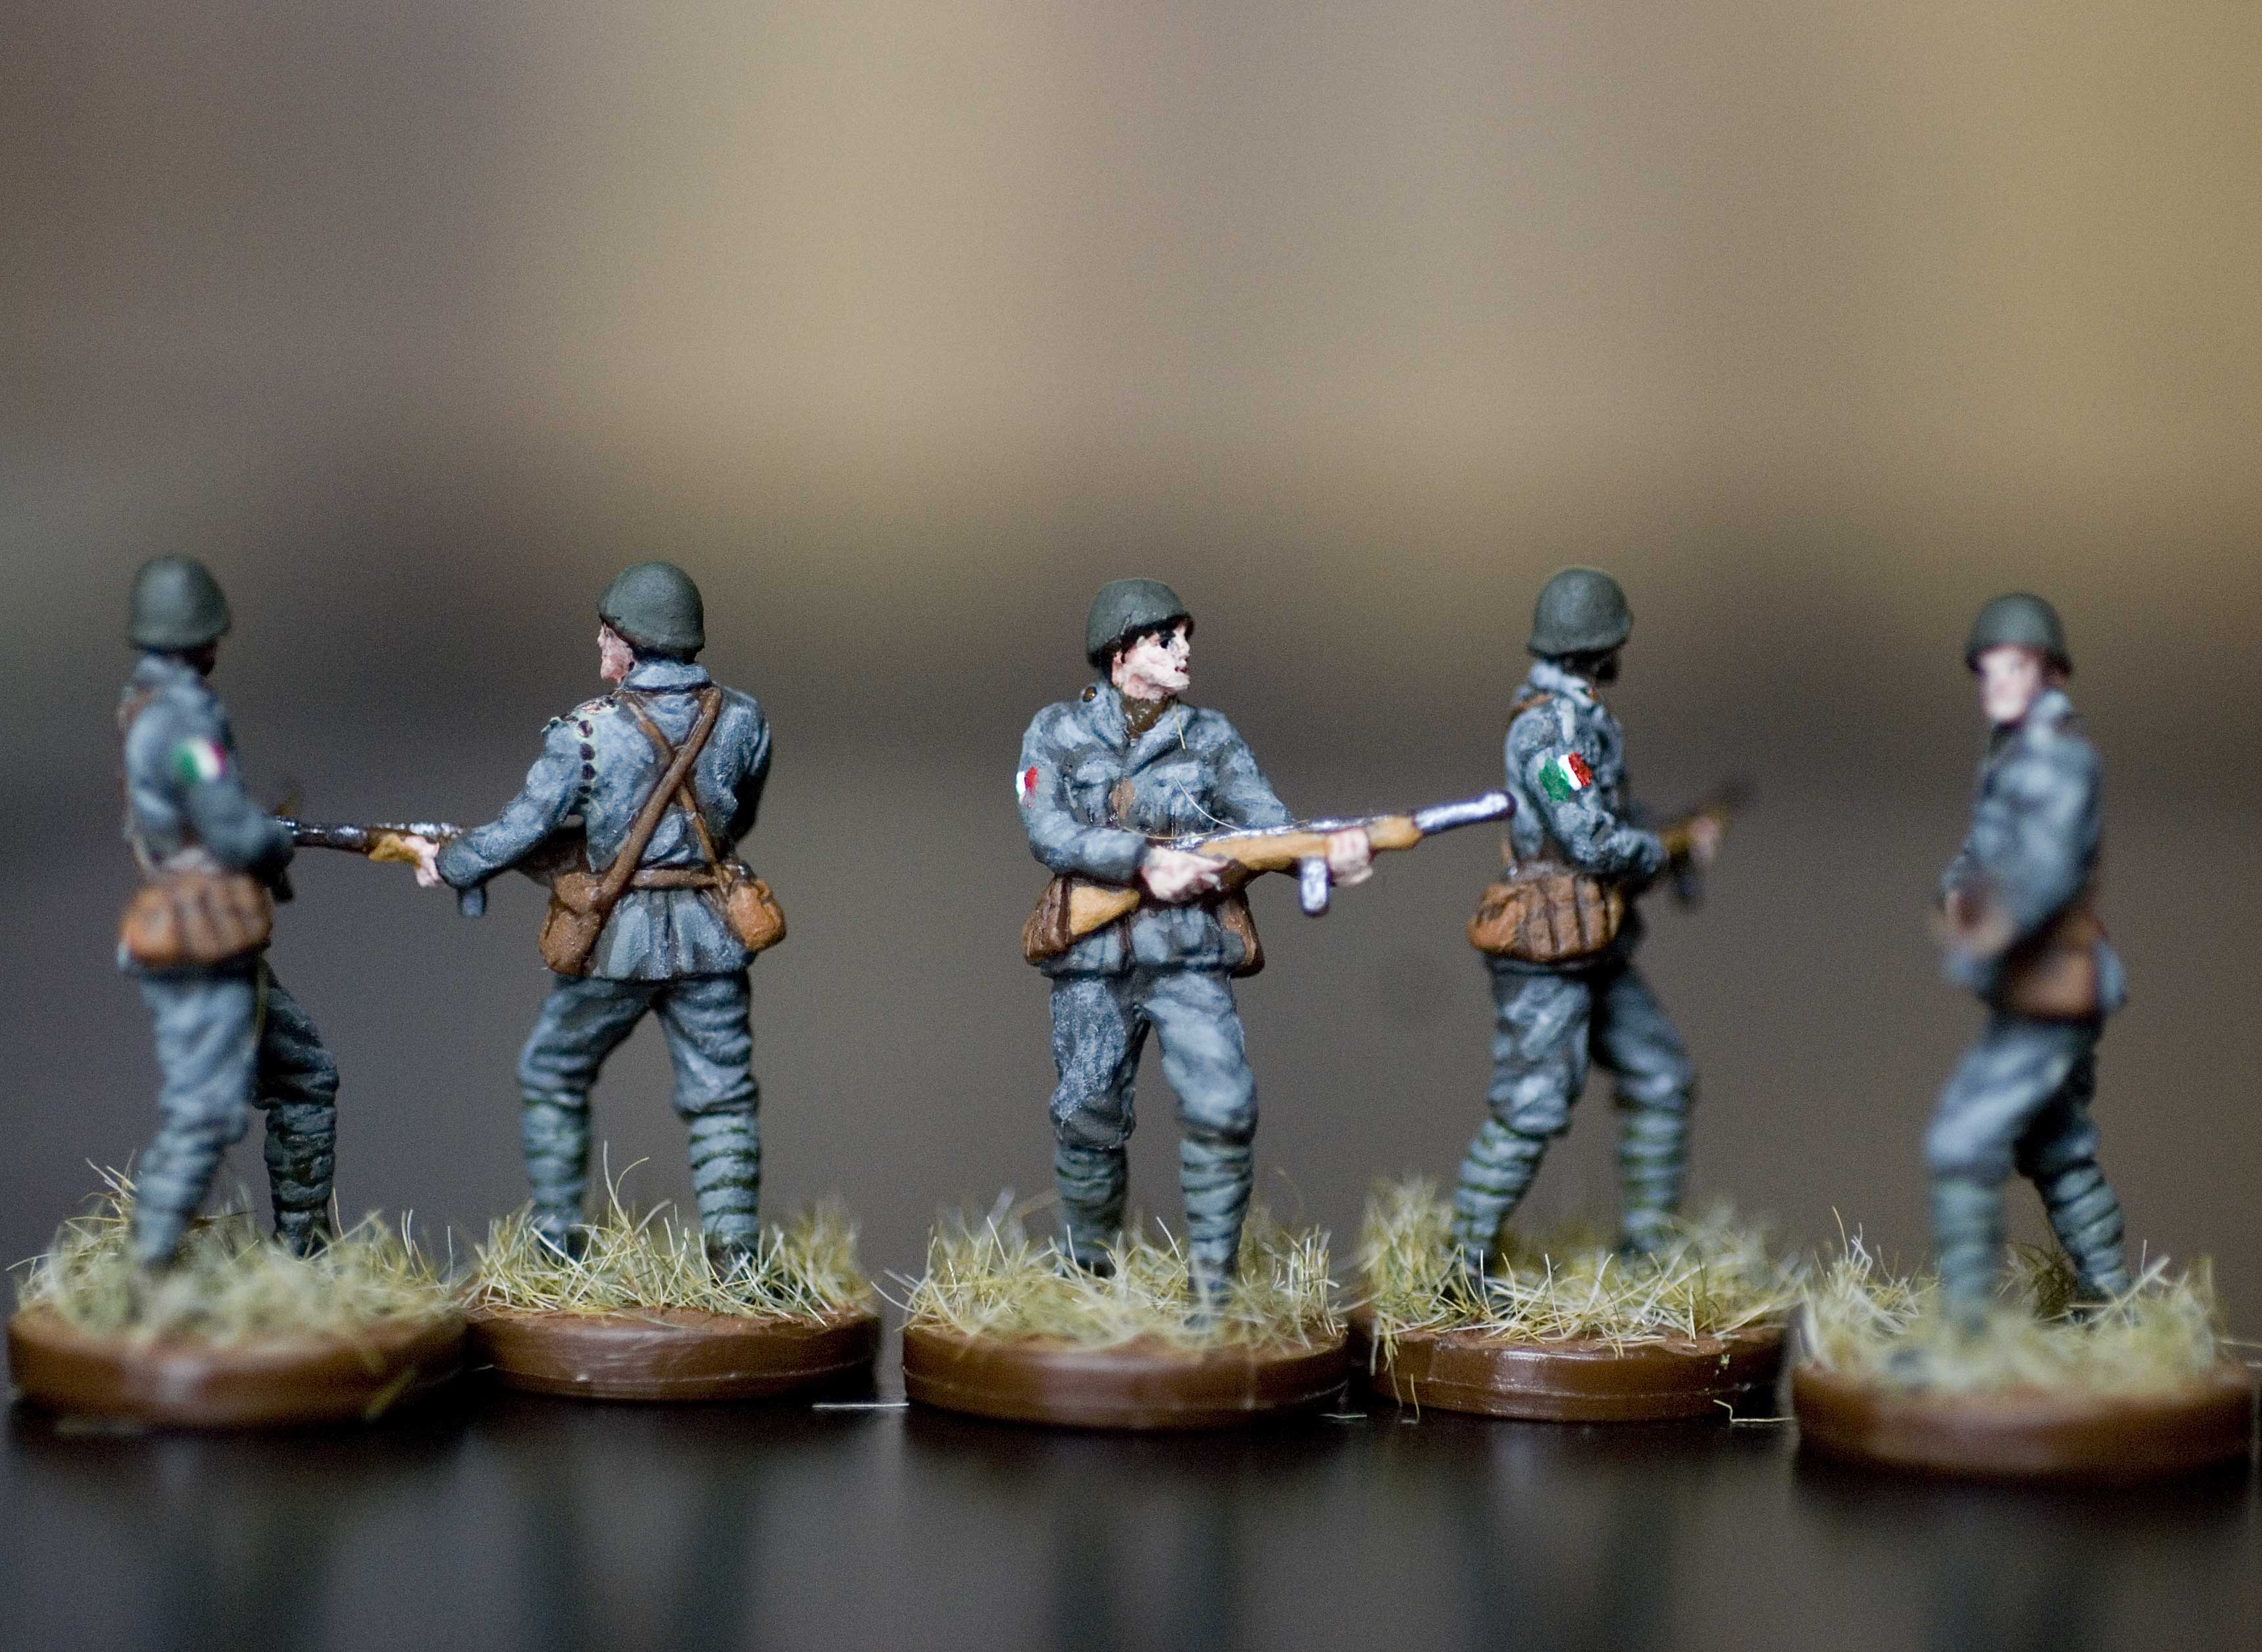
Very well, it seems that I will paint the FMG Italian ground forces next! I will have to do some research on color schemes and practice priming some of my other pieces before I spray my purchased FMG ones. I am slammed this week with school and work, so I will probably not be posting any news for a few days. I’ll let you know if I get any work done.
-
Spitfire,
I just received a pic of my FMG Italian Infantry painted by “Allworkandnoclay”. I hope it might assist you with the paint scheme research you spoke of. I look forward to seeing more of your excellent paint jobs. Keep up the good work.
“Tall Paul”
-
Thanks for the pics!! I love em. I think I’m going to do a dirtied/brown-washed desert sand scheme and also a grey/brown scheme. I’ll get to painting next week.
-
Update: I tried spraying my French infantry with primer to get the hang of it and to see how well it works. It’s GREAT! The pieces only require about 1 coat of paint with a few touch ups, and the paint applies very easily. I’m sold.
To spray your pieces, just set them on a piece of cardboard, and give them a 2 light (keyword, light) coats of primer, one after the other has dried. You should basically follow the instructions on the can- hold it about 10 inches away from the pieces.
So when it is suitable weather here I will prime my FMG units and start painting those, but until then, I have started one “national infantry” French piece… it’s just a French infantry with the roundel on the base, and some good detailing work like highlighting and shadowing. Pics will follow when I am done.
-
So, here are pics to follow up with my tutorial. As you can see in the first frame, the pieces are lined up about 1-2 inches apart. In the 2nd frame the pieces have been painted with one coat. The piece’s plastic still shines through a bit, but that’s good, because it means it is a light coat that doesn’t fill in the detail. Frame 3 is after 2 coats. Priming really helps the painting process!!
Frame 4 is after I painted a tan undercoat. I think I had done one brown ink wash too, but I don’t remember.

Here is a pic of one of the mech. inf I finished up on… just to see how it would look. I actually like it as a desert scheme a lot!!

-
Excellent… I’m working on a similar desert scheme myself. Love the division marking you added to the side as well :-D
-
I couldn’t figure out where to put it, but I think it looks pretty good on the side! I was also afraid the scheme would be a little too plain, but with a few ink washes of brown, it turns out to be a “dirtied sand” color… I really like it because it makes it look like its been driven around and in combat. :-)
-
wow these are realy good.i have been painting models for a while and have wanted to do this to forever. do you use a spray to prime them before painting and do you use a gloss to finish them. also how long did it take you to paint the chinese ones? thanks.
-
@Ghost:
wow these are realy good.i have been painting models for a while and have wanted to do this to forever. do you use a spray to prime them before painting and do you use a gloss to finish them. also how long did it take you to paint the chinese ones? thanks.
Well, I discussed the primer earlier. I hadn’t used it up until the Italian FMG pieces, but now I’m sold. I will always use it now- its just basic Krylon gray primer- $4 at Walmart or Home Depot.
I also use a spray enamel to finish the pieces (matte, not gloss). I may have covered that before…I don’t remember. Basically it justs portects the pieces and gives them a nice finish.Total painting time depends on a few things.
1. Your level of alertness/mood- If you’re really tired, not into it, or just sloppy, it will take a bit longer.
2. Type of piece- Infantry definitely take the longest to paint; then planes, ships, and ground units.
3. Number of schemes and difficulty- It really depends how detailed you want your pieces to be and how much variety you want as well.Overall, those Chinese pieces (15, not the standard 30) probably took me 7-9 hrs. For 30 it would probably be about 8-10. But again, I did that over a few different days, and I didn’t really know what I wanted, so it took a little bit longer than normal.
-
The FMG ground forces are finished!!
After the pieces were given a sand/camel color base coat, I did 2 or 3 coats of a brown inkwash, just because it kept coming out a little too light for my tastes. The first thing I did after that was the tires of the arty and mech inf and the tracks of the tanks. The tires were pretty difficult to perfect with even circles, but after a but of tweaking I got it to the desired look. I used the sharpened skewer, as a brush isn’t stiff enough to get the tight cracks and smooth lines. As you can see, especially on the arty, there were stray black paint marks, but I went over those later with either a sand color or a gunmetal gray for the mechanics of the artillery (Does the silver on the arty look good? I tried it out just for kicks. Let me know if I should do it for the European Italian units).
I didn’t really like how plain the tanks were, so I painted the things on the back (they appear to be barrels, but they may be bundles of supplies) brown to add some interest and variety. For the mech inf I painted the jug of gasoline, the entrenching shovels, and the headlights/mirrors on the front to add the same variety. (they were part of the piece, but its optional to paint them)

A quick note on the treads (Frame 3). I don’t know how well you can see the grey, but it shows up more in person. If you did this by hand, painting each individual line it would take forever. So basically what you do on anything with clearly defined or raised parts is…yep, you guessed it, drybrushing. I painted the tread brown, then selected a relatively stiff brush, and got started. Get the brush tip wet with some pain, then dry it almost completely off on a paper towel until you can barely see any paint coming off. Then do a rapid back and forth motion over the length of the treads…if you don’t see it at first, give it a sec and keep doing it- it will show up surely enough. By having little paint and doing it quickly you are ensuring the paint only comes off on the raised surfaces… ideally the tip won’t touch the depressions in the treads at all, only the raised parts.
Next it was time for the division and platoon markers. I did this because it
1. Fills up the empty space on the side of the piece
And
2. Gives the pieces more character in my opinion. It is cool to see the different pieces with its own unique something. You may find yourself cheering on your HQ “black and white stripe” mech inf in the battle for Alexandria because it has withstood the enemy fire- it is now an veteran piece to be counted on! :-DHere is the site I used. Great site for painting ideas- its a miniatures WWII battle site, but its great for this too. http://www.flamesofwar.com/Default.aspx?tabid=110&art_id=856&kb_cat_id=27
Add the platoon markings, do some touch up, add the Italian flag on the back (merely for identification) and voila!! You’re done. They turned out fairly well if I do say so myself. Keep in mind when you’re painting your own pieces (I need to remember this often!! :-)) that perfection isnt the goal. If there is a slight problem that you can’t quite fix, leave it. The piece should look good from table view (2 ft or so), so it doesn’t have to be an unblemished product. Do your best work, and appreciate it. I can see some flaws in my pieces right now, but it’s not a big deal in the end. They look good from far away, and we’ll have fun with them.

Comments and questions appreciated!! Thanks for reading.
-Spitfire38
-
Hello everyone! It has been quite a while since I have posted in this thread or given you guys any new content. I have still been painting, though not as much recently due to school exams. But now we are well into summer and I will hopefully start doing some more tutorials.
For now, here is my most recent project; the FMG Italian Navy!! If you are wondering, I did not purchase the whole FMG set- I bought bits and pieces from HBG. I DID NOT buy the DD, sub, commander unit, medium tank, truck, and I think that’s it. So the DD and sub in these pics are not the FMG molds. I don’t have a tutorial about these, but if you have questions, feel free to ask. And as always, enjoy!!
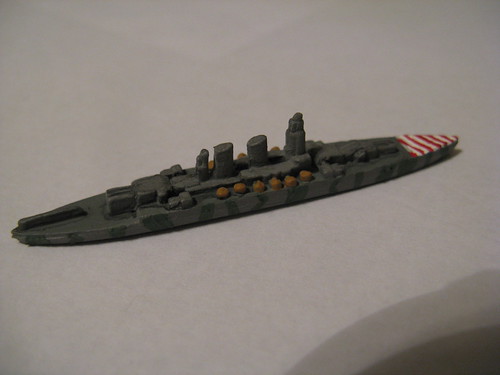
The Italian Battleship
The Italian Aircraft Carrier. P.S. I really like this deck color- every time I can mix a color straight from my head, I love it :-D

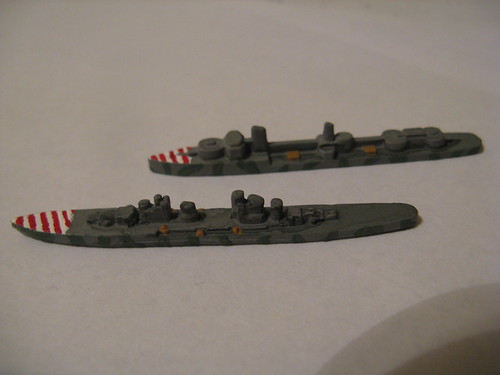
The Italian Cruiser and Destroyer
And last but not least, the Glorious Regia Marina
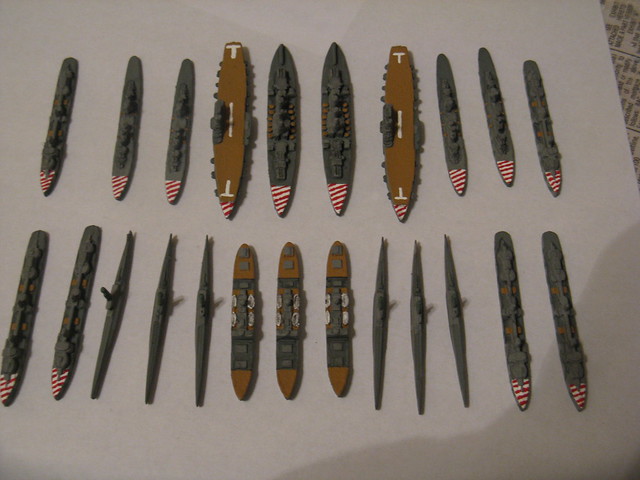
Note: The Italian subs will probably have an addition of a few colors to differentiate them from the US sub scheme.
Does anybody have any advice for taking good quality pics of pieces? I have tried a few methods and gotten mixed results. Any help would be appreciated.
–-----------------------------------------------------------------------------
Next up I’m trying my hand at terrain basing for units!!
I am going to be using some HBG Axis Minor Infantry units I purchased ($5 for 100 infantry? YEAH) to try out terrain basing. Ideally, once I get good, I will mount some pieces like tanks and trucks on a chip with gravel/grass/sand to make a terrain piece that can be used on the board… that would be sweet!
Does anyone have any experience with terrain pieces? Viracocha, I know you have done this on your AA50 pieces. Any input from anyone would be greatly appreciated! After all, this is a community thread for all to benefit from, so any knowledge is great :-)
-
Hey man - those look awesome! Love the BB especially.
In regard to the terrain basing… I use any and every (mostly for train sets, from turf to fine gravel) I try to stick to limiting certain types/colors consistently with one nation, makes it easy to ID at a glance (ref. my AA50th). But I do mix them up for ‘spotting’, these I haven’t posted yet. I call it spotting when I take some larger clumps/higher scale(?) of terrain and only put a bit in one spot - gives it the look of a bush or small tree. As far as applying any terrain, I simply sprinkle it on when the base paint is still fresh, the base paint being a color close to the nation’s color. No worries when/if you apply a clear coat, it helps. If you decide to try out some of the ‘thread like’ grasses that say… Gamesworkshop puts out, it’s a little more involved (well, at least I make it that way). After you sprinkle the threads on you do one more step, hold the mini upside down and tap it, I also brush the threads upwards around the base with a finger or a brush. This way the majority of the threads stick up like real brush. On my AA50th set I covered even the sides of the bases (and I didn’t use any thread grasses on them), but I kinda prefer to leave the sides of the bases their original color now (hindsight :| ). Hope that helps… let me know, I can try to explain further if need be.
-
No, that’s great info; thanks! I suppose I should just try it out myself to get the hang of things :lol:
-
Yeah, honestly, hands-on is the best way to go. Judging from the splendid detailing you’ve already done, should be a cake walk for ya with some cool looking results.
-
Enjoy!
So yesterday I whipped up some infantry and then practiced terrain basing…WOW, was I pleased with the results!!
Here are the materials I used.
1. Cut out egg container- This is what I used to make the glue mixture… you can use something else if you want. If you DO use the egg carton, make sure there are not small holes in the bottom, as many sections have 2 small holes. I figured it out the hard way a while ago- paint wash all over my desk :-P
2. One fairly stiff brush- This brush should be one you do not cherish, and it should be a little bit stiff, so you can paint glue where you want it.
3. Some terrain- Pick what you want. I went to Hobby Lobby for mine… $8 total. You want it to be pretty fine.
4. Tacky Glue- I would actually recommend PVA glue, but I couldn’t find any. So I used this. Its dirt cheap too.

To start out, make your basic infantry pieces. The only difference is, the base of the piece needs to be the color of the terrain you’re applying. (Oh, by the way, I figured out, the darker and more liberally you apply the paint wash, the better the pieces look IMO. just go back over the flesh and the gun, as those are parts you don’t really shadow.)
Desert/Sand- Light brown or tan
Grass/Forest- Olive Green
Dirt/Rocks- Brown
Cobblestone/Gravel/Urban- Grey
Seasons- White (Snow), Burgundy (Autumn), etc.Here are pics of my infantry. I painted them in 4 hours, which was actually remarkably fast, and they turned out to be my best work yet IMO.

Next, mix some of the tacky glue with a little bit of water… use your discretion. You need to stir it with a wooden skewer or your finger or something like that. You basically want spreadable glue. But not too much water!
Next, apply the glue to the base liberally. Here is a picture… sorry for the bad picture, but I don’t know how much I can show, besides the fact that the glue has beaded on the bristles, and it is still globby sort of.

Now, quickly spread the glue around the base liberally, then sprinkle the terrain all over the base; put a lot on, because some will fall off. If it’s too clumpy, crumble it between your fingers while you do it. OR, just as effectively, you can dip the piece into the terrain materials. See pics for examples.


Tap the pieces, brush off any excess around the base you don’t want, do some touch ups, and voila!!
Here are the final product. (The grey pieces I tried to paint, but they weren’t secure enough, so I couldn’t really get it to work… I’ll figure out a solution.)
The usual disclamier…things always look better in person, but here they are!
-
I must say sir, you have some fine minis there :-D Love the collars and your terrain turned out pretty cool. I’d suggest trying the terrain material labelled as ‘fine’ as well, has a dust - like appearance.
Interesting that you used a glue mix, how’s the finish look on that? Something that can’t truly be gleaned from photos online… I haven’t tried that because I was worried it would come out too shiny. No? Wondering because I just sprinkle directly on the base paint and it seems to hold.
Hope you don’t mind me posting these here, but I think images of the ‘threads’ kinda terrain exhibits better than my previous explanation.
-
WHoa. Those came out a little too big on the zoom. :roll: But you get the gist.
-
Post away! I am appreciative of the input.
Well, the glue dries perfectly clear. There is no problem with a shiny finish. I need to figure out something that holds better. If I used finer material, it would stick much better!
Haha yes, it did come out quite large! Interesting…I’ll have to try the fibers. It would look more realistic for fields, the Russian steppes, etc.
-
For those who want to see Viracocha’s pics, right click and open them in a new tab. its a good size then
Suggested Topics


