Great work, Bierwagen!
And thanks for the updated map, IL :mrgreen:
Great work, Bierwagen!
And thanks for the updated map, IL :mrgreen:
@Imperious:
So now with the map below you got 72x36 rather than 45x23
Phase 1 map:
http://www.mediafire.com/?amzmjhoi5uv
I like the work you’ve done on this map IL. I downloaded it from a post you made in another thread before AA50 came out and was wondering if you had made any changes that may have been initially wrong. What I mean to say, now that the game has been released (and I assume you have copy already [or several]), have you double checked to make sure everything is correct on your map?
Thanks for the time you’ve put into this. Knowing that I can get a big map so soon after AA50 has been released is a godsend. I’ve been so spoiled with my big AAR map :-D
I hope I’m not going too far of topic with this:
Just say I have 3 infantry to place in China. If one territory already has 2 infantry, would I be able to place all 3 reinforcements in that territory (since it had less than 3 units), or would I only be able to place one unit in there (bringing the total to 3) and have to place the other 2 elsewhere?
The latter is the way my playgroup has been doing it, but we just want to make sure that’s the way the rule is intended.
Cheers
Do you just take all the money that power collected at the end of their turn?
Yes, that’s right. The player must give you all the money he has once you capture his capital.
i think its more of a 1/6 lol and if u spend 30 ipcs on rockets chances r 6/6=1 you will ge rockets lol.
No, Rakeman is right. It’s a 1/6 chance to get some kind of weapon development, then (after you choose which set of six weapons you want to roll for - there being two charts of six weapons each) another 1/6 chance to get any specific weapon development, therefore 1/36 to get Rockets.
That is bloody awesome!
Thanks for passing on the info mate
@Imperious:
Mediafire.com its the best
Cheers mate. That site is extremely hassle free.
Here’s the big map file:
I just want to state for any future readers that this map is the work of Bionic Donkey who put in many hours to give us this map. Cheers to you Bionic Donkey if you ever read this.
.
If you know of a decent file sharing/hosting site I can upload it for you.
@Cmdr:
Are the fighters “cargo” on England’s Carriers or are they airborne?
I’m not sure what you’re talking about with England carriers (?).
@Cmdr:
If Japan attacked the sea zone, the fighters would be able to defend the fleet. Therefore, I would lean towards the latter and you have to engage the fighters in that sea zone and cannot by pass them in combat move phase.
But if you allowed that precedent, wouldn’t that mean that any time that a friendly fighter flew over an enemy land territory holding an enemy fighter that they would have to engage in combat?
@ncscswitch:
ANY enemy FIGs in a given sea zone or territory are ignored if they are just being “flown over”
Although this is a partial answer to what I need, I never mentioned that there were any fighters in the fleet.
@ncscswitch:
The ONLY unit that you have to worry about in a fly over is enemy AA, and then only during Combat Movement.
This is what I need. Thank you.
A&A Revised Rulebook, page 12.
“Air units (fighters and bombers) can fly over hostile spaces as if friendly, but they are subject to the following special rules.” The main special rule is AA guns, which would not be present. Therefore, your fighters can fly over the fleet without engaging in combat.
And this is what I specifically need. Thank you even more.
I’ve misplaced my rule book and need to know this for my current game.
If USA has a fleet in the seazone west of Japan, can Japan fly fighters over that fleet to attack Manchuria, or does the fleet effectively block that move?
I’m not sure what you mean by playing without markers. There are markers on the board – or do you mean using that marker chart to track IPCs?
[EDIT: I just realised you mean the chips under the units that count as one or five of that unit, depending on colour. I prefer to play without them if possible, it adds to the aesthetic value and it makes it easier (IMO) to remove individual units that die during battles]
In regard to paratroopers, I am sure pretty much everyone here wouldn’t like using our rule since it makes the game unrealistic, but we use it because we have found it to be more fun. It opens up so many more strategies, and you always have to be alert as to what the enemy can threaten you with. That’s why there are so many men on the board – leaving a territory empty is asking for an enemy paratrooper to take it without a fight.
You are right that you could add specific rules for paratroopers to make it more realistic (like the rules you’ve suggested in your post) but we like the simplicity of our rule whereby a paratrooper can be dropped anywhere that the bomber can make it without needing to worry about the question of supply.
In any case, it is extremely rare that a paratrooper will be dropped into a territory that is cut off from the front line. Generally they are used to bolster numbers in an attack on the enemy’s front line, or to attack the territory just behind the front line while the main army attacks the front line itself, creating a salient into the enemy’s territory.
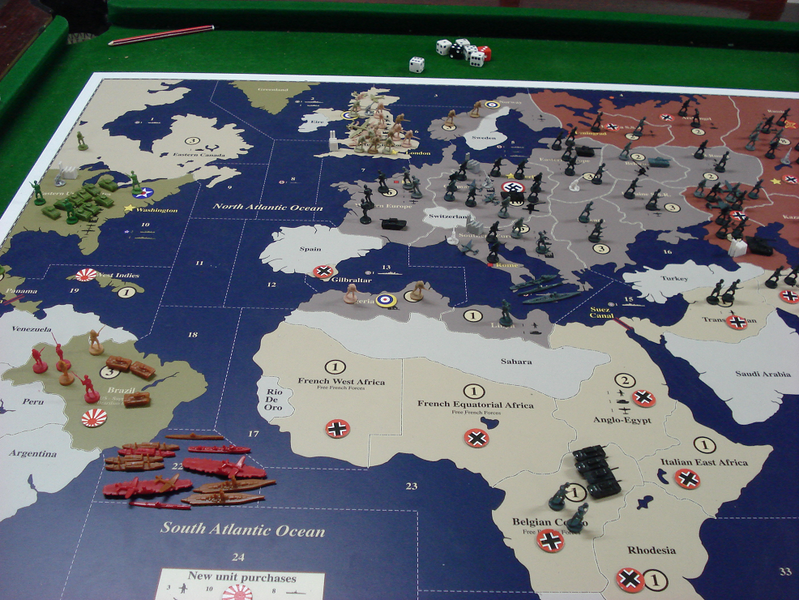
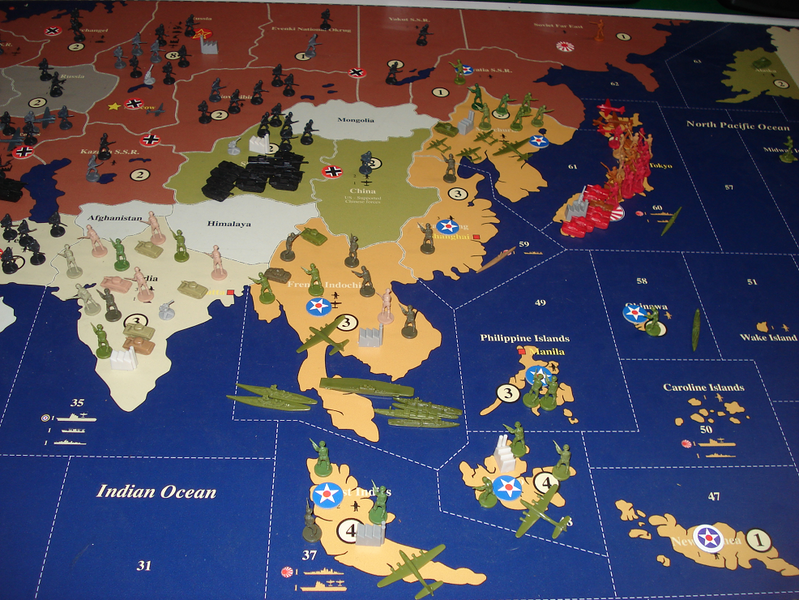
That Jap fleet came through the Panama Canal and took WI. They then headed South to capture Brazil. On the turn after the picture was taken, the Jap fleet linked up with the Kraut fleet in sz12 and Germany bought a factory for Western Europe. The following turn both fleets moved to sz6 and Germany pumped out 10 transports over 2 turns with the objective to take England.
By then USA was poised to invade Africa, whereas Africa was poorly defended by Germany. I decided to forego the invasion of Britain because once captured, all of those African IPC’s would go to USA when they began their African campaign. Instead I planned to take my fleet (and 20 transported units – a 1/1 split of tanks and inf) south to either help in defending Africa, or to head to the Pacific and give some aid to the Japanese.
So I moved south to sz12. USA wasn’t paying attention and failed to place enough units in E.USA to defend against my 20 units, so on my next turn I took E.USA and ended the game.
@ IL
It definitely isn’t a joke picture. My mate (who was playing the Allies) doesn’t like to give up, so he’ll keep playing well after you or I (or any sane person) would have given up.
Here’s a couple of starters for ya.
Me and my mate play with a para-trooper house rule, so you’ll notice there are more bombers than you’d normally purchase.
East
I’ve never played AARe nor looked through the rules, so this BB fix that you guys are talking about has piqued my interest. Can you explain exactly what it is/how it is different to normal AAR battleships?
Cheers
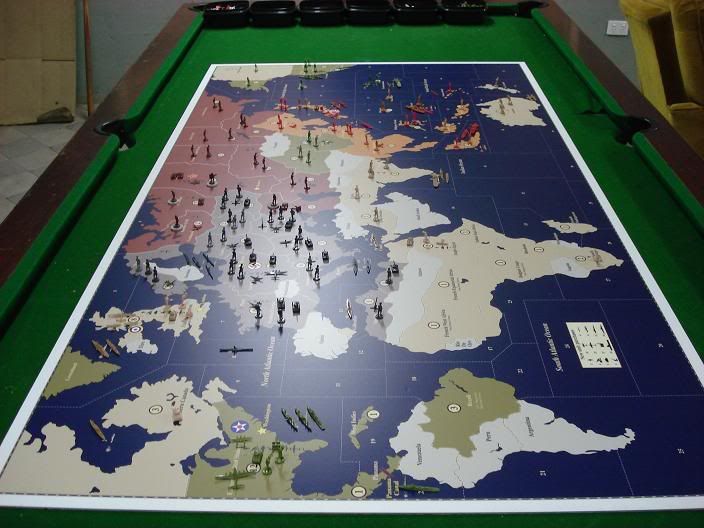
I also downloaded the map from Bionic Donkey. Like General Steiner, I live in Australia so I decided to get it printed here instead of having Bionic Donkey ship it over.
I got it printed on 5mm PVC with a matt laminate. The PVC is pretty flexible so it adapts if you have an uneven surface (for instance, if you had to put two tables together to have enough room for the board). The matt finish is to diffuse any glare on the board coming from over head lights (I have many over head lights downstairs where the board is set up).
The best thing about this board (other than the size) is that it has the unit placement marked on the board which makes it so much faster to setup. And I must say that playing on this board for a couple of months warps your perception of the original board. I look at that board and wonder how I managed to fit all the units in those little territories before. This big board is a luxury, and I’m spoiled.

@Rakeman:
Or is there a place online I can get a high quality version to print out?
You can download a high res map from this site - the link is down the bottom of the page.
The map is 4 times the size of the original though (36inch by 66inch) so you’ll have to have your local printers resize it if you want the board the same size as the original.
Thanks for the quick reply, Frimmel. Your help is much appreciated :-)
I got this game last week and I’m having some trouble wrapping my head around some of the rules.
Are the units that fought in combat allowed to move during the movement phase, or is the combat considered as their movement for that turn?
When attacking a hex with supplies, does a hit on the supplies mean that only one supply token is destroyed, or is the whole stockpile destroyed?
I’m sure I’ll have some more q’s once I play through the game for the first time…