@Gallo:
- The Game turns should be WE-GO instead of I-GO-U-GO
Is this like Diplomacy where all moves are simultaneous? Would be interesting, but it would void the difference values used by attacker-defender.
@Gallo:
- The Game turns should be WE-GO instead of I-GO-U-GO
Is this like Diplomacy where all moves are simultaneous? Would be interesting, but it would void the difference values used by attacker-defender.
Your favortie… Home Cheap-o!
WolfCraft 1/2" RH Plugs. 25/pack. #2957.
I centerbore them with a dremel tool press (n.b., so they don’t split) and then tap in a number #10 wire braid (e.g., 1.5") for flags and bombers. Fighters are mounted on a #17 - 1" braid.
I use 1/4" washers - 100ct #19822. They have a nice weight. However, with AA50 I switched to just using pennies. It’s cheaper ;-) A washer is $.0345 vs $.01 - though they are a little bigger.
Anyway, after it is assembled I spraypaint it all black with the Home Cheap-o $.99 enamal special and bada-bing-bada-boom nice shiney black flagpole/airplane stand.
Flags are just printed on label paper.
Enjoy!
Like I said previously I can’t take a digital photo to save my life, but here is some of my British 8th Army. I mount them on washers so they have a nice feel and color code the washers.
http://www.mediafire.com/imageview.php?quickkey=rxoy0mf9umx&thumb=5
I’m always amazed at step #1. SPRAYPAINT MY PEICES… are you nuts!?
But this is the magic. When it dries it shrinks and creates a flexible shell around your plastic figure. You lose none of the detail. This shell means you can bend the rifles (e.g., the Japanese are the worst offenders) and the paint doesn’t flake off.
So now you can paint this flexible shell with acrylics and it sticks very very nicely. Finally, the Minwax puts another protective shell around your acrylic and you can step on these figures and they are still o.k.
My group is very rough on my figures but they weather the beating very nicely.
Seeing all the hard work you’ve put into your figures you should give this method a try. You won’t be disappointed.
Enjoy!
One note you will see if you look closely at the photos. The paint is fairly soft, and the molding process leaves a finish that is not best for the paint. The paint has started to come off on the corners a bit. It isn’t a big deal but keep that in mind. I suspect there is someone out there that may know a pretreatment that would help the paint adhere to the soldiers even better.
Thanks for sharing your labor of love Dinosaur. Great work. I’d never painted plastics before either, so it took some research and some dabbling… here is one of the best articles I found that sums it up.
http://www.boardgamegeek.com/thread/183861
– article – (and to whoever wrote this… thank you!)
I’ll copy here the same thing I always post about painting the plastic men up for our Descent game, since we use the same technique for any plastic gaming miniatures we paint up.
Just insert the word “T.O.I” or “Memoir '44” for “Descent”. Indeed, someday I have to get around to painting those up, too!
////////////
My wife generally does our miniatures painting (she is really quite good), but for our Descent game we went with a tried-and-true, newbie-friendly method so that I could give her a hand, and still get nice results.
Plus, we’re cheap, old-school gamers. We don’t like to pay money if we don’t have to.
Step One: Primer
Use White automobile primer, no-name brands from low-cost stores like WalMart, etc. Coat lightly, but evenly. The masters don’t have to be pure white (they’ll wind up looking kinda pink-ish). Don’t worry. You just want enough primer for the other paint to stick to.
Step Two: The Paints
Use acrylic craft paints, like “Apple Barrel” paints, from low-cost stores like Walmart, etc. Don’t buy them at craft stores, or you’ll spend too much. Each tube of paint runs about 50 cents, and ours have lasted years and years. However, for metallics (like for chainmail, bronze, etc.) we still find that the standard miniatures paints are a little nicer.
Step Three: The “Dip”
For Descent miniatures, we opted to go for the “Dip” method, or “Magic Dip”, as it is sometimes called.
What is this magic dip, you ask?
Minwax light- or medium-brown wood stain. Yes, wood stain. I know, it sounds crazy! A little can, costs about 2 dollars, lasts for years of projects.
Some people actually “dip” their entire miniature in the stain, then wick off the excess. I find that a bit much, so instead we just paint it on with a brush.
The Dip Method:
a. When painting, paint broad general colours over things, but paint them in lighter tones than you normally would. So paint the beastman skin a light flesh tone, paint his loincloth a light red, leave his hair primed white, paint his sandals light brown. He looks cartoonish and ugly so far, with just general bright colours, and no details.
b. Brush on Minwax wood stain. Light/medium Brown colours work well, because they don’t darken the original paint too much. IF you want more black colours, make it a very light grey/black, or you’ll just stain the whole thing black.
The stain flows over everything, but then runs into the cracks by preference. It acts similarly to an ink wash, but with slightly different (and useful) results.
The wood stain tones down the colours (that’s why you painted them lighter than you would’ve normally), blends them, blurs the edges between each broad colour band. It also fills in the cracks with dark colour, making the details POP out instantly. Finally, it coats the miniature with a nice protective coating.
It really does blend the colours together. Our Hellhounds were painted with broad bands of 3 shades of brown, then stained, and suddenly they looked all blended and shaded, but with the cracks filled in an the manes completely detailed out. It is truly nifty to watch!
If too much stain has pooled in one spot, use a small piece of paper towel to wick off the excess easily. Check the miniature every few minutes, to see that you’re getting the results you want.
Let the stain dry completely, until it is no longer tacky. This can take a full 24 hours for some miniatures, but we’ve managed to paint miniatures just an hour or so after staining.
c. Now, go back and drybrush on a few last details. Drybrush teeth white (but leave those cracks filled in brown/black, so the details still stand out nicely). Drybrush chainmail with a nice metallic silver. And so on. Just pop out those last few details that you want to call attention to.
d. Clear-coat with a dull/matte acrylic clear coat protector. This will stop the paint from chipping through extended use.
/////////////
“The Dip” is fast, simple, easy, and gets results! I can’t paint a miniature to save my life, but I’ve managed to paint up my descent miniatures quite nicely. Of course, for truly nice work, I hand them over to my wife for detailing. However, for the general monstrous-type miniatures, when I just want to paint them quickly-yet-prettily, this method can’t be beat.
“Magic Wash” method (an alternative to “the dip”)
Another method is to use “Magic Wash”, which is a mixture of 4 parts water to one part “Miracle Floor Wax”, then mixed with paint. This forms a paint wash, which you can use instead of “the dip”, but with a similar sort of aim. You can customize the hue, tint, and colour to your heart’s content, wash it over your figure, and it’ll seep into the cracks. Make your Wash colour nice and dark (darker than what you’re painting), and it’ll also harden up ever so slightly when it dries (that’s the plastic wax component of the Miracle Floor Wax) to form a mild protective coating on your miniature.
Either method is quick and easy and cheap.
Those 15mm Oldglory miniatures really do turn out well once you get them painted up IL. Nice work.
Intriguing! Enjoying your stasticial analysis here.
However, there is a small fly in the ointment – in AA50 CVs defend at 2.
Bomber vs Aircraft Carrier = (4/6 * 13) - (2/6 * 12) = +4.67 IPCs
Makes them even more enticing.
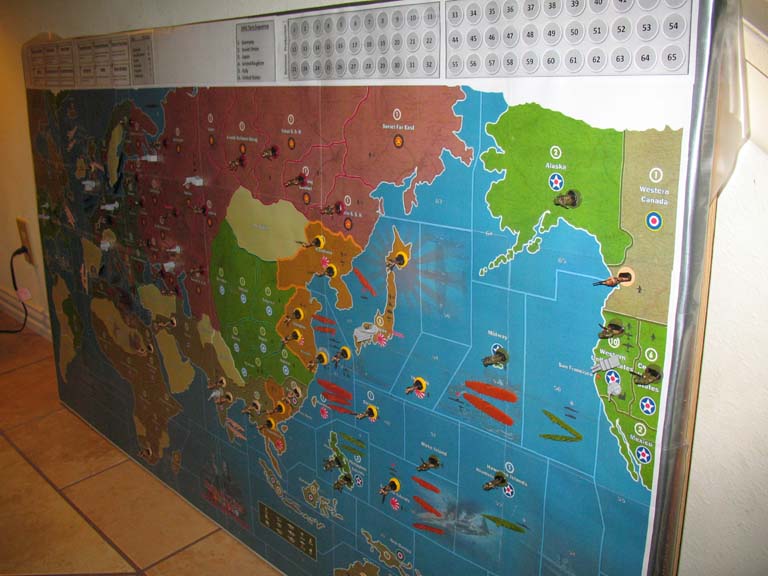
See my previous post http://www.axisandallies.org/forums/index.php?topic=12823.msg357475#msg357475 (I posted a picture of it being built).
I put a layer of sheet metal underneath my map so I can hang it on the wall at work. I’m putting neodymium magnets on all my pieces & chips. So now we can play at the office over lunch breaks, hang the map up when lunch is over, and keep the board is set up and ready for the next lunch break.
Exactly!
I use MS Office Publisher and use a .2 overlap. Gives you some wiggle room when slicing and dicing. I tape the back of it together and then use clear contact paper over the top. It comes out very nice. This is my third board and every time it gets a little easier.
24’ x 18" of clear contact paper is like $6-7. I mount it on hardboard with a frame which runs another $20 or so.
Too many fun boards out there to try out (e.g., AARHE) to sink $200+ into each one before they are stabilized.
I can fit two of them nicely in the back of my Toyota Corolla and schlep to all our gaming events. Once you play on a big board, there is no going back.
The magnets are a bit pricey, but it was worth it for me.
Unfortunately, I haven’t seen any games under 7 hours either. Ours actually tend to roll longer… lots of drinking and smack talk involved.
Afternoon Dinosaur,
I’m really into this as well. Nothing quite says “bring your A-Game” like a custom painted army. I’m digital camera impaired so I haven’t been able to get any good photo’s to post.
Being new to painting plastics, my best discovery to date has been the “secret sauce” = MinWax PolyShades satin 340. Not only does it do a fantastic job of highlighting all the cracks and crevasses, but it gives them an incredible protective coating.
I played the US last night and had some interesting success with dropping 2 planes into Australia on US1 (e.g., Hawaiian Island & sz44). Japan’s attempt at Australia on J2 was denied, and so I followed up with 2 more fighters to Australia on US2 while the previous ones left for India.
These 4 fighters managed to harrass Japanese shipping quite effectively while the US was building a fleet (n.b., which is an incredibly slow process trying to compete with the Japanese air force).
I like the bomber idea as well. Unfortunately, I had sent mine to SBR Germany in a knee-jerk KGF reaction. That toy would’ve added some extra punch. I’ll continue to experiment with this one and see how it pans out.
Sadly, the axis surrendered before US & Japan fleets could engage so I never saw the outcome of it – but it looked promising.
IL’s method works beautifully if you just want a single color change.
The cheap spray cans are a must!
I get the old .99 cent one from any of the local hardware stores.
The spray enamel paint shrinks when it dries so it creates a flexible shell around the figure.
If you are into detailing them, you can then paint them any color you like with acrylic paints. Finally, seal it with MinWax polyshades (i.e., antique walnut satin 340) to give it wonderful highlights and a protective coating – works wonders. They can really take a beating.
Thanks Axis_roll.
I thought my dotage was kicking in again, but in order to keep the peace I just smiled and agreed to get some further clarification.
Evening!
Question for the rule lawyers out there.
The new AA50 rules don’t prohibit you from moving land forces to reinforce a territory that you just finished capturing in the combat phase. In fact, I can’t find any prohibitions to it in my copies of LHTR 2.0, AAR, or AA 1986 rules.
When I tried to perform this maneuver tonight even my ally told me I wouldn’t be allowed to do it.
Any insights appreciated.
IL,
Thanks for your hard work in creating this outstanding map file.
I love the out of the box board – it is quite the fantastical upgrade from all the other products. However, after playing on it several times I can’t do it anymore. I’m spoiled! After using all your giant AARHE maps and Bionic Donkey’s AAR I just can’t go back to “all that cosmic power… itty bitty living space!”.
It was driving me crazy.
So, I did it on the cheap again and printed it off using 8.5 x 11". Assembled together on a frame with clear contact paper to cover and protect it. This time though, I put a layer of sheet metal underneath so I can hang it on the wall at work. I’m in the process of putting neodymium magnets on all my pieces. – and it’s turning out quite well. So now we can play at the office over lunch breaks and keep the board set up.
Here’s the first prototype.
Thanks again for the effort.
Enjoy the day!
Unfortunately, we hardly play AARHE anymore due to the quibbling over the rules.
oh…sad to hear
is it like because its still changing
or because of my language
or the complexity of the rules?and AARHE: lite is only 4 pages
Evening all!
Yeah, the thing that annoyed them was every month I’d come to the table with new rules. It was driving several of them nuts. The rest of us loved it. We learned, regrouped, asked some questions, came up with new ideas and gave them a whirl.
But, for many in our group of 10-12 they a new to the game and wanted a stable baseline to get used to. So, I gave in and we went for Caspian Sea trounament rules – basically OOB with 4 minor clarifications. The goal, get everyone to be able to play a game within 4-6 hours.
Now AA50 is here and it’s the latest gizmo. So, once we burn our fingers on that I’m sure we’ll start poking sticks at AARHE again. There are several of us who really groove on it.
OldSalty: Glad to see your still in the thick of it. I hope to rejoin you soon enough. Thanks for all the help researching pieces and rule.
That’s similiar to what they used in the Diplomacy game. Thanks for the pointer. I couldn’t figure out where I could get some of those bindings.
You’ve found them at an office supply store?
My group really despised subs as well. It was the most common complaint. Of course, I usually played Germany – and never had any issue with it ;-)
I don’t know what they were whining about?!
Unfortunately, we hardly play AARHE anymore due to the quibbling over the rules.
It’s a fantastic piece of work though, and I’d love to see some it integrated into AA50 when all the fuss dies down.
I really think sinking that BB/AP in sz2 is a must.
Unfortunately it pulls the bomber off of the Egypt raid. I can’t seem to figure out a good attack on Egypt.
The German bombers are amazing. With all the crazy money flowing around I built a bomber per turn and had a huge strike force that was able to keep the Atlantic free of UK/US shipping for several turns.