

This is a great alternative set up for 1942 anniversary game . Love the turn order and how the Americans right off the bat get action in the pacific theatre. I have played this set up twice and have seen the axis and allies both win a game. I can vouch for this scenario as I had a blast playing it. If you want more pieces and naval action quickly in the pacific then give this one a try.
1939 Scenario for the 1942.2 Map and Pieces
-
You have some flexibility, Young Grasshopper, but not much. Let’s say you try a January 1, 1943 start date.
At that point, the Americans had already gained naval dominance in the Pacific at the Battle of Midway back in the summer of 1942, and the Americans were massively outproducing the Japanese all through the summer and fall of 1942, so the Imperial Japanese Navy is going to be outnumbered roughly 2:1 vs. the US Pacific Fleet if you want any kind of historical realism. What the Japanese still had going for them was control of a middle and inner layer of defensive islands – you could give Japan some infantry and some land-based fighters on Iwo Jima, the Mariana Islands, Palau, and New Guinea, and you could leave the American transports back in Hawaii or even San Francisco, to show the difficulty in transporting troops over the entire Pacific Ocean.
In Africa, the Allies have seized Morocco, Algeria, and Libya. You can leave Tunisia in German hands, but it wasn’t held very strongly – it’s not really a useful beachhead; the Germans couldn’t afford to reinforce it, much less counterattack, without dangerously draining forces needed to occupy France or occupy the Balkans. Even if you leave the Germans in Tunisia, with American, British, and French forces all converging on Tunis, it’s only a matter of time until Germany gets pushed out of Africa.
On the eastern front, the Germans were crushed at the battle of Stalingrad, but they still held Rostov and the Caucuses in force, which makes for an interesting opportunity for the Germans to push forward. In real life, the Germans sensibly retreated from the Caucuses, but they could have doubled down with their last remaining reserves on the eastern front to try for Round 2 in Stalingrad, or to try to break into Persia and Iraq. The German front line at the time would have been something like Baltics - Belarus - Bryansk - Rostov - Caucuses. It’s a good front line, but the Russians are mustering a very large counterattack that will almost certainly break that line. The Germans could plausibly take Leningrad, Stalingrad, and maybe even Persia, but even if all of those battles went well, they would not have any realistic opportunities for breaking through to Moscow for at least another 4-6 turns, by which point the Allies are almost certainly sitting in Paris and Rome and threatening Warsaw.
The Japanese could plausibly have crushed the Chinese resistance in 1943 if they had poured additional tanks into the region instead of reinforcing their barrier island chains; it’s unclear if that would have had any serious effect on the defense of Moscow. As accurately reflected on the 1940 Pacific map, Moscow is 7 turns away from the Japanese industrial complexes on the eastern coast of china – even if China were totally undefended, it’s hard for Japan to move significant forces all the way through China and into Russia.
So, long story short, I think you could make an interesting game out of a January 1, 1943 starting setup, but you would need different victory conditions to give the Axis a chance at winning – maybe an economic victory condition, like the Axis win if they control 100 IPCs (I have no idea of the proper number), or something like that. The Axis could have made some major economic gains against the allies if they had a good year in 19432, but they just aren’t in a position to realistically assault more than a couple of victory cities in January 1, 1943, let alone in a position to conquer any Allied capitals.
-
Good assessment of the general war situation that existed in 1943, Argothair. For an A&A game to be set in 1943, it would have to take one of two approaches: either realistically model the situation that existed in 1943 (meaning that the Axis would be in a worse starting position than in 1941 or 1942), or it would have to be some kind of alternate-history scenario (which could achieve game balance at the price of historical accuracy).
That being said, 1943 does fall within the middle phase of WWII, so the date might still allow for a decent slugging match. The period from 1939 to about mid-1942 was the period when the Axis was in the driver’s seat. During 1944 and 1945, the Allies were clearly in the driver’s seat. The period between those two time brackets was the “deep war” phase during which, from the Allied point of view, the Axis advance had been checked and partially rolled back but victory was by no means yet certain. In Europe, Germany still had some strategic options open to it (as Kursk in 1943 and the Battle of the Bulge in 1944 were to show), but those options were much more limited than in 1942. In the Pacific, Japan was in a somewhat worse position (it made no land conquests after its failed attempt at Guadalcanal), but it did have the resources for two major rolls of the dice at sea: the Battle of the Philippine Sea in June 1944 and the Battle of Leyte Gulf in October of the same year.
Assuming one were trying to model historical reality accurately for a 1943 scenario, it would help to start as early in 1943 as possible because the problems for the Axis got worse and worse as the year progressed. Just off the top of my head, I’d say that if I had to design a 1943 scenario, I’d pick February (specifically February 10) as my starting date: 8 days after the fall of Stalingrad and 1 day after Guadalcanal was declared secured by the Americans. Those were two pivotal moments, so I’d choose mid-February 1943 in much the same way as Larry chose to start his Europe 1940 scenario right after the evacuation of Dunkirk. I’m not sure what I’d do in terms of victory conditions or force allocations, but conceptually the date seems like a workable candidate.
-
Those are both great posts, thanks guys… I don’t have time tonight to respond in detail and I don’t want to hijack Argo’s thread, all I can say is the term 1943 “Deep War” would make an awesome game title.
-
Are we talking about the 1939 scenario in 1942.2 or are talking about 1943?
-
@Frederick:
Hey wittmann, good job so far and it looks like Libya and Tobruk are empty are they up for grabs?
They are UK controlled, sorry for the omission. (Remember I was working from a AAA map.)
The Axis have no TTs and Italy’s fleet should not be able to defeat te joint Allied one. That was the plan, anyway!
It probably makes for a boring game for the Axis, unless, like me, you are a weird masochist. -
@Young:
Those are both great posts, thanks guys… I don’t have time tonight to respond in detail and I don’t want to hijack Argo’s thread, all I can say is the term 1943 “Deep War” would make an awesome game title.
Good idea YG – I’ll go have a look at that new thread.
Incidentally, the phrase “deep war” that I mentioned is a quote from Ilya Ehrenburg’s book The War, 1941-1945: “We speak of deep night, deep autumn; when I think back to the year 1943 I feel like saying: ‘deep war’.” Richard Overy quoted it at the beginning of one of the chapters in his book Why The Allies Won – the chapter titled “Deep War: Stalingrad and Kursk.”
-
Does anyone have comments on the 1939 scenario?
I’m glad this thread helped gather some ideas for a 1943 scenario, which is being discussed at http://www.axisandallies.org/forums/index.php?topic=36048.0. I have been contributing to the 1943 thread and I will continue to do so. However, I am also very interested in comments on the 1939 scenario if anyone has them!
Thanks,
Argo -
I like the handling of neutrals and the concept of USA entry is fairly brilliant. I actually wish G40 was conceived with such an idea for the Americans in mind, instead of a hard rules prohibition on US entry until DoW. The chip and roll method seems more entertaining to me from a gameplay perspective.
1942.2 seems a good choice, its probably a more manageable board than Global for a whole number of reasons, and likely easier to adapt for an alternative start date, since the total number of units and territories and player nations you have to manage are all fewer than in the 1940 games. 1942.2 is still in print and more readily available ie cheaper than the 1940 maps.
I also like how you used the factory damage mechanic to represent the surprise onset of war and as a way to manage the pace of the Allied build.
I like 39 for a mod, the appeal is that you get to choose from the outset what sort of warpath to pursue, without getting pigeonholed into an overly historical play pattern. Its cool for the gameplay, since it allows you to explore more what ifs, during the critical opening phases of the war.
-
Ps. The thing I like most about the mod is the detailed write up and rationale for the additional rules.
I would encourage a tripleA scenario! Basically the only thing that you couldn’t handle right now would be the neutral/allied chip idea for USA. Though this could be tracked independently and player enforced (the game has a free dice roll feature which could be used to determine whether USA is at war or not.) The defection idea could also be handled as a free roll, if its 50/50 that’s easy enough on a 1d6, and then edit control of the territory it to the opponent on the fly if they hit at a 3 or less for example. Any value that we can handle with six sided dice, can be achieved with the free roll and then player enforced, whatever the rule calls for.
I’m a bad boardgamer sometimes, in that set-up charts are harder for me to parse at a glance than a visual. And better still would be a visual that I can play haha.
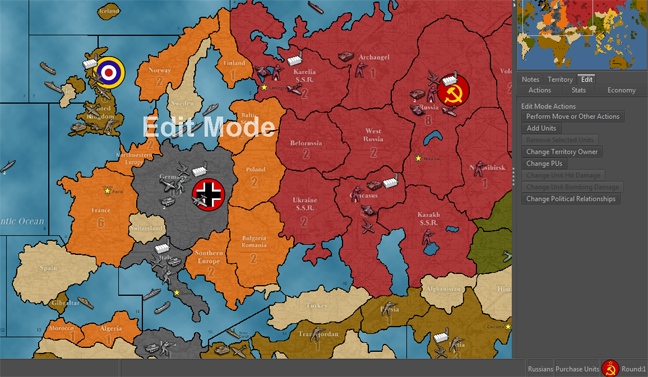
You could draft this up in the edit mode of tripleA, by assigning the desired control of territories to the 5 main nations. Edit mode also allows you to assign any territory to the “neutral” category. Which doesn’t quite capture the full mechanic you’re after but still gives the visual.
Here is an example of what I mean…
image of 1939 edit mod of 1942.2 attached below. I didn’t assign the units or anything, just changed some possessions around in Europe to make them neutral for a quick example. But you could build out the skeleton of the mod using this system and it might help to gather more general feedback, since potential players could check it quickly with the familiar map. :)
Once the skeleton is up, you could probably do the other stuff via xml edits (turn order etc.) to create a functional game that we can beta test or tweak.
39 edit mod.png_thumb
39 edit mod.png_thumb
39 edit mod.png_thumb
39 edit mod.png_thumb
39 edit mod.png_thumb
39 edit mod.png_thumb
39 edit mod.png_thumb
39 edit mod.png_thumb
39 edit mod.png_thumb
39 edit mod.png_thumb
39 edit mod.png_thumb
39 edit mod.png_thumb
39 edit mod.png_thumb
39 edit mod.png_thumb
39 edit mod.png_thumb
39 edit mod.png_thumb
39 edit mod.png_thumb
39 edit mod.png_thumb
39 edit mod.png_thumb
39 edit mod.png_thumb
39 edit mod.png_thumb
39 edit mod.png_thumb
39 edit mod.png_thumb
39 edit mod.png_thumb
39 edit mod.png_thumb
39 edit mod.png_thumb
39 edit mod.png_thumb
39 edit mod.png_thumb
39 edit mod.png_thumb
39 edit mod.png_thumb
39 edit mod.png_thumb
39 edit mod.png_thumb
39 edit mod.png_thumb
39 edit mod.png_thumb
39 edit mod.png_thumb
39 edit mod.png_thumb
39 edit mod.png_thumb
39 edit mod.png_thumb
39 edit mod.png_thumb
39 edit mod.png_thumb
39 edit mod.png_thumb
39 edit mod.png_thumb
39 edit mod.png_thumb
39 edit mod.png_thumb
39 edit mod.png_thumb
39 edit mod.png_thumb
39 edit mod.png_thumb
39 edit mod.png_thumb
39 edit mod.png_thumb
39 edit mod.png_thumb
39 edit mod.png_thumb
39 edit mod.png_thumb
39 edit mod.png_thumb
39 edit mod.png_thumb
39 edit mod.png_thumb -
Hi Black_Elk,
Thanks for the feedback! Unfortunately, I’m not willing to use TripleA or the TripleA xml code – I’m a recovering videogame addict, and TripleA was one of the games I was hooked on last time I fell off the wagon. You, or anyone else who reads this, is more than welcome to transfer my notes into TripleA and/or to play the scenario online. I’m just not going to be able to join you.
However, I’m giving you the next best thing: photos.
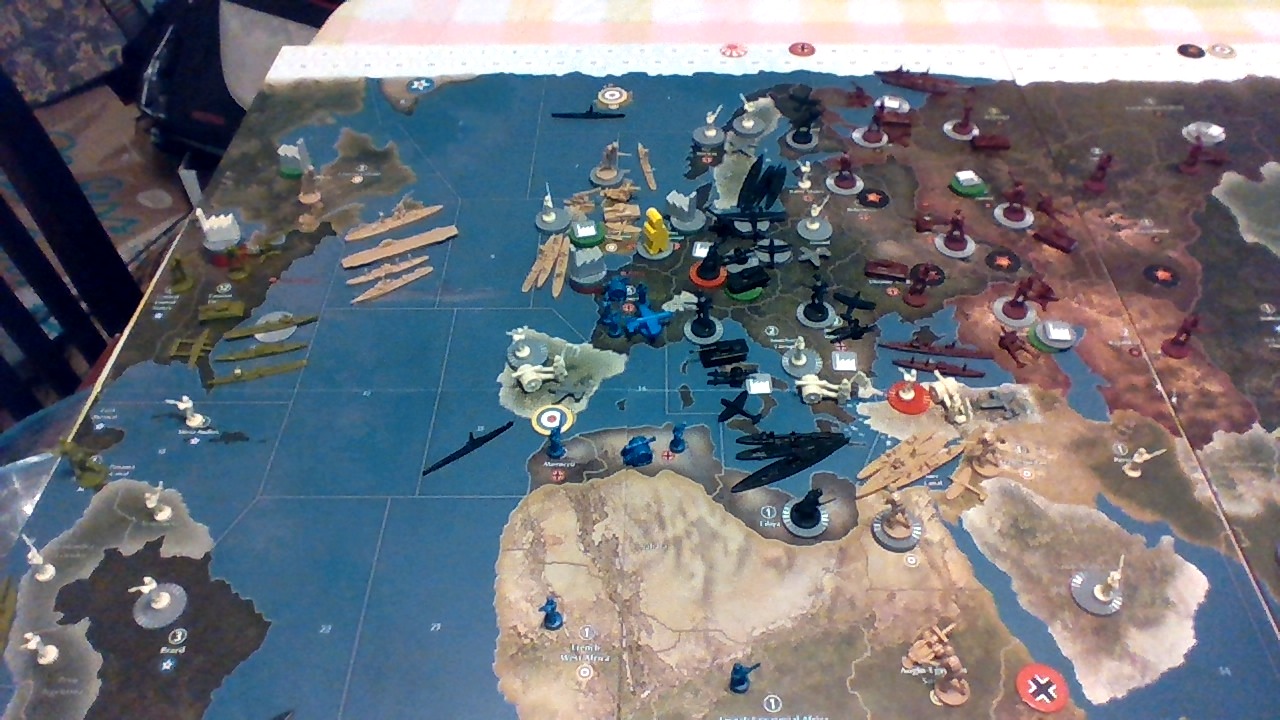

Europe.jpg_thumb
Asia.jpg_thumb
Europe.jpg_thumb
Asia.jpg_thumb
Europe.jpg_thumb
Asia.jpg_thumb
Europe.jpg_thumb
Asia.jpg_thumb
Europe.jpg_thumb
Asia.jpg_thumb
Europe.jpg_thumb
Asia.jpg_thumb
Europe.jpg_thumb
Asia.jpg_thumb
Europe.jpg_thumb
Asia.jpg_thumb
Europe.jpg_thumb
Asia.jpg_thumb
Europe.jpg_thumb
Asia.jpg_thumb
Europe.jpg_thumb
Asia.jpg_thumb
Europe.jpg_thumb
Asia.jpg_thumb
Europe.jpg_thumb
Asia.jpg_thumb
Europe.jpg_thumb
Asia.jpg_thumb
Europe.jpg_thumb
Asia.jpg_thumb
Europe.jpg_thumb
Asia.jpg_thumb
Europe.jpg_thumb
Asia.jpg_thumb
Europe.jpg_thumb
Asia.jpg_thumb
Europe.jpg_thumb
Asia.jpg_thumb
Europe.jpg_thumb
Asia.jpg_thumb
Europe.jpg_thumb
Asia.jpg_thumb
Europe.jpg_thumb
Asia.jpg_thumb
Europe.jpg_thumb
Asia.jpg_thumb
Europe.jpg_thumb
Asia.jpg_thumb
Europe.jpg_thumb
Asia.jpg_thumb
Europe.jpg_thumb
Asia.jpg_thumb
Europe.jpg_thumb
Asia.jpg_thumb
Europe.jpg_thumb
Asia.jpg_thumb
Europe.jpg_thumb
Asia.jpg_thumb
Europe.jpg_thumb
Asia.jpg_thumb
Europe.jpg_thumb
Asia.jpg_thumb
Europe.jpg_thumb
Asia.jpg_thumb -
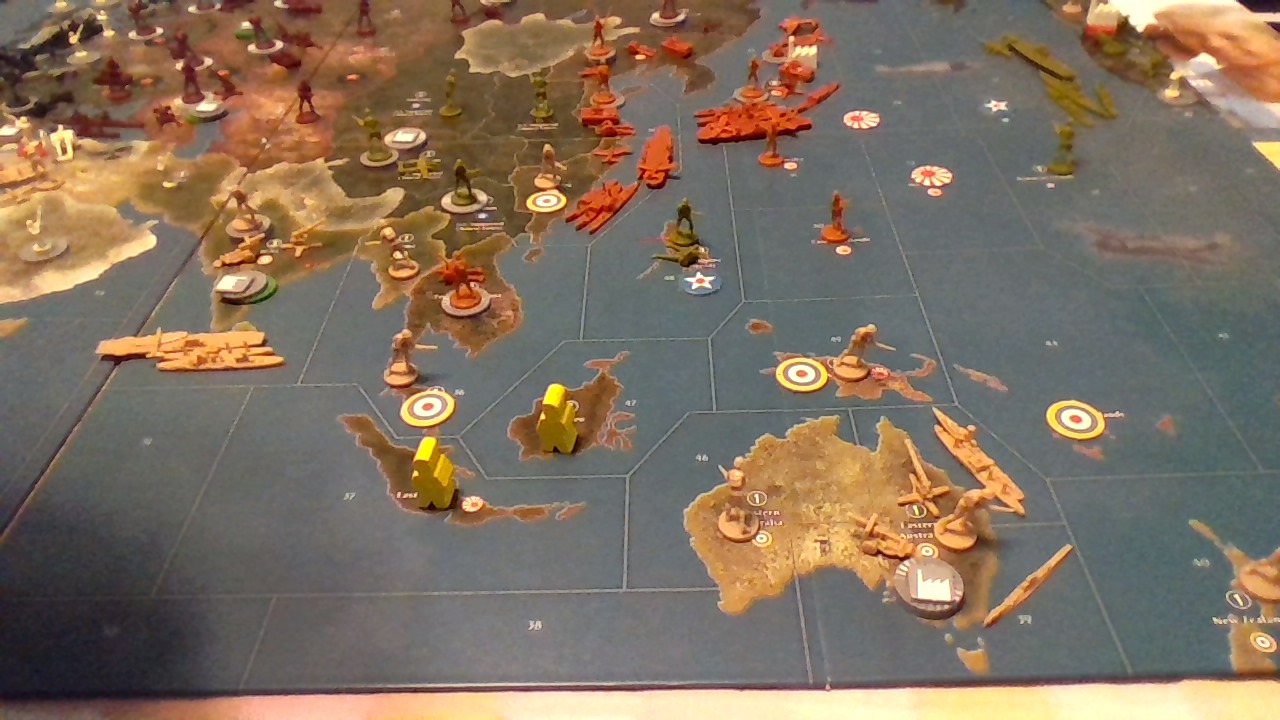
A couple more photos.
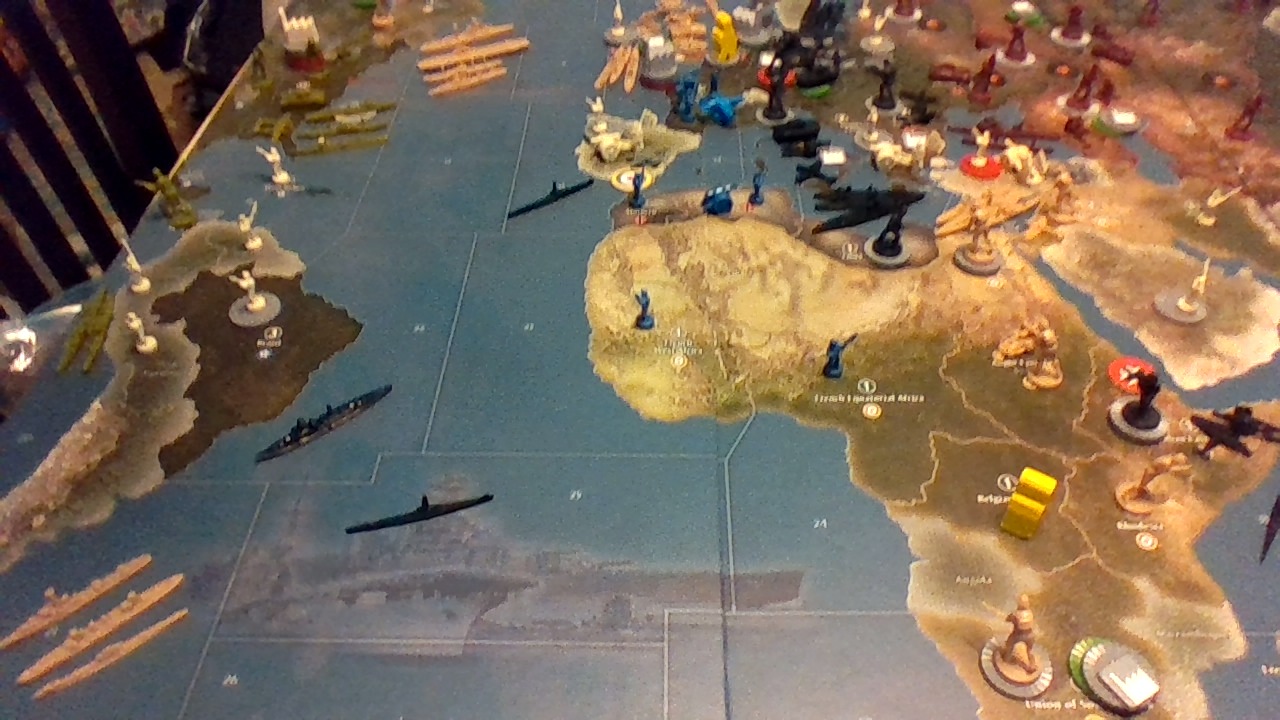
Africa and South America.jpg_thumb
India and ANZAC.jpg_thumb
Africa and South America.jpg_thumb
India and ANZAC.jpg_thumb
Africa and South America.jpg_thumb
India and ANZAC.jpg_thumb
Africa and South America.jpg_thumb
India and ANZAC.jpg_thumb
Africa and South America.jpg_thumb
India and ANZAC.jpg_thumb
Africa and South America.jpg_thumb
India and ANZAC.jpg_thumb
Africa and South America.jpg_thumb
India and ANZAC.jpg_thumb
Africa and South America.jpg_thumb
India and ANZAC.jpg_thumb
Africa and South America.jpg_thumb
India and ANZAC.jpg_thumb
Africa and South America.jpg_thumb
India and ANZAC.jpg_thumb
Africa and South America.jpg_thumb
India and ANZAC.jpg_thumb
Africa and South America.jpg_thumb
India and ANZAC.jpg_thumb
Africa and South America.jpg_thumb
India and ANZAC.jpg_thumb
Africa and South America.jpg_thumb
India and ANZAC.jpg_thumb
Africa and South America.jpg_thumb
India and ANZAC.jpg_thumb
Africa and South America.jpg_thumb
India and ANZAC.jpg_thumb
Africa and South America.jpg_thumb
India and ANZAC.jpg_thumb
Africa and South America.jpg_thumb
India and ANZAC.jpg_thumb
Africa and South America.jpg_thumb
India and ANZAC.jpg_thumb
Africa and South America.jpg_thumb
India and ANZAC.jpg_thumb
Africa and South America.jpg_thumb
India and ANZAC.jpg_thumb
Africa and South America.jpg_thumb
India and ANZAC.jpg_thumb
Africa and South America.jpg_thumb
India and ANZAC.jpg_thumb
Africa and South America.jpg_thumb
India and ANZAC.jpg_thumb
Africa and South America.jpg_thumb
India and ANZAC.jpg_thumb
Africa and South America.jpg_thumb
India and ANZAC.jpg_thumb
Africa and South America.jpg_thumb
India and ANZAC.jpg_thumb
Africa and South America.jpg_thumb
India and ANZAC.jpg_thumb
Africa and South America.jpg_thumb
India and ANZAC.jpg_thumb
Africa and South America.jpg_thumb
India and ANZAC.jpg_thumb
Africa and South America.jpg_thumb
India and ANZAC.jpg_thumb
Africa and South America.jpg_thumb
India and ANZAC.jpg_thumb
Africa and South America.jpg_thumb
India and ANZAC.jpg_thumb
Africa and South America.jpg_thumb
India and ANZAC.jpg_thumb
Africa and South America.jpg_thumb
India and ANZAC.jpg_thumb
Africa and South America.jpg_thumb
India and ANZAC.jpg_thumb
Africa and South America.jpg_thumb
India and ANZAC.jpg_thumb
Africa and South America.jpg_thumb
India and ANZAC.jpg_thumb
Africa and South America.jpg_thumb
India and ANZAC.jpg_thumb
Africa and South America.jpg_thumb
India and ANZAC.jpg_thumb
Africa and South America.jpg_thumb
India and ANZAC.jpg_thumb
Africa and South America.jpg_thumb
India and ANZAC.jpg_thumb
Africa and South America.jpg_thumb
India and ANZAC.jpg_thumb
Africa and South America.jpg_thumb
India and ANZAC.jpg_thumb
Africa and South America.jpg_thumb
India and ANZAC.jpg_thumb
Africa and South America.jpg_thumb
India and ANZAC.jpg_thumb
Africa and South America.jpg_thumb
India and ANZAC.jpg_thumb
Africa and South America.jpg_thumb
India and ANZAC.jpg_thumb
Africa and South America.jpg_thumb
India and ANZAC.jpg_thumb
Africa and South America.jpg_thumb
India and ANZAC.jpg_thumb
Africa and South America.jpg_thumb
India and ANZAC.jpg_thumb
Africa and South America.jpg_thumb
India and ANZAC.jpg_thumb
Africa and South America.jpg_thumb
India and ANZAC.jpg_thumb
Africa and South America.jpg_thumb
India and ANZAC.jpg_thumb
Africa and South America.jpg_thumb
India and ANZAC.jpg_thumb
Africa and South America.jpg_thumb
India and ANZAC.jpg_thumb
Africa and South America.jpg_thumb
India and ANZAC.jpg_thumb
Africa and South America.jpg_thumb
India and ANZAC.jpg_thumb
Africa and South America.jpg_thumb
India and ANZAC.jpg_thumb
Africa and South America.jpg_thumb
India and ANZAC.jpg_thumb
Africa and South America.jpg_thumb
India and ANZAC.jpg_thumb
Africa and South America.jpg_thumb
India and ANZAC.jpg_thumb
Africa and South America.jpg_thumb
India and ANZAC.jpg_thumb
Africa and South America.jpg_thumb
India and ANZAC.jpg_thumb
Africa and South America.jpg_thumb
India and ANZAC.jpg_thumb
Africa and South America.jpg_thumb
India and ANZAC.jpg_thumb
Africa and South America.jpg_thumb
India and ANZAC.jpg_thumb
Africa and South America.jpg_thumb
India and ANZAC.jpg_thumb
Africa and South America.jpg_thumb
India and ANZAC.jpg_thumb
Africa and South America.jpg_thumb
India and ANZAC.jpg_thumb
Africa and South America.jpg_thumb
India and ANZAC.jpg_thumb
Africa and South America.jpg_thumb
India and ANZAC.jpg_thumb
Africa and South America.jpg_thumb
India and ANZAC.jpg_thumb
Africa and South America.jpg_thumb
India and ANZAC.jpg_thumb
Africa and South America.jpg_thumb
India and ANZAC.jpg_thumb
Africa and South America.jpg_thumb
India and ANZAC.jpg_thumb
Africa and South America.jpg_thumb
India and ANZAC.jpg_thumb
Africa and South America.jpg_thumb
India and ANZAC.jpg_thumb
Africa and South America.jpg_thumb
India and ANZAC.jpg_thumb
Africa and South America.jpg_thumb
India and ANZAC.jpg_thumb
Africa and South America.jpg_thumb
India and ANZAC.jpg_thumb
Africa and South America.jpg_thumb
India and ANZAC.jpg_thumb
Africa and South America.jpg_thumb
India and ANZAC.jpg_thumb
Africa and South America.jpg_thumb
India and ANZAC.jpg_thumb
Africa and South America.jpg_thumb
India and ANZAC.jpg_thumb
Africa and South America.jpg_thumb
India and ANZAC.jpg_thumb
Africa and South America.jpg_thumb
India and ANZAC.jpg_thumb
Africa and South America.jpg_thumb
India and ANZAC.jpg_thumb
Africa and South America.jpg_thumb
India and ANZAC.jpg_thumb
Africa and South America.jpg_thumb
India and ANZAC.jpg_thumb
Africa and South America.jpg_thumb
India and ANZAC.jpg_thumb
Africa and South America.jpg_thumb
India and ANZAC.jpg_thumb
Africa and South America.jpg_thumb
India and ANZAC.jpg_thumb
Africa and South America.jpg_thumb
India and ANZAC.jpg_thumb
Africa and South America.jpg_thumb
India and ANZAC.jpg_thumb
Africa and South America.jpg_thumb
India and ANZAC.jpg_thumb
Africa and South America.jpg_thumb
India and ANZAC.jpg_thumb
Africa and South America.jpg_thumb
India and ANZAC.jpg_thumb
Africa and South America.jpg_thumb
India and ANZAC.jpg_thumb
Africa and South America.jpg_thumb
India and ANZAC.jpg_thumb
Africa and South America.jpg_thumb
India and ANZAC.jpg_thumb -
Thanks for the photos. Out of curiosity, what do the yellow meeples represent? The minor colonial powers?
-
I used blue Risk pieces for the French neutrals, white Risk pieces for the true neutrals, and yellow meeples for the Dutch neutral infantry.
-
Good idea on the Risk pieces but where did you get aircraft for France or the neutrals?
-
So I finally did a short playtest for this variant, on low luck, and most of the opening battles came out roughly the way I wanted. It was fun! As a result of the playtest, I’ve given Rome and Tokyo 1 extra infantry each, removed one Russian infantry and one Russian tank, and moved the Russian fighter from Buryatia to Yakutsk so it’s not such an easy target. I also switched the USA entry roll from 3d6 to 4d6. All these changes are now reflected in my (modified) original post.
I also tweaked the USA setup – instead of starting the USA factories with (double) maximum damage and full income, I’m starting the USA with (single) full damage and -20 IPC/turn income. The -20 IPC/turn penalty goes away when the USA enters the war. This change was necessary to avoid giving the USA a huge artificial incentive to drop a factory in the Philippines on A1 (which in turn would give the Japanese a huge artificial incentive to attack the Philippines on J1, screwing up the USA entry clock by directly attacking a US territory). The USA can still choose to build a factory in the Philippines, and it’s not a bad idea, but at least now it’s not strategically required. The changes also give the Axis a little more reason to avoid flagrantly attacking the Allies on G1 and G2. Under the old rules, the US did not accumulate enough TUV to even want to counter-attack the Axis anywhere until at least turn 3.
-
I’m going to do a series of posts on 1939 opening strategy until I either run through all five nations or people tell me they’re bored with the idea.
Thoughts on the GERMAN opening:
Germany’s biggest decision on G1 is whether to attack France right off the bat.
Attacking France on G1:
If you do decide to attack Paris on Germany’s first turn, you will need to commit about half of Berlin’s starting forces, and because north Africa will probably side for the Allies, you should also attack Algeria, which requires committing your Libyan infantry, half of the Italian forces, and your Mediterranean transport. Evacuating Libya means that your Italian fighter can’t land safely after attacking the British fleet in the eastern Med, so you are probably better off consolidating your Mediterranean and South Atlantic fleets off the west coast of Spain, and using air power to sink the Russian cruiser and transport in the Black Sea and to sink the British fleet in the English Channel.
With your leftover resources, you can grab Norway OR Leningrad in the north and Southern Europe OR Ukraine in the south. If you win all your battles, that’ll leave you with a solid 28 IPC. Don’t get too greedy about gobbling up your neighbors on G1 – you want to be able to hold France against a counter-attack from the Canadian transport, and your Romanian IC is surprisingly fragile if you use all of its troops on the attack.
The Northern Attack
If you don’t want to attack Paris on G1, you need to find another way to make up the income. One option is to tilt hard to the north, taking Norway, the Baltic States, Poland, and Leningrad, for a G2 income of 25 IPC. Your Italian tank can hit Poland with help from the artillery in Romania, leaving your planes free to help your Finnish infantry hit Norway. Norway has neither an AA gun nor a fighter, so you don’t have to be as concerned about providing fodder – 2 infantry is probably enough. That leaves you with four ground units, planes, and shore bombardment to take Karelia. You also have 2 inf, 1 art in Italy that aren’t being used – you can use them to set up for a G2 attack on France, to reinforce Libya, or to trade for Egypt, but the best use is probably to invade Southern Europe, getting ready for a very early Barbarossa. You can actually use your Mediterranean transport to evacuate Libya, sending the troops to assist in conquering Southern Europe. Your Ethiopian ground troops can invade Rhodesia, forcing Britain to waste IPCs activating the South African factory, while your Ethiopian fighter flies north to help take out the British fleet in the eastern Med and then lands in Italy.
For obvious reasons, the northern attack lends itself well to an early assault against Russia – if you build a second Baltic transport on G1, you should be able to hold Leningrad by G2, and if you evacuate Africa on G1, then you should be able to take Stalingrad on G3 and hold it on G4. If you use this strategy, the Japanese should seriously consider attacking the 4 inf Buryatia stack on J1 to further stress Russia’s thin starting forces. You might wind up never invading France or NW Europe – just leave the neutral troops as a buffer to help protect your western flank while you drive hard for Moscow.
Attacking the Suez Canal on G1:
Another option is to crush the eastern Med right off the bat. You can actually take Egypt without using the transport. If you’re willing to sacrifice a fighter, you can get 75% odds in Egypt by attacking with just the 2 Libyan inf plus 1 Italian fighter and 1 German bomber. You can then attack the British fleet with your Med BB and DD, plus your Ethiopian fighter, which, surprisingly, gives you 93% odds to get the transport through to Trans-Jordan. In Trans-Jordan itself, you have 81% odds if you bring 1 inf, 1 tnk from Italy and your second German bomber. Your Ethiopian ground forces can pick off the 1 inf in Rhodesia, further splitting and reducing the British forces in Africa. You can then finish up by attacking Southern Europe directly from Germany and downing the Russian Black Sea Fleet with your German fighters. Alternatively, you can leave the Black Sea fleet intact, build a carrier in the Med (which gets reinforced by your Moroccan sub), and use the German fighters in the Med campaign, landing them on the carrier after they attack the British fleet, which frees up your Ethiopian fighter to assist in Egypt. If you’re feeling gutsy, you can also pick off the Baltic States, although you’re not likely to be able to hold it against the Russian counter-attack. This opening limits your income on G2 to at most 25 IPC, but it puts the British in an extremely awkward position. With Morocco, Algeria, French West Africa, French Equatorial Africa, Madagascar, and Persia still neutral, and Libya, Egypt, Trans-Jordan, Rhodesia, Italian East Africa in German hands, Britain is left trying to hold onto Africa with nothing but Sudan and South Africa – a total of 3 inf, 1 art defending the whole continent. The Western Allies can’t ship in reinforcements from the Atlantic without attacking neutral France and risking the whole French Empire siding for the Axis. If you coordinate this attack with an early Japanese assault on India, Germany may be able to overwhelm even the (damaged) British factory in South Africa.
-
I have a quick question why is Russia at war when they weren’t in 1939?
-
It’s a fair question. Thematically, Russia is at war in 1939 because if Stalin wanted to invade a territory, there was nobody to tell him not to. In 1939 Russia was fighting wars in both Finland and Mongolia, and occupied the Baltic States with over 20,000 troops. It’s not as if Russia was on a peacetime footing – even though they had relatively friendly relations with Germany, they could have chosen to attack Germany in 1939 if they wanted to.
Mechanically, Russia is at war because it’s boring for the only Allied nation that can fight the Nazis to be the British. The game moves slowly enough without being told something like “Oh, by the way, all you can do on turns 1 and 2 is just reshuffle your troops.”
That said, if you want to add a house rule that says Russia can’t attack Germany until turn 3 unless Russia attacks Germany first, go right ahead.
-
Thoughts on BRITISH strategy:
Britain starts the game in an excellent position – you have a decent starting income, very few of your territories start out under any serious threat, and you have powerful naval groupings in most corners of the world that can be used or combined to help solidify your control over a region. Unlike Global 1940, the 1939 setup puts you in no immediate danger from a Sea Lion attack, because the German economy just isn’t strong enough yet to drop multiple transports into the Baltic (at most, they can manage two transports on G1). Britain’s weakness in the opening is that it has many small territories held together by many small industrial centers – if you don’t start producing in Capetown or Sydney or Calcutta a couple of turns before they come under seige, then you won’t be able to produce fast enough to save them from a serious attack, but you also can’t afford to produce infantry everywhere at once – you also need your cash to buy fighters for your carrier groups, to repair the starting damage on your colonial factories, and to replace early losses at sea.
What to do in Europe
What Britain wants to do in Europe depends a lot on what happened to France. If Germany invaded France successfully, then you need to look at the forces they left in Paris and see if Paris is vulnerable to a counter-attack. Even if you can’t hold Paris, it’s often worth sacrificing a transport or two to force Germany to divert troops and planes from Berlin to re-conquer Paris – with only 17 IPCs of income on G1, Germany is rarely in a position to both re-conquer France on G2 and press its attack in the east. You also get 6 IPCs for trading the territory, which helps defray your losses. You will likely have some bonus forces in the French colonies that defected to your side after the German invasion; depending on their location and on how many troops Germany brought to Africa, you can try funneling them toward Egypt or South Africa, or just use them as fodder to attack the remaining French colonies to maximize your income. Keep in mind that your Canadian infantry can reach French West Africa by transport if needed; that’s not a bad place to consolidate your Canadian and South Atlantic fleets if the Germans neglected to block your path. Follow up by building transports and ground troops in London, building at most one fighter to keep your Canadian carrier company – Germany is going to be weak on the ground in the opening if they have to keep trading France, and you want to capitalize on that by quickly sending more infantry into the western European region. That doesn’t necessarily mean you always unload transports in Paris – if the Germans took Norway, you might want to take it back, and once the Japanese start taking the money islands, you might be able to reinforce a suddenly friendly NW Europe.
If you can’t or don’t want to liberate an occupied France, then you will need to withdraw any ships still in the English Channel, because German planes can fly three spaces to the Channel and then land in occupied France. As long as you’re pulling boats away from mainland Europe, now might be a good time to try to clear out German subs in the Atlantic, and to re-position your navies to be able to deal serious damage to German boats on B2. You want to try to trap one of the three major German task forces (South Atlantic, Baltic, Mediterranean) so that anywhere the task force moves on G2 it will be subject to annihilation on B2, while being careful not to put your own fleets in the same position.
If Germany invaded France unsuccessfully, then it should be your top priority to reinforce France with all available troops and planes, even at the expense of losing the long-term battle for control of the Atlantic. A failed German attack on France is a huge blunder, and you need to capitalize on it effectively so you can turn it into a game-ending blunder. Plan to spend your cash on clearing out at least 10 pips of industrial damage out of France and then dropping something like 3 inf, 1 ftr right into Paris during your build phase on B1. Consider launching suicidal attacks from, e.g., Egypt to Libya, and ask the Russians to rush everything to Ukraine and Belorussia, just so that the Germans are short on reinforcements.
If Germany skipped attacking France altogether, then your options in Europe are more limited, because Germany probably has a lot more surviving troops milling around eastern Europe, and Germany is either blowing you up in the Suez or threatening to do so next turn. It often makes sense to counter-attack in Norway and/or Finland, depending on how those battles went for Germany on G1, and on where the German navy finished its turn. Otherwise, conserve your troops, consolidate your fleets, and get ready to make a landing (probably in NW Europe) on B2.
What to do in Africa
The glaring difference in Africa for 1939 vs. 1942 is that the Axis still have control of Italian East Africa, starting with 3 inf, 1 art, 1 ftr there. Because Italian East Africa (Ethiopia) is right in the middle of the southern British empire, it kind of limits your flexibility and your security; you wind up having to leave garrisons around to deter a surprise attack. There’s also that Axis sub off the coast of Ethiopia, which can be used to pick off undefended transports. It’s not necessarily a good idea to attack Ethiopia on B1 unless Ethiopia splits up its forces – even if you bring in the Trans-Jordan fighter, the Indian Ocean fighter, and a transport full of ground troops from India, you’re still only looking at ~80% odds, with an average profit of 10 IPCs – not great for such an all-out attack on a marginal territory. On the other hand, if Ethiopia does attack, e.g., Rhodesia, then you know at a minimum the Ethiopian fighter is going to be separated from the Ethiopian ground troops, and then it makes sense to attack one or both of the Ethiopian territories.
In north Africa, you may have a chance to take Libya if Germany either evacuated it or failed to reinforce it – you can’t hold both Libya and Egypt against a determined German assault on G2, but picking off 2 German infantry and denying German planes a safe place to land in north Africa can be a worthwhile use of the Trans-Jordan fighter (3 inf + 1 ftr vs. 2 inf is a good battle for the British).
If the Germans captured both Egypt and Trans-Jordan, you will have to figure out if if it even makes sense to fight for Africa – trying to supply both South Africa and India at the same time will give you a headache and drain your budget. You may be better off leaving South Africa alone and activating the Sydney factory to help protect India – you do lose the victory city in Capetown, but it’s not as if capturing a damaged factory in South Africa will be a huge strategic coup for the Germans. Africa is much harder for the Germans to blitz through in 1939 than in 1942.2, partly because of the French neutrals, and partly because the British start with more in the way of garrison troops there. Even if you never build or attack in Africa, it can still take 4+ turns and a heavy investment before the Germans control the entire continent, which means that Germany has a much harder time making an African campaign pay for itself before the game ends on turn 10. Meanwhile, the Russians should be in excellent shape with so much German material heading south – if you can scrape together a few bucks to drop a loaded British transport in, e.g., NW Europe or Norway every turn, then Germany may be in trouble despite its superior income. If you do abandon Africa, be on the lookout for opportunities to re-take Trans-Jordan from either India or Stalingrad, so that you can close the Suez canal and stop Japan from linking up its fleets with the Germans.
What to do in Asia
Britain’s biggest decision in Asia is whether or not to try to fight Japan for control of the Indian Ocean. If you want to contest the seas, you can immediately unite your Indian Ocean and Australian fleets in SZ 37, for a total of 1 CV, 1 CA, 1 DD, 1 SS, 1 ftr. If your fighter from trans-Jordan survived, that fighter can also reach SZ 37, making it 2 ftrs in the combined Pacific fleet. Make sure to take control of French Indo-China when uniting your fleet on B1 (using the transport from India plus your infantry in Burma and Singapore), or else Japan will be able to hit you with its entire starting air force and land in Vietnam.
Assuming you do take Indo-China, Japan can hit your fleet with 1 CV, 1 CA, 1 DD, and 4 fighters, which gives Japan very slight odds – something like 55%. Even if Japan does win, you’ve got about 70% odds of killing at least three Japanese fighters, which can seriously retard Japan’s economic growth. Because Japan starts with only 15 IPCs, they don’t necessarily want to make an even trade with their fleet and air force; it gets in the way of them trying to quickly conquer the money islands and southeast mainland Asia. Still, stacking the Pacific British Navy on B1 is a gambit – there’s a signficant chance Japan can just thump the fleet and live to laugh about it.
Another, more conservative option for contesting the Indian Ocean is to stack in SZ 46, off the coast of Western Australia, leaving a lone destroyer off the coast of Burma to stop Japan from attacking India on J1. Japan can’t hit that sea zone on J1 with anything more than 4 fighters, which you can easily handle. You can use the Australian transport to ferry the New Guinea infantry over to Western Australia on your way to SZ 46, leaving you with 3 inf, 1 art on a land territory next to two well-protected transports. On B2, those transports can strike at the Philippines, New Guinea, Borneo, East Indies, Singapore, and/or Burma – a very reasonable strike range for ANZAC forces. This setup works best if you build additional ships and planes at your India factory so that you can try to dead-zone SZ 36, or at least force Japan to invest in expensive new ships if they want to advance their navy.
You can, of course, choose to abandon the Indian Ocean entirely, retreating to the Persian Gulf with your Indian forces and sending the Australian navy to either the Philippines or Hawaii. It can still make sense to block SZ 36 with a destroyer to slow down the Japanese attack on India by a turn, but be careful of leaving an undefended carrier next to the Ethiopian submarine – if you lost Egypt or if the Germans sank your fleet in the eastern Med, then you might actually want to use the carrier as the blocking ship in Burma, and use your fighter and destroyer to hunt down the Ethiopian sub.
If you do abandon the Indian Ocean, it becomes less critical to take Vietnam, which gives you other options for your Asian infantry. One neat idea is to stack up 2 inf, 2 ftr in Yunnan, which, together with the 3 American inf + 1 American fighter you can move there, will make Yunnan a highly undesirable target on J1. Japan can take out 5 inf, 3 ftr using only three transports and its air force, but the cost in planes is high enough that the Allies should be happy to make the trade. Be sure to rotate the remaining American infantry clockwise (Szechuan -> Anhwei, Anhwei -> Kwangtung) so that you don’t leave Yunnan open to attack by the Manchurian tank.
-
It’s a fair question. Thematically, Russia is at war in 1939 because if Stalin wanted to invade a territory, there was nobody to tell him not to. In 1939 Russia was fighting wars in both Finland and Mongolia, and occupied the Baltic States with over 20,000 troops. It’s not as if Russia was on a peacetime footing – even though they had relatively friendly relations with Germany, they could have chosen to attack Germany in 1939 if they wanted to.
Mechanically, Russia is at war because it’s boring for the only Allied nation that can fight the Nazis to be the British. The game moves slowly enough without being told something like “Oh, by the way, all you can do on turns 1 and 2 is just reshuffle your troops.”
That said, if you want to add a house rule that says Russia can’t attack Germany until turn 3 unless Russia attacks Germany first, go right ahead.
My point is that Russia was more leaning towards axis than allies during 1939, but I would say they aren’t at war unless Germany attacks them until R2. What you could do is roll a dice in the beginning and if it’s a 6 Russia joins the axis, but america is immediately in the war. If it’s a 1 then Russia is immediately at war with the axis R1. If it’s 2, 3, 4, or 5, then they stay neutral until R2 unless there attack by Germany.
Suggested Topics

