

@Midnight_Reaper well, i use the 3 pieces of the first image, they serve me well, for that they are.
Now, the system and the mechanics of the game are made for a fast gameplay, and map and combat are more a -ww2 in europe- theme or abstraction, instant of a true 100% historical simulation.
Yes, random dice can by a problem some times, but rock-paper-scissors system can minimice the dice factor. And there are some post-production official optional rules and ideas, i find in the forums, to engance gameplay.
Wen i playtest all options, i can put here, if you want to know, my full opinion on the game.
-A Painting Tutorial and Resource for A&A Global-
-
I’ll try to elaborate on those tanks. I’m not sure exactly what to tell you, but I’ll give you my best thoughts.
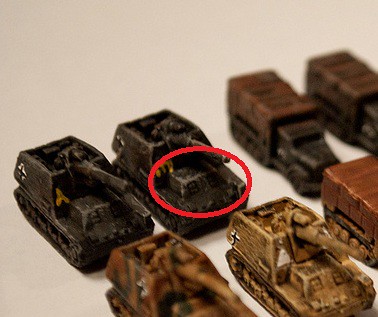
All right, so I started with a coat of spray can primer, just a standard light gray primer from the hardware store. Then, I painted a base coat of dark gray on it. However, the base coat needs to be lighter than you intend the final product to be because of the wash. If I had gone with a near black gray from the start, the tanks would just be black and you wouldn’t see any detail and it would be nasty looking. The base coat was something like “Value 2” from this color swatch.

That’s the best estimate I can give you, since I didn’t take a picture of my paint when I was painting. I can tell you it was one of my dark gray paints with a bit of black mixed in to make it a bit darker. After that, I did a wash with black. (I have black and brown; I just used the straight black wash. There’s a picture of it a few posts up.) This was liberally applied, then I sucked up any thick pools of it with my brush until it was a decent amount left, mostly from the tracks and the hatch/MG at the top of the StuGs. If you want the wash to really do it’s job, you should apply the wash one side at a time, setting the piece on it’s side to dry. That way it seeps into the tracks and the lines in between the side skirt panels or under the turret, depending on what you’re painting. After the wash was completely done drying (20 mins?), I went back over and did a drybrush with a light gray. Something like “Value 4” or “5” from the image. This was applied pretty liberally, because I felt that I had gone overboard with the darkness and that the piece was too dark for what I wanted. But it’s all personal preference, so if you like the color you bave, don’t worry about making the streaks and highlights show up everywhere. So it was applied liberally, and I really made sure to get the ridges on the Hummel and the skirts and turrets of the StuGs and Panzers, since these are the really defining parts of the piece, and the parts that have really defined edges and make for a great drybrush. This all gives it the “scratched paint” look, and since I did it enough, it sort of looks like there is a light gray base coat that I somehow covered up with gray, while it was actually the other way around. Here’s an example with the Hummel.
You can see it on the desert scheme Hummel as well. After the drybrush, I did a light drybrush with brown on the turret and MG, and the back a bit, just to simulate dirt and stuff like that. Very light drybrush though. Then it was divisional markings and identification stuff, and Then I was done. Oh, the tracks. The tracks are done by dragging a brush with just a bit of paint across the tracks, and since they are raised (both the tracks themselves and the mechanisms), it makes your job really easy.I’ll try to specifically answer your points. @LHoffman:
It is not flat
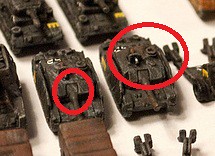
I think this is directly due to the wash. I can’t state it enough; a wash really makes the model look more 3D, and the shadows/highlighting give it more of a sense of color and realism IMO. Here, on the StuGs. The gun is really separate from the rest of the piece from the wash, which is retained even after the drybrush.
nor are the highlights overstated
I think I just got lucky on this one :D Apply the drybrush in layers. You can always add more, but you can’t really take it off once it’s done. Make sure you really go for the sharp edges on the piece.
I hope this helps, and if there’s anything I missed or something extra you’d like to know, just ask!
-
Excellent! Thank you for the tips.
-
Great Job!
You got just the look I was going to do on my own pieces.
I use the same techniques as you do for painting.
Looking more closely on some of my old pieces, I see that I might need to add more pin washes to accentuate deep recesses and leave most
of the raised details alone to make them pop out.
Love the armor schemes. -
Spitfire,
@Tall:
––And you’ve hit a home run with the ‘Combat Tuxedo’ on the “From Russia with Love” character. 8-) You have to “let Loose” every once in awhile.
“Combat Tuxedo”. I like it; I think that will now be his name!
––Please do! As a matter of fact,…I think you might paint one of each nations’s units in a “Combat Tuxedo” scheme for formal occasions,….like surrender ceremonies, haha.
----On a related note,…when Wil Tan and I were talking about taking the lifeboats off of some FMG Italian ships to use in making some U.S. Navy APD attack destroyers said,…"It seems you have a regular war machine going on there. I liked it and now our ‘gang’ is called the “WarMachine Team”.
––You gotta have FUN, man. especially when you have such a large project underway. :-D“Tall Paul”
-
If the “combat tuxedo” is for surrender, you should give tuxedos to the entire French army. :-D
-
If the “combat tuxedo” is for surrender, you should give tuxedos to the entire French army. :-D
Haha nice one!!! :-D That reminds me…
“Why do French tanks have rear view mirrors?”
– “So they can see the enemy as they’re running away!”Poor French… they got the bad end of the deal. In '39, the U.S. military was ranked 17th in the world, right behind Romania. The French may have had the troops, but nobody was prepared for Blitzkreig.
For anyone reading this, I will be posting more tutorials (or at least pictures) in the near future… there have been many developments lately. I was away for travel, but I’ve recently purchased some HBG units, as well as toured Bastogne. I have some inspiration! Right now I’m finishing up some British infantry, and then I’ll move on to a tutorial.
Thanks for the views- hopefully it’s a good resource that can stick around.
-
For anyone reading this, I will be posting more tutorials (or at least pictures) in the near future… there have been many developments lately. I was away for travel, but I’ve recently purchased some HBG units, as well as toured Bastogne. I have some inspiration! Right now I’m finishing up some British infantry, and then I’ll move on to a tutorial.
Excellent! Looking forward to it!
-
Guys,
For anyone reading this, I will be posting more tutorials (or at least pictures) in the near future… there have been many developments lately. I was away for travel, but I’ve recently purchased some HBG units, as well as toured Bastogne. I have some inspiration! Right now I’m finishing up some British infantry, and then I’ll move on to a tutorial.
Excellent! Looking forward to it!
––Me, too! I enjoy seeing your excellent work and I’m sure it inspires all of us. BTW, my Dad who’s still “alive and kicking” was “involved” in the Battle of the Bulge". If I get the financing to open my Railroad & Military Museum I’ll hopefully be able to publish his book of WW2 experiences. Anyway, I’m looking forward to some more pics of your excellent work.
“Tall Paul”
-
Here is half of the US Navy.
If you look closely on the right side, you can see some US destroyers from A&A 1941 that I threw in as a light cruiser/destroyer.
I definitely want to go with this paint scheme for my US Navy as well. Any chance we could look at your carriers?
-
Sure thing!

-
I’m very impressed by the detail in all of the pictures I see. I bet these customizations really add to the game!
It takes me back to my military modeling days. When I was a teenager I would spend countless hours painting 1/72-1/35 scale miniatures to build military dioramas. I even did one for my Senior project in high school where I made a diorama of the US Special Forces camp at Lang Vei being overrun by PT-76 tanks and NVA in 1-35 scale…
Maybe when my kids get a little older I can start the hobby back up and practice on my Axis and Allies pieces since they look (the infantry at least) about the same size as 1/72 scale.
-
It takes me back to my military modeling days. When I was a teenager I would spend countless hours painting 1/72-1/35 scale miniatures to build military dioramas. I even did one for my Senior project in high school where I made a diorama of the US Special Forces camp at Lang Vei being overrun by PT-76 tanks and NVA in 1-35 scale…
Wow, those sound like really cool projects! You don’t happen to have any photos of these dioramas, do you? I bet you have a lot of experience in terrain and weathering as well. Really neat.
Maybe when my kids get a little older I can start the hobby back up and practice on my Axis and Allies pieces since they look (the infantry at least) about the same size as 1/72 scale.
I have painted some 1/72 infantry, and it is almost the same size; probably a bit closer to 1/76. Good luck on all future customization projects!
Unfortunately I don’t…I did a whole bunch of them when I was growing up though.
The first thing about terrain and weathering I would say is doing a lot of research. This hobby is really how I became super interested in history because I had to make these things very very accurate since many of the judges in the modeling contests I would enter were experts themselves or even veterans of the pieces I was portraying.
For example. The first time I did this my dad came in (a Marine multiple tour infantry/door gunner Vietnam Vet) with a Dragon set of 4 US Marines from Vietnam and said, we’re going to build a diorama and submit it in a contest that was 2 weeks away. So I diligently started putting together and painting the Marine figures based off the colors that the box had set for their uniforms and equipment. After finishing a few he came in to inspect my work and flatly said “the uniforms are the wrong color”…I said that forest green was the color the box had on it. He mentioned “sure, maybe when they’re issued, but not after they’ve been exposed to sweat, dirt, and the sun for months on end. They should be a very light green to almost a white color because this portion of the battle takes place after the monsoon season and the sun will bleach those uniforms several shades lighter then when they were issued.” I was only about 12 at this time and didn’t really have any concept of what my dad did in Vietnam at that point…but it was at this point that I realized that 1. my dad really seemed to know what he was talking about…and I wondered why that was and 2. if he saw that, then the judges would certainly see that. The following week he dropped off a stack of books on the subject in my room and basically said; “If you want to make this right, you need to start reading.” And boy did I start reading lol. I ended up taking second in that contest but it lit a fire to really get into the nitty gritty of the research portion of not only the soldiers, their equipment, and their battles, but also on books that were published that concentrated on making your figures “come to life”. It took a lot of trial and error and I must say my neck, shoulders, and eyesight probably paid for it being hunched over for hours looking through a magnifying glass trying to get that oh so small piece of equipment just the right combo of OD green and weathered dirt color. It paid off though because my hallmarks ended up being:
A 1/72 scale diorama of a city block in the battle of Hue city near the citadel. It had about a platoon and half worth of US Marines and about a platoons worth of NVA. It also had an M48 Patton tank as well as a mechanical mule with a 106mm recoiless rifle mounted on it. Lots of weathering for the city damage and the battle damage on the tank.
The first one I did was of a portion of the line at Khe Sanh in 1/35 scale complete with a trench line, bunker, lots of sandbags, and jarheads either taking cover from incoming or shooting the “pig” (an M60 machine gun). Not to mention getting the mud the right reddish. In the trench line the level of detail went from expended C ration cans, spend shell casings, to rats running along the edges.
I did a 1/35 scale one of a PBR river boat extraction of a SEAL team under fire in the Mekong Delta. That was a very difficult one to do trying to get the resin I used as water to look realistic with the motor wash of the boat, the splashes of the team scrambling in the shallow water to get to the boat, and the splashes to make it look like rifle and machine gun fire was landing in the water around them as they exfilled. I don’t know how many times I had to start over getting it just right…but once I did…it looked awesome.
The senior project I did was on the evolution of Special Operations forces within the US military from WWII to present. I made a timeline over all types of different units we’ve had throughout the years with a description of their mission set, training, and utility. I mounted 1/35 scale representations of each group I had made on a board to the appropriate area of the timeline for graphic representation of what those troops would look like. Then I capped it off with the Special forces compound diorama set in Vietnam since that was Special Operations most prominent role they had fulfilled up to that point in their history. (9/11 hadn’t happened yet)
Sadly, once I joined the Army, most of my stuff either got destroyed in PCS moves or was unknowingly thrown out by my parents throughout the years…plus that hobby has kind of gone by the wayside. I still have a bunch of the unfinished models from those years sitting in a plastic Rubbermaid container somewhere in my garage…maybe by picking up the hobby again I can get my wife to get off my back about getting rid of it LOL!
-
The first time I did this my dad came in (a Marine multiple tour infantry/door gunner Vietnam Vet) with a Dragon set of 4 US Marines from Vietnam and said, we’re going to build a diorama and submit it in a contest that was 2 weeks away. So I diligently started putting together and painting the Marine figures based off the colors that the box had set for their uniforms and equipment. After finishing a few he came in to inspect my work and flatly said “the uniforms are the wrong color”…I said that forest green was the color the box had on it. He mentioned “sure, maybe when they’re issued, but not after they’ve been exposed to sweat, dirt, and the sun for months on end. They should be a very light green to almost a white color because this portion of the battle takes place after the monsoon season and the sun will bleach those uniforms several shades lighter then when they were issued.” I was only about 12 at this time and didn’t really have any concept of what my dad did in Vietnam at that point…but it was at this point that I realized that 1. my dad really seemed to know what he was talking about…and I wondered why that was and 2. if he saw that, then the judges would certainly see that. The following week he dropped off a stack of books on the subject in my room and basically said; “If you want to make this right, you need to start reading.” And boy did I start reading lol. I ended up taking second in that contest but it lit a fire to really get into the nitty gritty of the research portion of not only the soldiers, their equipment, and their battles, but also on books that were published that concentrated on making your figures “come to life”. It took a lot of trial and error and I must say my neck, shoulders, and eyesight probably paid for it being hunched over for hours looking through a magnifying glass trying to get that oh so small piece of equipment just the right combo of OD green and weathered dirt color.
The close connection between modeling work and history is one of the reasons that it is so great. Your work becomes that much more personal and interesting when you have studied the history behind it and can make your pieces/dioramas/game boards have stories and authenticity.
I did a 1/35 scale one of a PBR river boat extraction of a SEAL team under fire in the Mekong Delta. That was a very difficult one to do trying to get the resin I used as water to look realistic with the motor wash of the boat, the splashes of the team scrambling in the shallow water to get to the boat, and the splashes to make it look like rifle and machine gun fire was landing in the water around them as they exfilled. I don’t know how many times I had to start over getting it just right…but once I did…it looked awesome.
Uff, that sounds terribly frustrating. You’re right though- I bet it looked really sweet! I’ve only ever seen dioramas with stagnant/flowing water, and those looked great, so I can imagine that the effects you could get with some hard work would be well worth it.
-
I have had some more free time lately, so I decided to whip out the paints again and paint the P-51 Mustangs that I got from HBG’s US Supplement Set. I only have 4, but that’s enough for the European theater. I went for four different schemes for variety and to add some life to the game, since each plane comes from a different fighter group. From top left, clockwise. “Beantown Banshee” with invasion stripes and the anti-glare panel. The second is “Snoot’s Sniper” from the 352nd FG. Then a plane roughly based off of a Mustang from the 55th FG. The last is from the 332nd African American “Tuskegee Airmen”, or “Red Tails” as they were affectionately known as.

The inspiration and research came from several different sources, which I will provide below to help my fellow customizers in their quest for their perfect set! I am also (re)painting my Russian air force (VVS), so some of these sources were found as I did the research for that.
For P-51 specific schemes I found an RC modeler’s site which had a lot of great examples.
http://www.rcgroups.com/forums/showthread.php?t=1112761A resource for general air force painting information is this site by “Fritz the Fox”, with paint schemes and information on different planes and periods of the war.
http://www.fritzthefox.com/camo_guide.htmlA Russian air force specific site is hobbyvista.com. Under the “Monthly” section, which I have linked, the author has done extensive research using WWII photographs to determine exact paint schemes and deployment of different fighter groups. If you look under “Links” there is also a plethora of other references that should meet all your Russian painting needs!
http://vvs.hobbyvista.com/Monthly/index.phpI will post more links if/when I find them. Feel free to share any useful sites or resources you have used, even if it doesn’t pertain to air forces.
-
It’s amazing how realistic a sculpt small enough to fit on a quarter can be made to look with a good paint job!
-
Talk about perfect timing. I have been looking at multiple sources to decide how to go about painting mine. I think I am going with the “Red Tails” after looking at all of yours.
-
Hey guys! I’m selling my fully painted 1942 set over on the Marketplace; in the process of preparing the set for sale, I took photos of all of the pieces. They are the pieces that I began painting as a beginner, so you can see the development of the quality over time. I thought you might like to see them for ideas, questions, laughs, etc. If for no other reason, A&A painters love photos!
Here is the link to my Flickr page, where you can see them all. http://goo.gl/SbKgLZ
Happy Wednesday!
Looks awesome! Um…how much for the whole set!
Hey Redleg, I sent you a PM. If anyone else is interested, you can look in the Marketplace subforum for the information.
Suggested Topics

