

Instead of escort @1 and interceptors @2 is now in BM escorts @2 and interceptors @2 ?
Then I agree with that. Promotes more bombing
Axis "J2/I2" Strategy
-
What are you going to about russia invades Finnland instead of retreating to moscow with the whole stack?
-
This is all very standard stuff. I do very much the same most games if I am going for the throat. Outside of extremely bad dice luck, or UK putting nearly 100% of its economy into fighters sitting on Moscow (and even then…), a G6 Moscow is quite possible. An I6/G7 Moscow is basically guaranteed.
Germany:
Why take Greece as Germany? Is it merely to help Italy? Judging by your comments about them, probably not.The tanks you could potentially afford to send down there because they can make it back into Russia in time to be useful, but sending the Bulgarians means those guys are never making it to Moscow until G8 (one round after the potential 12 far est ruskies show up). Is the gain of 2 IPCs/turn for Germany/Italy worth the loss of 5 infantry for your Moscow crash (or the threat of a crash while you duck south and grab Volgo/Caucasus)? Is the main reason just to make sure you don’t give the allies a juicy landing point later in the game?
Note: Sometimes, depending on what Russia does and where you want your Finns to go/stay, you can choose to not declare war on Russia on G3 and just move into Italian-controlled Eastern Poland. You lose Baltic States/Karelia money, but so what, you’re still 3 IPCs ahead. (The obvious things about still having a German sub in 125, and not failing take a free Novgorod if Russia is silly enough to let you walk in, are all assumed.)
Italy:
Standard. Tanks/mechs I1/I2, then turtle up hard. Even buying planes to support the can opener is possible I3/I4 if the allies are nowhere to be found in Europe. I try to let Italy grab as much land in Russia as it can (exempting the mICs and victory cities).Japan:
Why not do most of this J1?Differences between what you’d do and what I do:
I just let the Allies have western europe if I must. I usually keep some of my finns and dudes from norway up in scandinavia so I can push a landing back out with the help of some air. The only way I’m trying to defend normandy/S France, however, is if they land an anemic force. If it’s strong, screw it, I’m still going 100% for Moscow. The more tanks, and if you’re very damn lucky, mechs, that survive the moscow altercation, the more I’ve got to drive straight on south through the middle east and on to Cairo. I can retake Western Europe when Moscow falls. No problem. Mosow’s the goal. Let the allies play around in the West if they show up. They could never take Berlin before G8, and Japan is likely just absolutely wrecking the Pacific.
I don’t screw with Greece as Germany. Italy very often still ends up taking this because it still has one transport and some planes to play with. I want my Bulgarians in Moscow G6, which means sending those nazi-supporting bastards east as soon as they hit the ground.
J1.
@aequitas:
What are you going to about russia invades Finnland instead of retreating to moscow with the whole stack?
You have 7 scandinavian infantry as Germany. Let the Russians take Finland for one round, then hit them with those 7 dudes + 2 more whatevers from a transport and your air. Some people even take their Danes up early as well, meaning 11 land units for a Finland counter. The Russians can’t do anything about that unless they want to leave Moscow as a super easy treat for Germany. Russians in Scandinavia on a straight push like this are a blessing, not a threat. It would take a heavily coordinated effort between Russia on one side and UK/US on the other to make it matter, and at that point the situation is too complex to discuss much in the scope of this post’s original intent.
-
For an offensive Ger. player, Greece might be vital to him.
It provides 3ipc income per round and might be strategic in an aggressive Axis Med. Gameplay.
I often take Greece as Germany so I can save my 40ies each round for russia. -
Yes, but he’s said he’s not doing med play. He’s going straight for Moscow. Med play would be, by necessity, at the earliest G6 for buys (but probably G7 for the Italian can-opener).
Is it 3 IPCs? I thought it was 2. Woops. Either way, you’re losing 5 Bulgarians if you send them all to Greece in the Moscow crash or Bryansk stack. That’s 15 IPCs of money there. When you account for positioning, the income of even 3/turn isn’t really worth that, especially if your singular goal is Moscow Must Die ASAP. Maybe if you sent only one or two Bulgarians, since it’s worth 3 IPCs/turn, it could pay for itself by allowing you to buy another strat. bomber by G5 which could be used against Moscow.
All I’m saying is, it doesn’t make sense to mess with Greece on G2 if you’re potentially weakening your ultimate goal of G6/G7 crash ‘n’ smash in the east.
The only reason I could see would be to deprive the UK, or possibly the Americans, from a very welcoming landing in Greece.
I might also have a hard time understanding you based on your word choices and grammar as I have in some other posts, so forgive me there. (I’m not making fun of you by any means, I can barely speak just this one language, so anyone who can piddle about in two or more deserves respect.)
-
Thank you Mr. Elk, this is a very clean and solid narrative of a good, basic game that wins because it doesn’t rely on long odds or distractions just a straight road to victory.
I’d more or less agree about Greece, its the wrong direction and 4 infantry is easy to defeat at some point G-I 2-4 just whenever it comes up rather than sending a battlestax that way.
I’d add to your India gambit that taking Ceylon gives you an unsinkable aircraft carrier right off India’s coast and that can be safer than having to stage right next to Bombay.
Your overall plan is a good reminder that the Russian Eastern troops tying down Manchuria are key and so are the few destroyers you get as bogglers/blockers (1US, 1UK, 1 ANZAC) and that Japan is really hard to stop or even slow down unless you have all 5 powers work together.
-
Your summary makes a lot of sense Mr. Elk and is a big help to someone like me who is still getting to grips with G40.
Being on the edge of losing to wittman, who had a 13 bid as allies, I wonder what allied bid you feel would effectively counter the strategy you lay out? My understanding is that experienced players believe axis to have a significant advantage without such a bid.
witt used his bid to blast the Italians out of Africa and the Med in turn 1. A larger bid might be used to bolster the north atlantic or the Russian front.
Our next game will be me as allies, so this bid question is going to be very pertinent! :|
-
@aequitas:
What are you going to about russia invades Finnland instead of retreating to moscow with the whole stack?
I’ve only encountered that once so far and it turned out very badly for Russia as it requires a commitment of units larger than he can afford. The combination of fast units that are building in Germany, the reach of air power, and the ability to transport a couple more per turn end up isolating Russia’s attack stack and getting it cut off from behind when G captures Novo. If enough is committed Russia might even be able to hold it, but at a far greater cost along the rest of his front. Russia doesn’t start with many fast units and he has to commit those to that attack, weakening his threat elsewhere; I’d welcome it as G.
-
This is all very standard stuff. I do very much the same most games if I am going for the throat. Outside of extremely bad dice luck, or UK putting nearly 100% of its economy into fighters sitting on Moscow (and even then…), a G6 Moscow is quite possible. An I6/G7 Moscow is basically guaranteed.
I usually don’t end up taking Moscow until G9 or G10. But he’s making under 15 income several turns before that so it’s a matter of convenience. Since you can finish him off at your leisure, there’s no need to sacrifice position elsewhere to rush it. And if UK panics and dedicates his whole production to shipping fighters there, great! That’s production that is not able to be useful in any other way, so it’s not being efficiently used against Axis.
Germany:
Why take Greece as Germany? Is it merely to help Italy? Judging by your comments about them, probably not.The tanks you could potentially afford to send down there because they can make it back into Russia in time to be useful, but sending the Bulgarians means those guys are never making it to Moscow until G8 (one round after the potential 12 far est ruskies show up). Is the gain of 2 IPCs/turn for Germany/Italy worth the loss of 5 infantry for your Moscow crash (or the threat of a crash while you duck south and grab Volgo/Caucasus)? Is the main reason just to make sure you don’t give the allies a juicy landing point later in the game?
I have Germany do it since Italy loses their transports before they can get to it and I’d rather Italian slow units opening cans than being extra turns behind. Germany can afford for the Greece attack to go poorly but Italy cannot, so this plays into my risk aversion. Also, I’m not in a rush to kill off Russia at any particular time so there’s time for those inf to play catch-up. You need a few spare inf to picket Belarus and other territories and they can get to those places when you need them, even while they are a move or two behind the main stack.
Italy:
Standard. Tanks/mechs I1/I2, then turtle up hard. Even buying planes to support the can opener is possible I3/I4 if the allies are nowhere to be found in Europe. I try to let Italy grab as much land in Russia as it can (exempting the mICs and victory cities).I’ve been buying a fighter for Italy on I1 but a tank/mech would probably fit better, that’s a good suggestion.
Japan:
Why not do most of this J1?I don’t do it on J1 because I don’t have the transports to move enough units to create the follow-up threats on J1, so it is riskier and less solid in my opinion. Being risk-averse, I try to have a robust enough position that it can sustain getting diced once in a while, since that is inevitable. Odds become much better on J2; with the air pre-positioned, all the attacks are overkill attacks and getting diced is less likely. Waiting a turn also makes it much less likely that the US will build full-Pac and extends the time that Japan has a free hand.
The US needs minimum 2 turns of building to create a threat in one theater or the other. If they split then they don’t have threat in either. In the absence of J1 the US usually builds Atlantic, and of course it takes a move to position the US threats, so Japan doesn’t need to deal with it until as late as J6. If they build Pac anyway, Japan can efficiently stall the threat for a long time; build carriers and pull back air to protect them, as you don’t need much air on land past J3, DDs to block and limit US threat to air only, and subs to kill off his blockers to make him deal with the counterthreat to Hawaii from your growing SZ6 defensive stack.
Japan getting to 68 production on J3 means you can full-build tanks/mechs in FIC and still have enough to defend even a full-build US pac strategy for a very long time. Japan’s expeditionary fleet never gets more than 2 moves from returning to SZ6, so bringing it back to allow your full fleet to counter a move to the Carolines stalls him further if need be.
If US does full-build Pac, Japan can’t be quite as aggressive, but Germany can be more aggressive and kill Russia off faster, as it doesn’t need to repel the US from Western Europe. Italy can also consider building ships and reviving its Med game in that case. Alternatively, Germany can start adding subs to raise the cost of the eventual US entrance in the Atlantic theater, which is an efficient delaying tactic.
-
@aequitas:
For an offensive Ger. player, Greece might be vital to him.
It provides 3ipc income per round and might be strategic in an aggressive Axis Med. Gameplay.
I often take Greece as Germany so I can save my 40ies each round for russia.Greece is not that important overall. You could choose to ignore Greece entirely to strengthen the main stack earlier instead. I like having the extra income as income means flexibility, and it gets the Balkans over with for good. Leaving those units there gives the allies backup if they choose to invade via that route, and I’m not comfortable with the risks to Italy on that attack.
As you noted, it also opens up an additional option for counterplay in the Med, if the opportunity is right. Ignoring the Med is part of the strategy only because it’s inefficient, but if Allies allow an opportunity to efficiently counter then the option is there. A key theme of the method is preservation of options; an open option, exploited or not, still forces the opponent to account for it.
-
@Private:
Being on the edge of losing to wittman, who had a 13 bid as allies, I wonder what allied bid you feel would effectively counter the strategy you lay out? My understanding is that experienced players believe axis to have a significant advantage without such a bid.
That’s my question as well. I don’t even know if an effective counter strategy can be pulled off by Allies without serious mistakes made by the Axis player. That’s one concern I have had about G40 for quite some time and it has yet to be demonstrated to me that the Allies are viable on this map. If someone does pull it off, I would very very much like to know how.
-
This is all very standard stuff. I do very much the same most games if I am going for the throat.
To address this - I am not claiming any of this is original. It’s all stuff that was done to me when I was playing Allies more often that I couldn’t solve. So I started doing it to other people, and nobody’s been able to solve it yet.
My setup for J2 is very close to Cow’s J2, maybe 6-7 units total are in different position at the start of J2. I put less emphasis on northern China, if China wants to stack in Kansu they are not in a position to affect anything important.
As others have noted, G40 is all about threat projection. The aim of this strategy is to reduce potential allied threats to three manageable ones.
Foregoing Sealion attacks means there is no Russian offensive threat to deal with. A focus on China/India early means there is no threat from either in Asia. For Russia/China/India in general, turtled and isolated positions do not project threat. Ignoring Africa means there’s no threat to deal with there as there’s nothing to threaten.
The first threat is the Russian defensive counter. This can be managed by counterstacking, or even retreating temporarily if neccessary, or by moving around it.
The second threat is the US Pac fleet. This can be managed by building a defensive fleet in SZ6 or the Phillipines and using DDs to limit movement, and being able to bring back the second, expeditionary IJN fleet in a timely manner.
The third and most dangerous threat is the US Atlantic invasion fleet. I manage this threat by stacking inf preemptively. If Allies have any hope of countering this strategy, it’s by effectively managing this invasion - but I’ve yet to see someone pull it off.
There’s one other potential threat that I should probably address, which is the Russian eastern infantry if stacked in Amur. I ignore this threat, if it is created at all, and let Russia strike first. Because I rely on transports rather than ICs, there are no fixed positions Russia can reach that need to be defended, which mitigates some of the threat. As Russia can’t reinforce its position, the threat never grows. It can only hold one territory at a time so it can’t do much production damage, and Japan can set up to eliminate this stack at its leisure. Should the US reinforce it with air, that actually reduces the threat from the stack further as Russia won’t abandon expensive US air support thanks to the favorable turn order - Japan can strike the US air between the two enemies’ turns if Russia’s infantry moves out, so Russia is stuck wherever that air lands. And of course if Russia strikes first, it loses the 6 Mongolian infantry I’d otherwise have to account for.
-
Even if it isn’t original, its solid. This kind of discussion is interesting and useful. I’m typically not repeating or testing out my own opinions because I’m not that good or creative–I’m repeating other people’s moves and opinions to test them against the group’s experience and opinions.
In most games, there is a “critical path” to victory. Not a series of “must-dos”, but a series of ‘should-dos’.
That is why the earlier posters this week were spot on by stating what is the “optimal” move. Not the “best move under all odds in all situations”. Just the “optimal” one considering everything that we as a group or individuals presume to know.
-
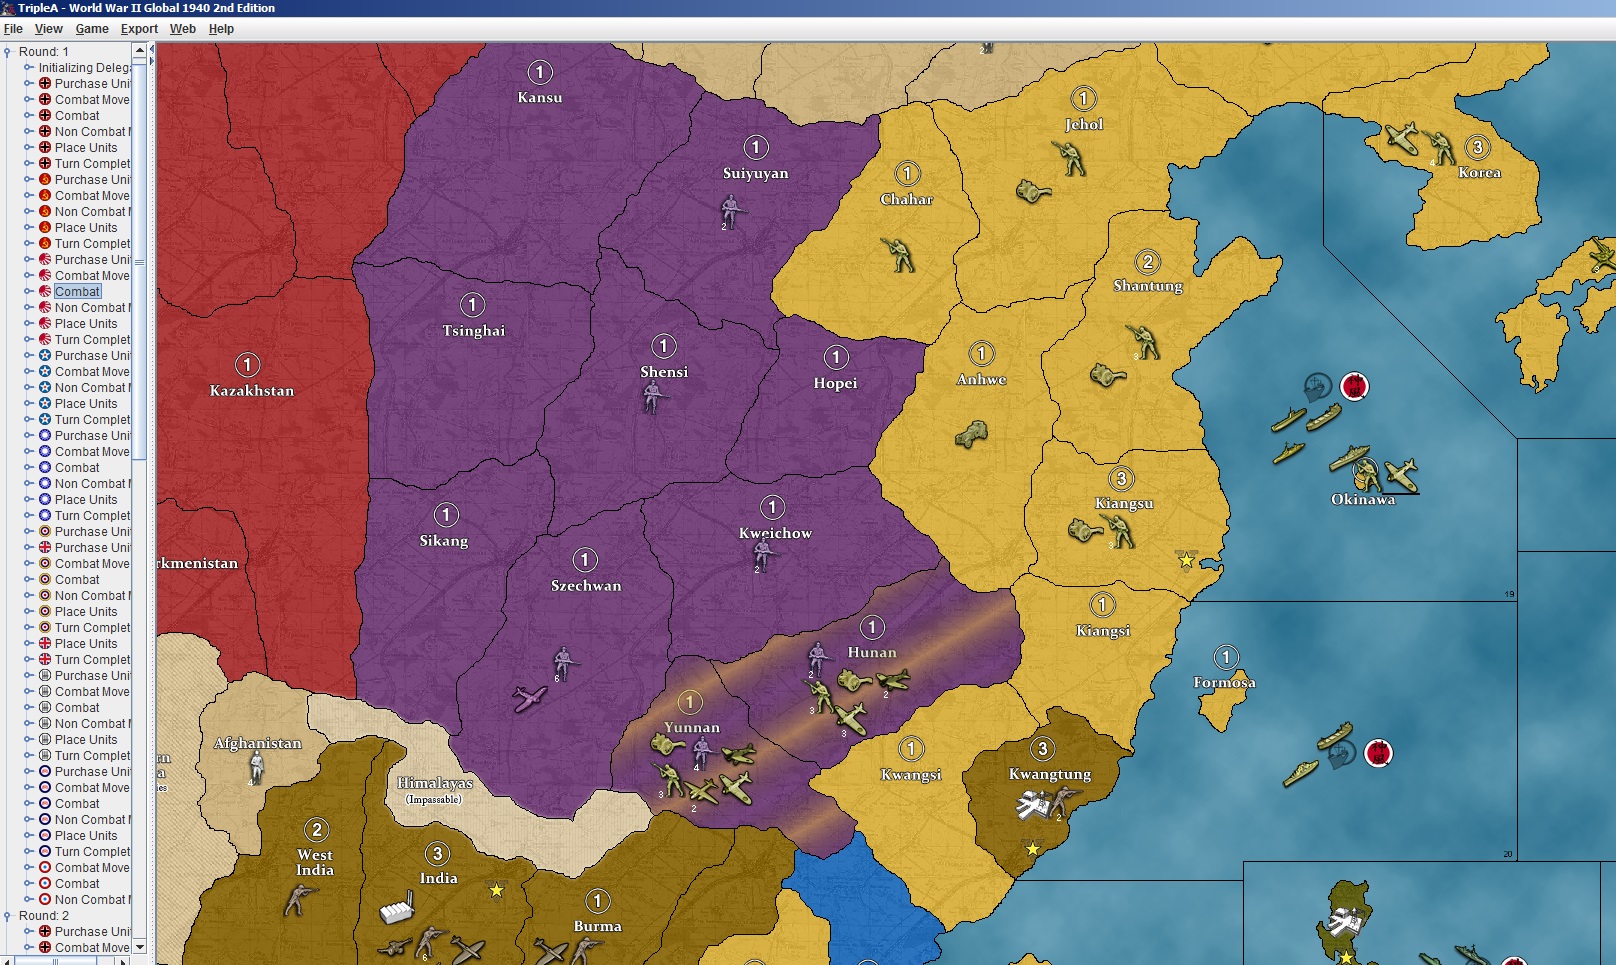
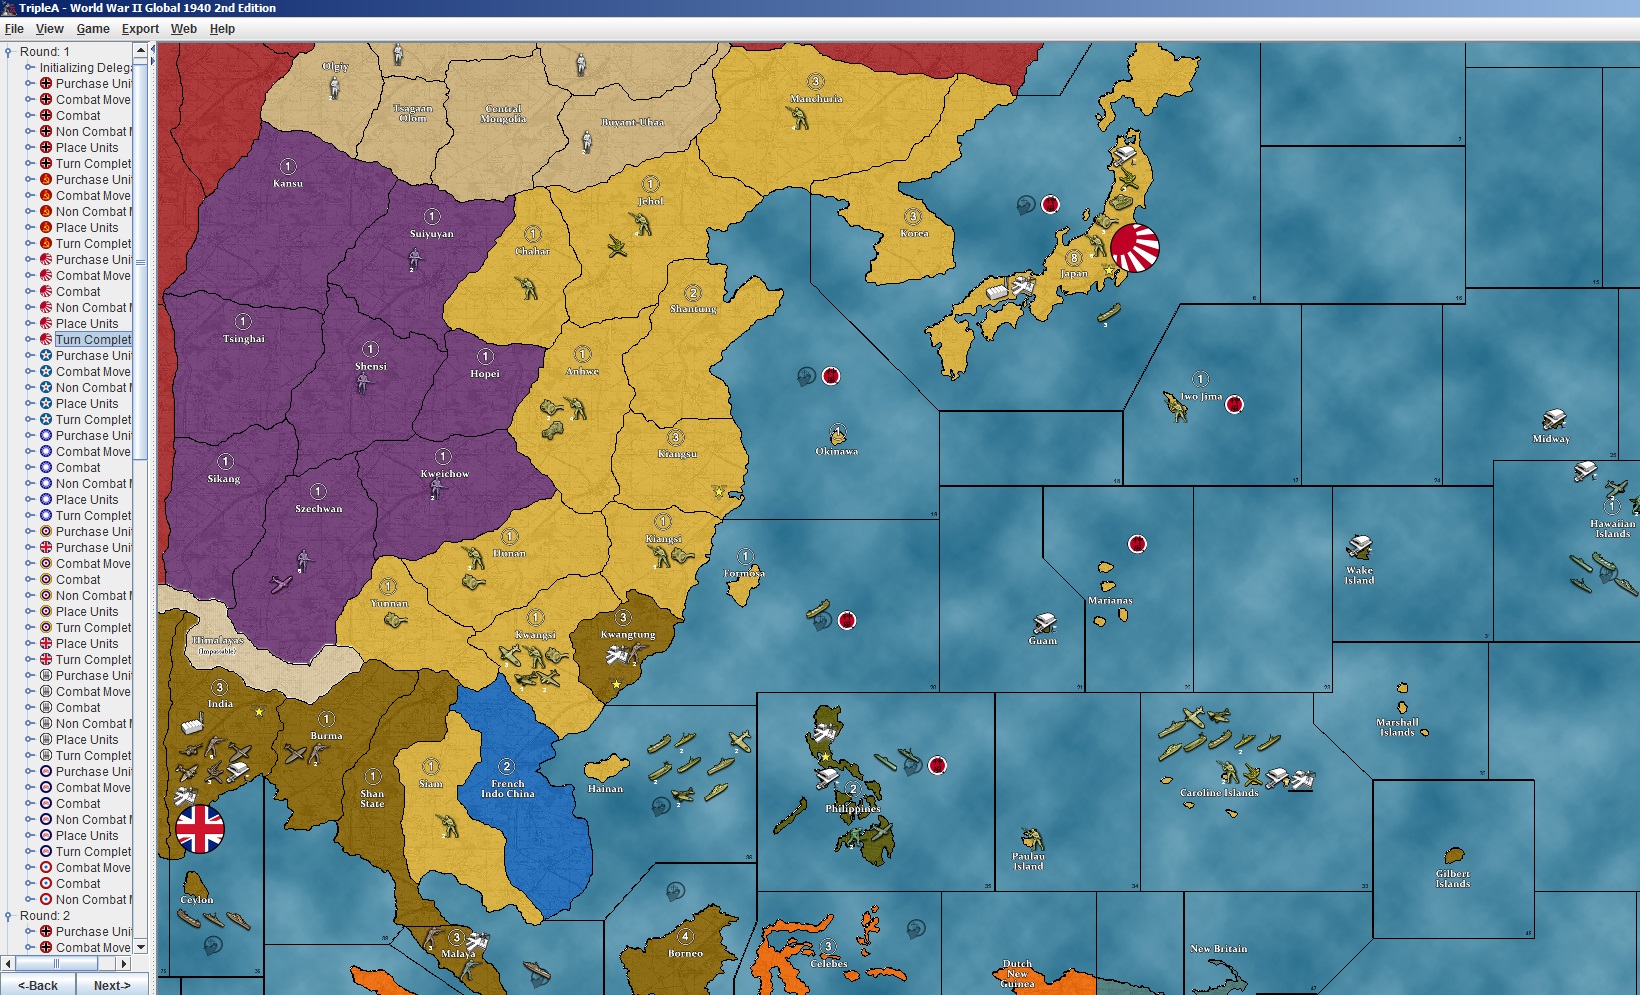
Some screenshots of the progression on the Pacific side.
Japan turn 1 combat move and turn complete
J1combat.jpg_thumb
J1combat.jpg_thumb
j1done.jpg_thumb
J1combat.jpg_thumb
j1done.jpg_thumb
J1combat.jpg_thumb
j1done.jpg_thumb
J1combat.jpg_thumb
j1done.jpg_thumb
J1combat.jpg_thumb
j1done.jpg_thumb
J1combat.jpg_thumb
j1done.jpg_thumb
J1combat.jpg_thumb
j1done.jpg_thumb
J1combat.jpg_thumb
j1done.jpg_thumb
J1combat.jpg_thumb
j1done.jpg_thumb
J1combat.jpg_thumb
j1done.jpg_thumb
J1combat.jpg_thumb
j1done.jpg_thumb
J1combat.jpg_thumb
j1done.jpg_thumb
J1combat.jpg_thumb
j1done.jpg_thumb
J1combat.jpg_thumb
j1done.jpg_thumb
J1combat.jpg_thumb
j1done.jpg_thumb
j1done.jpg_thumb
J1combat.jpg_thumb
j1done.jpg_thumb
J1combat.jpg_thumb
j1done.jpg_thumb
J1combat.jpg_thumb
j1done.jpg_thumb
J1combat.jpg_thumb
j1done.jpg_thumb
J1combat.jpg_thumb
j1done.jpg_thumb
J1combat.jpg_thumb
j1done.jpg_thumb
J1combat.jpg_thumb
j1done.jpg_thumb
J1combat.jpg_thumb
j1done.jpg_thumb
J1combat.jpg_thumb
j1done.jpg_thumb
J1combat.jpg_thumb
j1done.jpg_thumb
J1combat.jpg_thumb
j1done.jpg_thumb
J1combat.jpg_thumb
j1done.jpg_thumb
J1combat.jpg_thumb
j1done.jpg_thumb
J1combat.jpg_thumb
j1done.jpg_thumb
J1combat.jpg_thumb
j1done.jpg_thumb
J1combat.jpg_thumb
j1done.jpg_thumb
J1combat.jpg_thumb
j1done.jpg_thumb
J1combat.jpg_thumb
j1done.jpg_thumb
J1combat.jpg_thumb
j1done.jpg_thumb
J1combat.jpg_thumb
j1done.jpg_thumb
J1combat.jpg_thumb
j1done.jpg_thumb
J1combat.jpg_thumb
j1done.jpg_thumb
J1combat.jpg_thumb
j1done.jpg_thumb
J1combat.jpg_thumb
j1done.jpg_thumb
J1combat.jpg_thumb
j1done.jpg_thumb
J1combat.jpg_thumb
j1done.jpg_thumb
J1combat.jpg_thumb
j1done.jpg_thumb
J1combat.jpg_thumb
j1done.jpg_thumb
J1combat.jpg_thumb
j1done.jpg_thumb
J1combat.jpg_thumb
j1done.jpg_thumb
J1combat.jpg_thumb
j1done.jpg_thumb
J1combat.jpg_thumb
j1done.jpg_thumb
J1combat.jpg_thumb
j1done.jpg_thumb
J1combat.jpg_thumb
j1done.jpg_thumb
J1combat.jpg_thumb
j1done.jpg_thumb
J1combat.jpg_thumb
j1done.jpg_thumb
J1combat.jpg_thumb
j1done.jpg_thumb
J1combat.jpg_thumb
j1done.jpg_thumb
J1combat.jpg_thumb
J1combat.jpg_thumb
j1done.jpg_thumb
j1done.jpg_thumb
J1combat.jpg_thumb
j1done.jpg_thumb
J1combat.jpg_thumb
j1done.jpg_thumb
J1combat.jpg_thumb
j1done.jpg_thumb
J1combat.jpg_thumb
j1done.jpg_thumb
J1combat.jpg_thumb
j1done.jpg_thumb
J1combat.jpg_thumb
j1done.jpg_thumb
J1combat.jpg_thumb
j1done.jpg_thumb
J1combat.jpg_thumb
j1done.jpg_thumb
J1combat.jpg_thumb
j1done.jpg_thumb
J1combat.jpg_thumb
J1combat.jpg_thumb
J1combat.jpg_thumb
J1combat.jpg_thumb
J1combat.jpg_thumb
J1combat.jpg_thumb
J1combat.jpg_thumb
J1combat.jpg_thumb
J1combat.jpg_thumb
J1combat.jpg_thumb
J1combat.jpg_thumb
J1combat.jpg_thumb
J1combat.jpg_thumb
J1combat.jpg_thumb
J1combat.jpg_thumb
J1combat.jpg_thumb
J1combat.jpg_thumb
J1combat.jpg_thumb
J1combat.jpg_thumb
J1combat.jpg_thumb
J1combat.jpg_thumb
J1combat.jpg_thumb
J1combat.jpg_thumb
J1combat.jpg_thumb
J1combat.jpg_thumb
J1combat.jpg_thumb
J1combat.jpg_thumb -
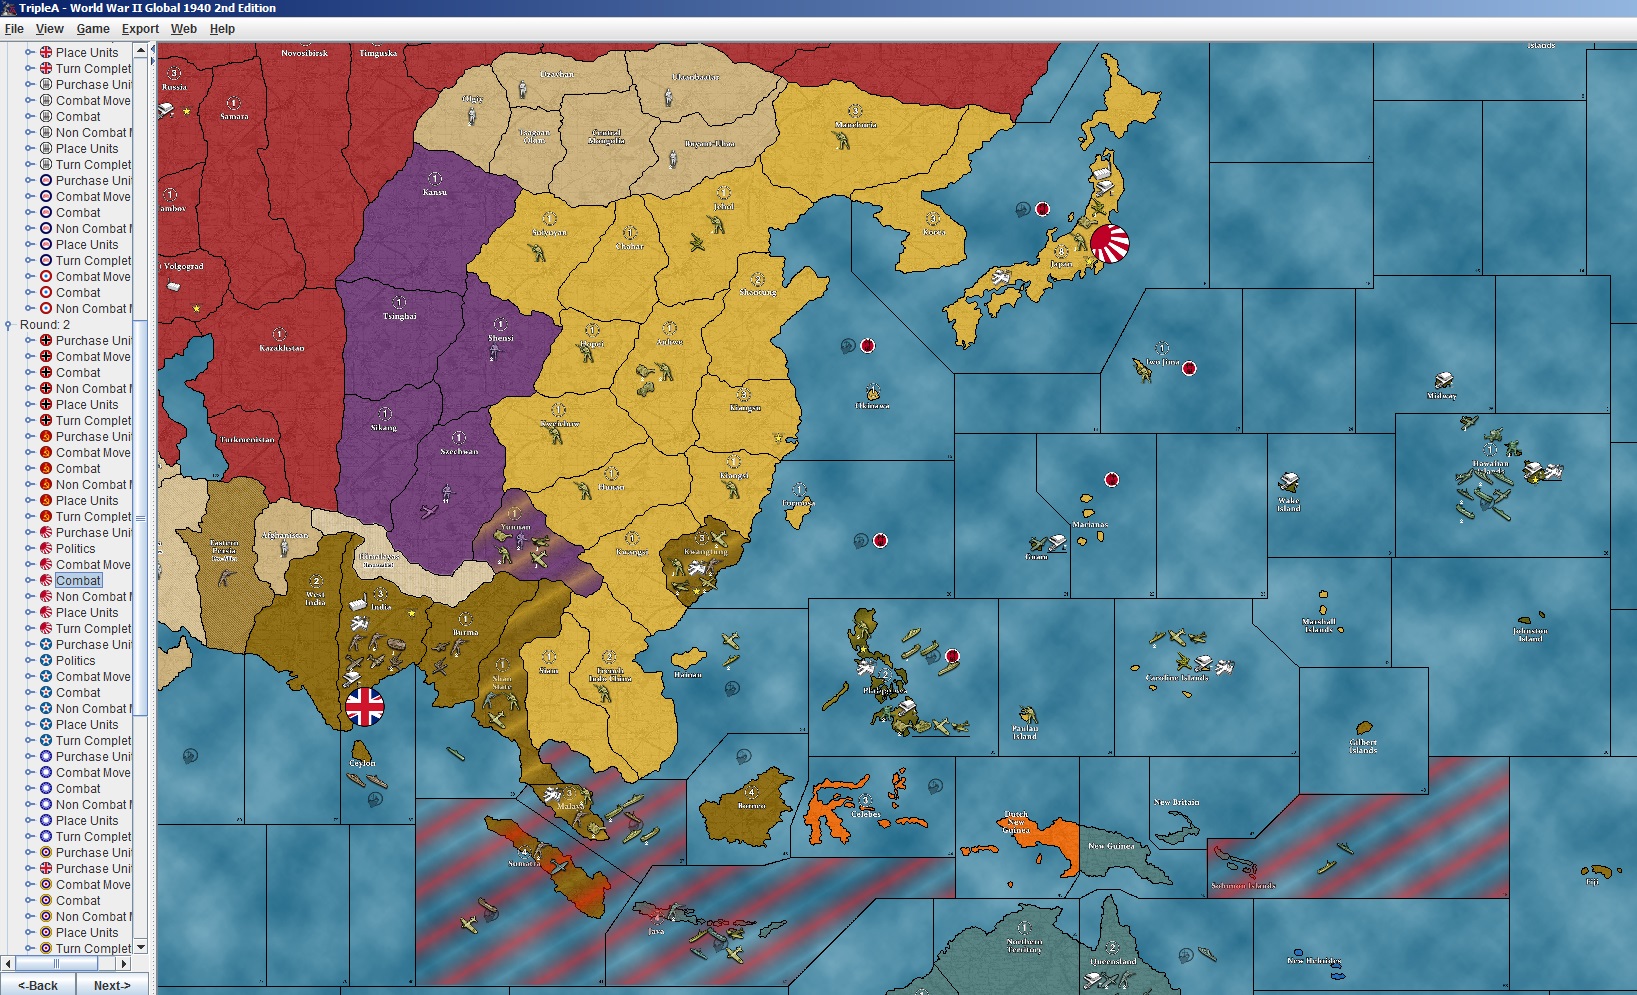
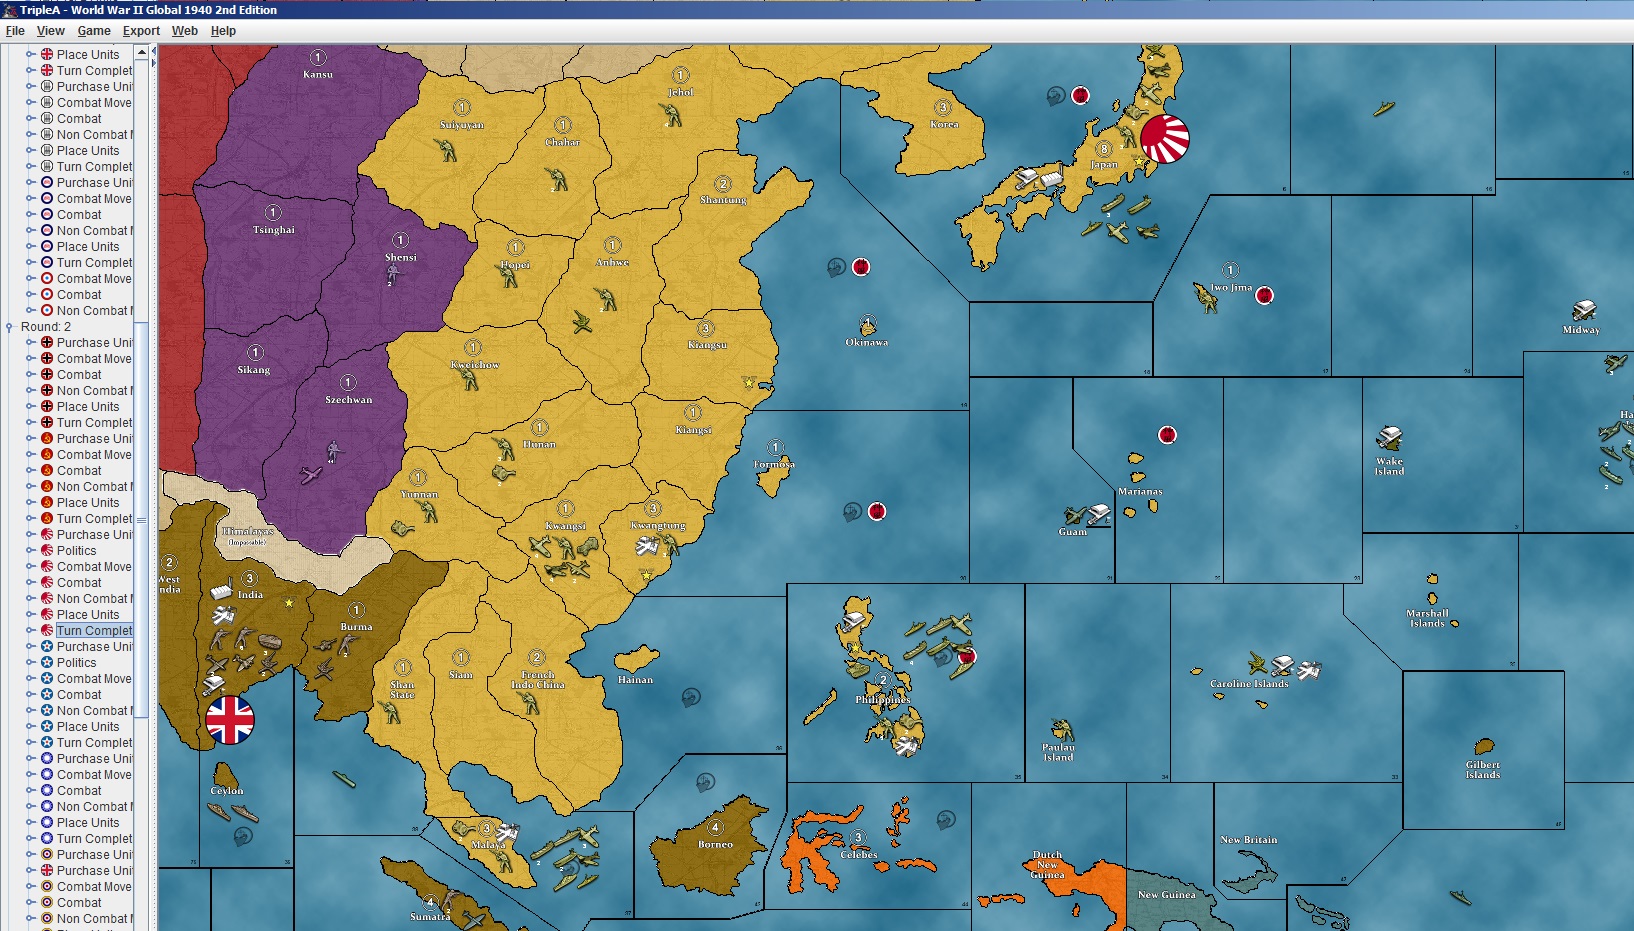
Pac turn 2 combat and complete
j2combat.jpg_thumb
j2done.jpg_thumb
j2combat.jpg_thumb
j2done.jpg_thumb
j2combat.jpg_thumb
j2done.jpg_thumb
j2combat.jpg_thumb
j2done.jpg_thumb
j2combat.jpg_thumb
j2done.jpg_thumb
j2combat.jpg_thumb
j2done.jpg_thumb
j2combat.jpg_thumb
j2done.jpg_thumb
j2combat.jpg_thumb
j2done.jpg_thumb
j2combat.jpg_thumb
j2done.jpg_thumb
j2combat.jpg_thumb
j2done.jpg_thumb
j2combat.jpg_thumb
j2done.jpg_thumb
j2combat.jpg_thumb
j2done.jpg_thumb
j2combat.jpg_thumb
j2done.jpg_thumb
j2combat.jpg_thumb
j2done.jpg_thumb
j2combat.jpg_thumb
j2done.jpg_thumb
j2combat.jpg_thumb
j2done.jpg_thumb
j2combat.jpg_thumb
j2done.jpg_thumb
j2combat.jpg_thumb
j2done.jpg_thumb
j2combat.jpg_thumb
j2done.jpg_thumb
j2combat.jpg_thumb
j2done.jpg_thumb
j2combat.jpg_thumb
j2done.jpg_thumb
j2combat.jpg_thumb
j2done.jpg_thumb
j2combat.jpg_thumb
j2done.jpg_thumb
j2combat.jpg_thumb
j2done.jpg_thumb
j2combat.jpg_thumb
j2done.jpg_thumb
j2combat.jpg_thumb
j2done.jpg_thumb
j2combat.jpg_thumb
j2done.jpg_thumb
j2combat.jpg_thumb
j2done.jpg_thumb
j2combat.jpg_thumb
j2done.jpg_thumb
j2combat.jpg_thumb
j2done.jpg_thumb
j2combat.jpg_thumb
j2done.jpg_thumb
j2combat.jpg_thumb
j2done.jpg_thumb
j2combat.jpg_thumb
j2done.jpg_thumb
j2combat.jpg_thumb
j2done.jpg_thumb
j2done.jpg_thumb
j2combat.jpg_thumb
j2done.jpg_thumb
j2combat.jpg_thumb
j2done.jpg_thumb
j2combat.jpg_thumb
j2done.jpg_thumb
j2combat.jpg_thumb
j2done.jpg_thumb
j2combat.jpg_thumb
j2done.jpg_thumb
j2combat.jpg_thumb
j2done.jpg_thumb
j2combat.jpg_thumb
j2done.jpg_thumb
j2combat.jpg_thumb
j2done.jpg_thumb
j2combat.jpg_thumb
j2done.jpg_thumb
j2combat.jpg_thumb
j2done.jpg_thumb
j2combat.jpg_thumb
j2done.jpg_thumb
j2combat.jpg_thumb
j2done.jpg_thumb
j2combat.jpg_thumb
j2done.jpg_thumb
j2combat.jpg_thumb
j2done.jpg_thumb
j2combat.jpg_thumb
j2combat.jpg_thumb
j2combat.jpg_thumb
j2combat.jpg_thumb
j2combat.jpg_thumb
j2combat.jpg_thumb
j2combat.jpg_thumb
j2combat.jpg_thumb
j2combat.jpg_thumb
j2combat.jpg_thumb
j2combat.jpg_thumb
j2combat.jpg_thumb
j2combat.jpg_thumb
j2combat.jpg_thumb
j2combat.jpg_thumb
j2combat.jpg_thumb
j2combat.jpg_thumb
j2combat.jpg_thumb
j2combat.jpg_thumb
j2combat.jpg_thumb
j2combat.jpg_thumb
j2combat.jpg_thumb
j2combat.jpg_thumb
j2combat.jpg_thumb
j2combat.jpg_thumb
j2combat.jpg_thumb
j2combat.jpg_thumb
j2combat.jpg_thumb
j2combat.jpg_thumb
j2combat.jpg_thumb
j2combat.jpg_thumb
j2combat.jpg_thumb
j2combat.jpg_thumb
j2combat.jpg_thumb
j2combat.jpg_thumb
j2combat.jpg_thumb
j2combat.jpg_thumb
j2combat.jpg_thumb -
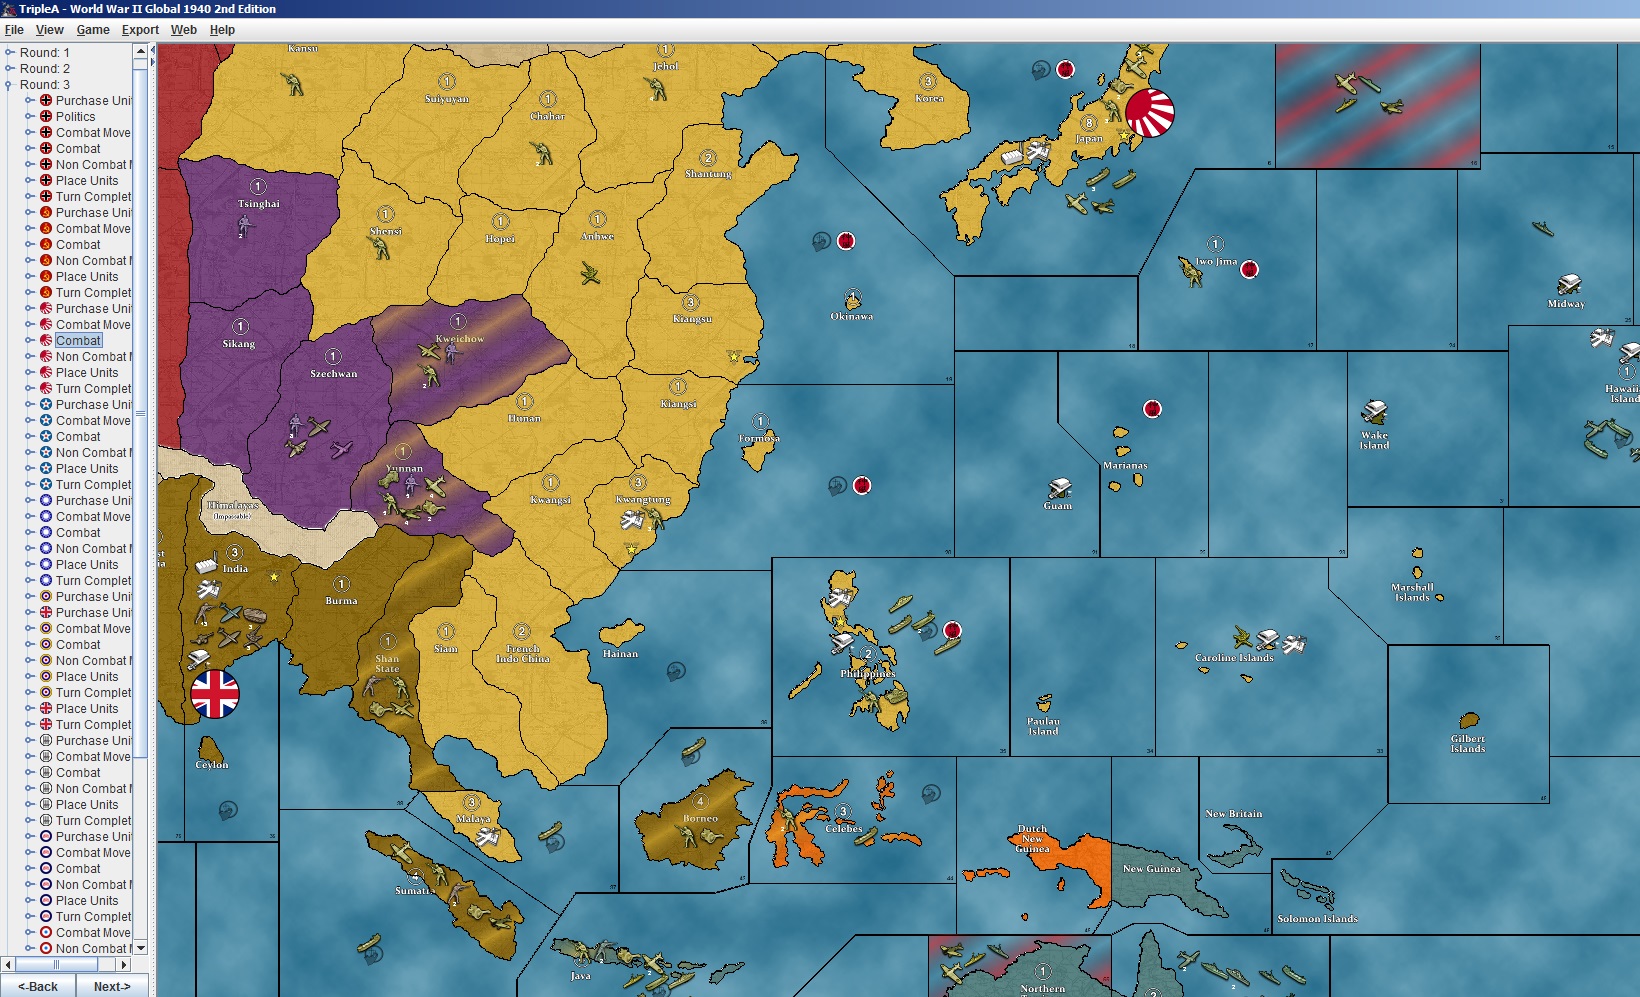
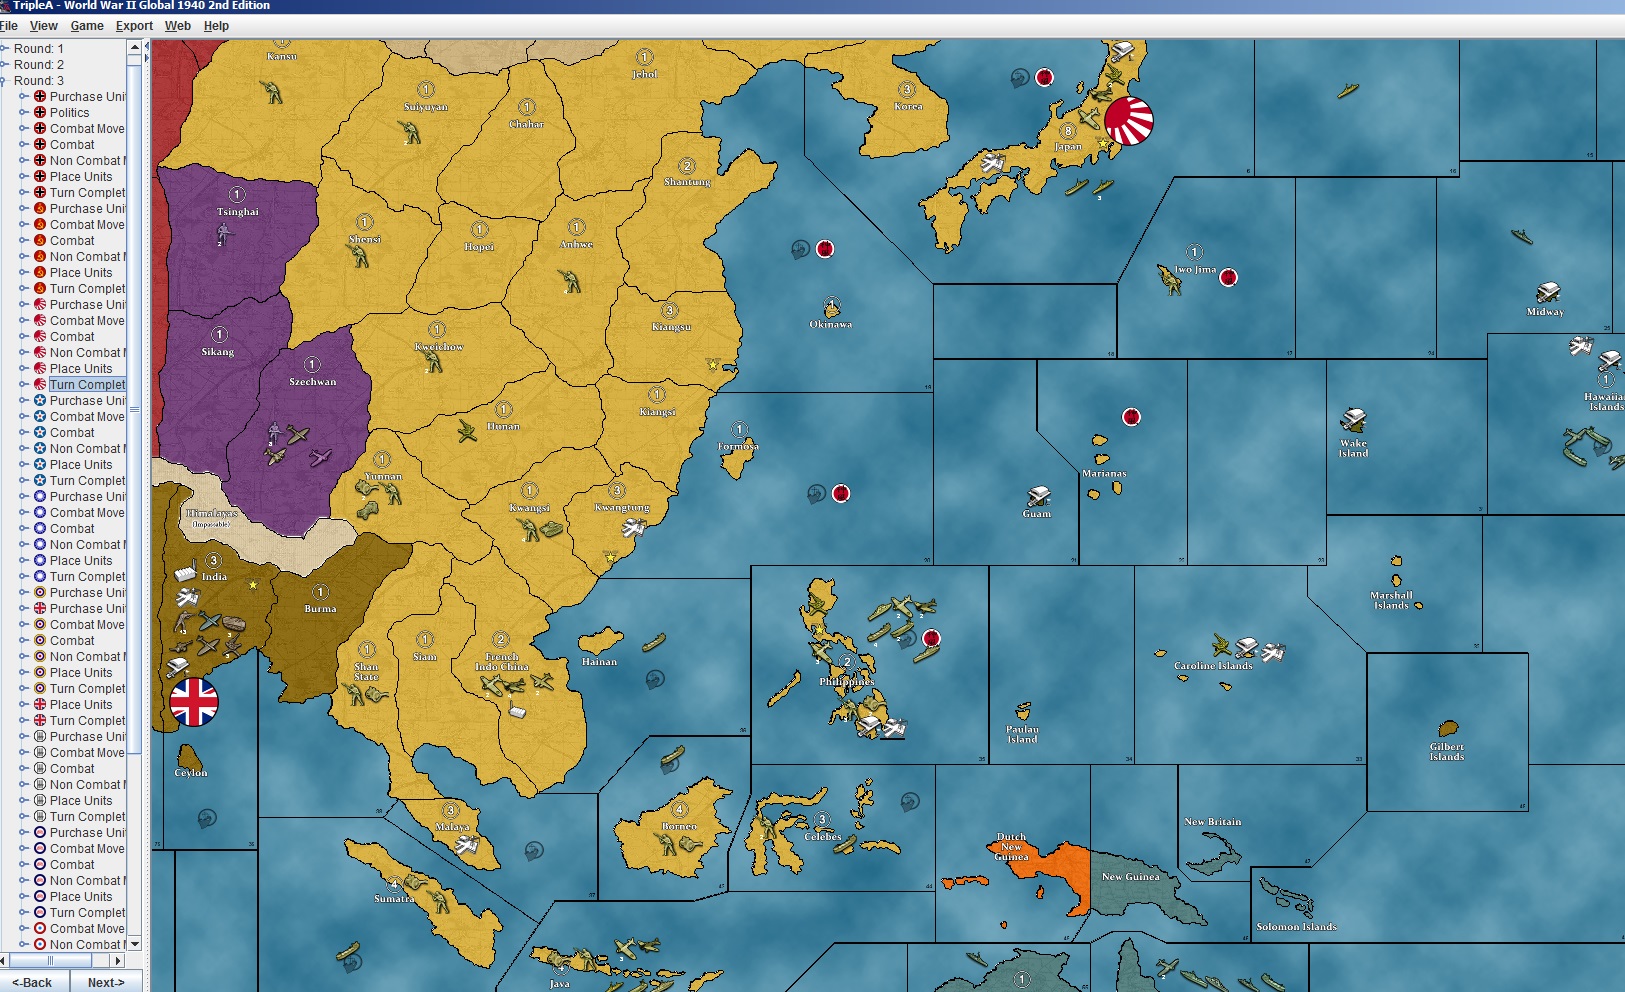
Pacific turn 3 combat and complete
Notice that there’s really nothing at all Allies can do about any of this, the opponent played it about as well as he could have, and that the number of hits scored by Allies is about what can be expected barring very low probability outcomes.
A few transports get sacrificed in DEI on J3, which is compensated for by the additional transport builds on J2 which you can see in the SZ6 at the end of these turns. The transports in the Phillipines can pick up the units from the other islands and take them to Burma or Shan or recapture an island as needed, and the new transports go to Phillipines to pick up the units left there, which maintains the level of threat.
j3combat.jpg_thumb
j3done.jpg_thumb
j3combat.jpg_thumb
j3done.jpg_thumb
j3combat.jpg_thumb
j3done.jpg_thumb
j3combat.jpg_thumb
j3done.jpg_thumb
j3combat.jpg_thumb
j3done.jpg_thumb
j3combat.jpg_thumb
j3done.jpg_thumb
j3combat.jpg_thumb
j3done.jpg_thumb
j3combat.jpg_thumb
j3done.jpg_thumb
j3combat.jpg_thumb
j3done.jpg_thumb
j3combat.jpg_thumb
j3done.jpg_thumb
j3combat.jpg_thumb
j3done.jpg_thumb
j3combat.jpg_thumb
j3done.jpg_thumb
j3combat.jpg_thumb
j3done.jpg_thumb
j3combat.jpg_thumb
j3done.jpg_thumb
j3combat.jpg_thumb
j3done.jpg_thumb
j3combat.jpg_thumb
j3done.jpg_thumb
j3combat.jpg_thumb
j3done.jpg_thumb
j3combat.jpg_thumb
j3done.jpg_thumb
j3combat.jpg_thumb
j3done.jpg_thumb
j3combat.jpg_thumb
j3done.jpg_thumb
j3combat.jpg_thumb
j3done.jpg_thumb
j3combat.jpg_thumb
j3done.jpg_thumb
j3combat.jpg_thumb
j3done.jpg_thumb
j3combat.jpg_thumb
j3done.jpg_thumb
j3combat.jpg_thumb
j3done.jpg_thumb
j3combat.jpg_thumb
j3done.jpg_thumb
j3combat.jpg_thumb
j3done.jpg_thumb
j3combat.jpg_thumb
j3done.jpg_thumb
j3combat.jpg_thumb
j3done.jpg_thumb
j3combat.jpg_thumb
j3done.jpg_thumb
j3combat.jpg_thumb
j3done.jpg_thumb
j3combat.jpg_thumb
j3done.jpg_thumb
j3combat.jpg_thumb
j3done.jpg_thumb
j3combat.jpg_thumb
j3done.jpg_thumb
j3combat.jpg_thumb
j3done.jpg_thumb
j3combat.jpg_thumb
j3done.jpg_thumb
j3combat.jpg_thumb
j3done.jpg_thumb
j3combat.jpg_thumb
j3done.jpg_thumb
j3combat.jpg_thumb
j3done.jpg_thumb
j3combat.jpg_thumb
j3done.jpg_thumb
j3combat.jpg_thumb
j3done.jpg_thumb
j3combat.jpg_thumb
j3done.jpg_thumb
j3combat.jpg_thumb
j3done.jpg_thumb
j3combat.jpg_thumb
j3done.jpg_thumb
j3combat.jpg_thumb
j3done.jpg_thumb
j3combat.jpg_thumb
j3done.jpg_thumb
j3combat.jpg_thumb
j3done.jpg_thumb
j3combat.jpg_thumb
j3combat.jpg_thumb
j3combat.jpg_thumb
j3combat.jpg_thumb
j3combat.jpg_thumb
j3combat.jpg_thumb
j3combat.jpg_thumb -
One more note, in case anyone was wondering…
UK can stack Burma on UK1 and then combine-and-hold with China on Yunnan on UK2. The problem with that is that UK makes only 6 income on UK2 and then can’t hold India from the direct amphibious threat from all those transports. The Japan response to this maneuver would be to move all the transports and their loads to Malaya and hit India on J4, while holding off on building the IC in FIC. UK/ANZAC cannot put enough units to stop 6 transports plus air plus bombard shots so that gives Japan a 100% attack on India for J4 that can’t be countered. In this scenario Japan would have a little bit more trouble in China but UK Pac is dead earlier and Japan has the use of that IC instead of the one in FIC. Japan can then build new loaded transports to clean up the Yunnan stack; staging in FIC is immune from a Chinese counter, UK doesn’t have enough units to attack, and US/ANZAC help is too far away to get there in time.
-
There’s still no reason to not do J1 that I’ve read (but I’ve not seen your screenshots). The points have been presented before in several threads, and if nobody else does it or finds links, I’ll maybe get around to doing it on a lunch break or something soon.
You can do basically everything you want to do on J2 on J1 with only slightly higher risk, with no net gain for the US, with significantly higher loss for UK Pac, and with a slight increase in your Japanese income. The only downsides are 1: America can go full Atlantic 1 turn earlier (great to see for Japan!), and 2: ANZAC makes 5 more IPCs for one turn. But I am going to have to stop there, bed time.
Or, maybe, you show me something I haven’t seen before and blow my mind. Here’s hoping.
-
Part of the equation is that I see the UK battleship as being perhaps the least useful unit, PU for PU, on the whole board. I do not view it as being even close to the equivalent of the US getting +20 to spend.
Another part is that you get free kills on UK and ANZAC transports when they inevitably go for Sumatra and Java in round 1, and that is a huge benefit to Japan. UK can’t replace its transport and ANZAC takes two turns minimum to do so. You often get a free destroyer kill where the battleship used to be, and you can absorb it with your BB - which gets repaired by the harbor right away - instead of risking the loss of a cruiser.
An additional factor is that having the position in Malaya on the first turn Japan is at war makes DD blocking in DEI impossible, and thus makes them easier to capture and hold.
Then there is also the risk of a successful China/UK combine in Yunnan which can be a serious problem for Japan. This can really only be prevented by having threat on Burma on the turn in which Japan goes to war. In the J1 scenario that threat can be completely nullified by a single ship left off Malaya. If you look at the prototypical J1 outcome http://www.axisandallies.org/forums/index.php?action=dlattach;topic=26960.0;attach=172410;image Japan has 2 land units that can reach Yunnan, against a potential stack of 13inf/2ftr/1tac for China/UK plus a backup UK stack in Burma ready to reinforce. Japan CAN wipe this out… at the average cost of a third of its air force, with some potentially catastrophic outcomes in that mix - while not being able to take the territory and facing yet another Chinese/UK stack of 17 units the next round. This is a great way for Allies to wipe out Japanese starting land and air forces, which can make China a serious problem moving forward and greatly weakens the ability to defend against the US. So what if India dies? They die anyway at even lower odds later on, if they can weaken Japan that much they have done their job. Now US is full-building Pac and Russia has every incentive to join in the party, and Japan is without much of the material they require to hold off these threats - and don’t yet have the income to take them all on.
So no, I do not at all like the potential outcomes of the J1 - there are some really really bad scenarios in there, whereas there are none at all in the super-safe J2 alternative. Allies have decent responses to J1. They don’t have ANY good responses to my version of J2.
I would also turn the question around and ask: what additional benefit is gotten by attacking on J1? By the end of J3, which situation is better for Japan, a typical outcome of a J1 attack (which comes with risk), or the situation in the J3done screenshot (which comes with almost no risk)?
If you can show me an outcome from a J1 attack which is better than the outcome from the J2 under discussion, I’d be happy to look at it. Take a screenshot from a save and show me the alternative for the J1 case.
-
@Private:
Being on the edge of losing to wittman, who had a 13 bid as allies, I wonder what allied bid you feel would effectively counter the strategy you lay out? My understanding is that experienced players believe axis to have a significant advantage without such a bid.
That’s my question as well. I don’t even know if an effective counter strategy can be pulled off by Allies without serious mistakes made by the Axis player. That’s one concern I have had about G40 for quite some time and it has yet to be demonstrated to me that the Allies are viable on this map. If someone does pull it off, I would very very much like to know how.
Took a look at the League board pp 1&2 - bids vary between 12 and 28, averaging 20.5. wittman is offering me 18. Mmm!
-
K, summary time. This is super quick and dirty as I stuff my face during my lunch break. I very well may have forgotten something.
I assume you’re familiar with the “standard” J1. The user here, Cow, may not have invented the concept (or maybe he did), but he definitely popularized it.
Further assumptions:
-All players are of equal skill, and that the game will take place at an advanced or higher level of play.
-Russia does not stack Amur. (If they do (they won’t), you should take this gift.)
-If Russia fully stacks Buryatia (and doesn’t send 6 inf to Yakut), you understand the slightly increased risk of doing J1.America:
On the Philippines, you kill a US destroyer/submarine that could have escaped, as well as a fighter. You have a 99%++ chance to win the fight.
I don’t like the hard IPC metric, but in this instance it’s entirely accurate. You are killing 6+8+10 = 24 IPCs of very mobile units that would have otherwise survived and would have been directly and immediately involved in the Pacific theater. Instead of collecting 52, America collects 70, for an increase of +18. (72 if they take Brazil for +20).
The loss of a land unit on the Philippines can be taken from Paulau. Losing two ground units isn’t optimal, but is still fine. If you get very unlucky, and hit that less than 8% chance, and lose three ground units, then that’s not fun for J2.
In the instance of losing three ground units, you must choose 1: to lose a plane instead, or 2: You’ll likely be taking Malaya J2 and the (rest of) the money islands J3 in that instance, but it’s sometimes possible to still take all of the money islands.
Pros:
1: You have actually removed 4 IPCs from America’s Pacific effort by doing J1, not added anything to it.
Cons:
1: America now has a major factory to build with in the Pacific, so can place more than three boats in the water. This is not a major difference. America usually builds at least one expensive unit on A1 anyway. The only time this would matter much is if they build six destroyers or 8 submarines or something (which is likely non-optimal).
2: America could decide to mess with Europe a bit. This is great for Japan. This is not great for Germany, but by your own admission Germany is likely able to handle this, and we’re speaking entirely about Japan here.
3: ~8% chance to either lose a plane, or to potentially reduce J3 income by 9-16 (somewhat mitigated by ANZAC’s income going down by 5).
United Kingdom:
J1 trounces the p�ss out of the poor brits.
I would disagree that the BB is the least valuable unit in the game. Indeed, it’s not useful in most games the first couple of turns, but any decent British person, if they can keep it, will be using it effectively on or before UK 4. Whether that’s in the med, or doing a suicide ram into your fleet before ANZAC does the same, it’s a damn battleship, and it is very useful. Sending the cruiser down to hit the BB is a 66% chance to lose the cruiser. 33% chance to keep it. If you do keep it, the brits can decide to put planes and a destroyer out of place to kill it, which is great for Japan. Britain never does this. That cruiser can then potentially convoy Malaya. Losing the cruiser hurts, no doubt, especially since you’ll likely be doing some bombardments and gimungous naval battles later, but you still have three other bombarding units, and I’d argue it’s totally worth the cruiser to sink the battleship. The reduction of variables in the game helps the Axis. When you add in the 1/3 chance of the cruiser surviving (actually very slightly less but let’s not get too deep into probability), which is a god damned fantastic boon, the move is fully justified in my opinion.
The Kwangtung fight is the most painful one, because there is the 11% chance to lose both of your ground units. In this case, I’d argue it’s better to lose a plane (which can be replaced quickly at any point later on since it’s flying in) because that also robs UK Pac of 8 IPCS (3 + NO). Either way, you can stand the loss of one plane at this stage of the game, especially if it’s only an 11% chance.
You can still lightly threaten Calcutta on J3, forcing a destroyer block (which you kill with a great ratio), or forcing them to reduce aid to China. You can have a serious J4 threat against Calcutta, which then adds enough pressure to turtle them up.
There are a lot of variables about the UK’s pacific transport. Do they go for Sumatra? Dutch New Guinea? Stack on Java? Persia? Iraq? Something else weird? All I can say about this is, is see my comments on the ANZAC transport below. Your arguments for J2 being better at handling this transport are flawed.
Pros:
-UK Pac’s economy is immediately reduced to only 10 + a money island if they choose to lose the transport to take one (which I’d argue is non-optimal). There’s also a 16.6% chance that you convoy them in SZ 37.
-A BB is destroyed, reducing the UK Pac’s navy’s effectiveness by half, and saving the Med. Axis or Japan grief later on.Cons:
-Japan has a ~2/3 chance to lose a cruiser.
-Japan has a 11% chance to lose a fighter in Kwangtung.ANZAC:
Anzac has the most to gain from this. They will make their 10 + 5 from the Malaya NO + another 4 or 5 more, depending on what they want to do, for 19 or 20 IPCs. (Britain could have also gotten Dutch New Guinea for them, meaning 24 IPCs, but that’s at a loss of a british transport).
J1 is definitely worse than J2/J3 if your goal is to take Sydney, but let’s be honest, nobody really ever guns for an early Sydney against non-stupid Allied players. There’s too much wealth to be had in China/the money islands. Easily shutting down Calcutta’s income to 5 - convoys helps both sides of the map immediately. These things are easily argued to be more advantageous than a very complex J4/J5 Sydney.
ANZAC is very possibly going to lose that transport to annoy you whether you do J1 or J2. If you do J1 and they don’t move it out to claim anything, it’s also not doing anything useful. Your claiming you get to kill the ANZAC transport where you otherwise may not and that this is a completely positive thing exclusive to J2 is a fallacious statement.
China:
China is in a stronger position than it might otherwise be, but not by a great amount. You mention them stacking Yunan, which is a major fear of yours. Yeah, that kinda sucks, but that’s not that bad. You can bring up a couple of infantry to defend your plane stack on Kwangsi. They won’t attack it, and if they do: good. Wasting 80% of the Chinese land units at this stage in the game is a dozen nails in their coffin. Is your progress in China slowed for a couple of turns? Potentially yes. When the Japanese ground forces move south a bit more, by J4/J5, China is in full retreat, having never made any real progress. Without Russian aid, China is dead or crippled, with only a momentary hiccup in the process coming when Japan must fight an American fleet or take Calcutta. Also see my comments below in Japan’s section.
Japan:
You now own FIC. You can place a mIC there one turn earlier. You now own Kwangsi, where you can also optionally place a mIC there one turn earlier. These can produce 6 land units (mechs, likely) to nail China, or to refill your transports on their way to wherever.
You now own the Philippines, which is a fantastic staging point for J2.
Instead of gaining +14 over your original income (Trading with America NO + 4 in China), you gain +14 or +15 (3 or 4 in China, +FIC, +Borneo, +Philippines, +Kwangtugn) so either it’s the same or better.
You are still in position to take the money islands on J2 unless ANZAC/UK has done something screwy with their planes/transports. However, if they do that, then you’re now able to kill their planes/transports. It’s a win/win situation. They could have done something equally as screwy whether you did J2 or J1, mind you, so this doesn’t really even matter.
You have an 11% chance and an 8% chance to lose a plane. You have a lot of planes. Come on. And while losing both would kinda suck, there’s only a ~1% chance of that.
You hurt the allies more or no less by doing J1 instead of J2. Inarguable. Your situation as Japan is either stronger doing J1 than J2, or the same, unless you get truly terrible probability. J2 reduces this probabilistic self-fucking, but a very tiny amount made even less isn’t really all that noticable. It’s like being stranded in the middle of, then drowning in, Lake Superior vs. the Indian Ocean. Apart from the saltwater stinging your eyes a bit as you gulp in your final, deadly breath (drink?), what’s the damn difference?
_edit-
And finally, there’s one more thing I like about J1 that has no place in a mechanical discussion, but I feel is worth mentioning as a footnote. When playing at a table of real people, getting the guy playing America into the fight sooner is a bit more fun for him._
Suggested Topics

