• @dinosaur:

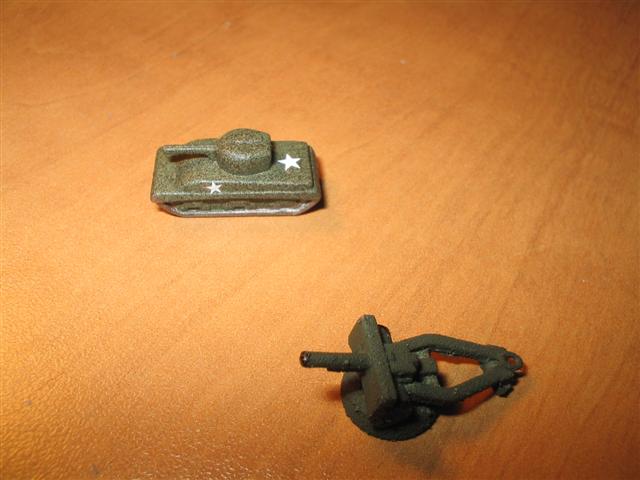
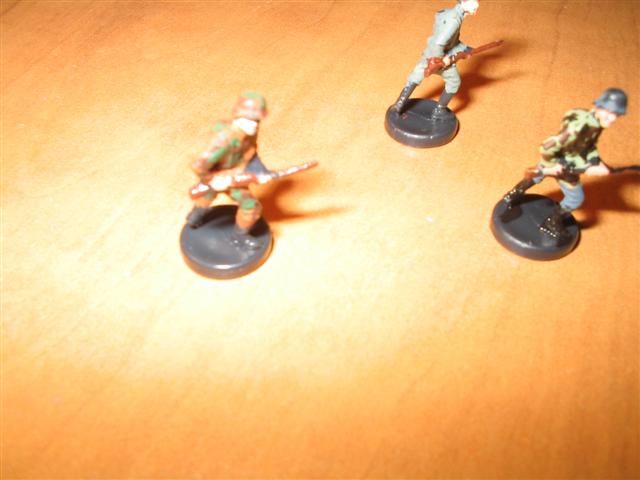
    One note you will see if you look closely at the photos.  The paint is fairly soft, and the molding process leaves a finish that is not best for the paint.  The paint has started to come off on the corners a bit.  It isn’t a big deal but keep that in mind.  I suspect there is someone out there that may know a pretreatment that would help the paint adhere to the soldiers even better.

    Thanks for sharing your labor of love Dinosaur.  Great work.  I’d never painted plastics before either, so it took some research and some dabbling… here is one of the best articles I found that sums it up.

    http://www.boardgamegeek.com/thread/183861

    – article – (and to whoever wrote this… thank you!)

    I’ll copy here the same thing I always post about painting the plastic men up for our Descent game, since we use the same technique for any plastic gaming miniatures we paint up.

    Just insert the word “T.O.I” or “Memoir '44” for “Descent”. Indeed, someday I have to get around to painting those up, too!

    ////////////

    My wife generally does our miniatures painting (she is really quite good), but for our Descent game we went with a tried-and-true, newbie-friendly method so that I could give her a hand, and still get nice results.

    Plus, we’re cheap, old-school gamers. We don’t like to pay money if we don’t have to.

    Step One: Primer
    Use White automobile primer, no-name brands from low-cost stores like WalMart, etc. Coat lightly, but evenly. The masters don’t have to be pure white (they’ll wind up looking kinda pink-ish). Don’t worry. You just want enough primer for the other paint to stick to.

    Step Two: The Paints
    Use acrylic craft paints, like “Apple Barrel” paints, from low-cost stores like Walmart, etc. Don’t buy them at craft stores, or you’ll spend too much. Each tube of paint runs about 50 cents, and ours have lasted years and years. However, for metallics (like for chainmail, bronze, etc.) we still find that the standard miniatures paints are a little nicer.

    Step Three: The “Dip”
    For Descent miniatures, we opted to go for the “Dip” method, or “Magic Dip”, as it is sometimes called.

    What is this magic dip, you ask?

    Minwax light- or medium-brown wood stain. Yes, wood stain. I know, it sounds crazy! A little can, costs about 2 dollars, lasts for years of projects.

    Some people actually “dip” their entire miniature in the stain, then wick off the excess. I find that a bit much, so instead we just paint it on with a brush.

    The Dip Method:
    a. When painting, paint broad general colours over things, but paint them in lighter tones than you normally would. So paint the beastman skin a light flesh tone, paint his loincloth a light red, leave his hair primed white, paint his sandals light brown. He looks cartoonish and ugly so far, with just general bright colours, and no details.

    b. Brush on Minwax wood stain. Light/medium Brown colours work well, because they don’t darken the original paint too much. IF you want more black colours, make it a very light grey/black, or you’ll just stain the whole thing black.

    The stain flows over everything, but then runs into the cracks by preference. It acts similarly to an ink wash, but with slightly different (and useful) results.

    The wood stain tones down the colours (that’s why you painted them lighter than you would’ve normally), blends them, blurs the edges between each broad colour band. It also fills in the cracks with dark colour, making the details POP out instantly. Finally, it coats the miniature with a nice protective coating.

    It really does blend the colours together. Our Hellhounds were painted with broad bands of 3 shades of brown, then stained, and suddenly they looked all blended and shaded, but with the cracks filled in an the manes completely detailed out. It is truly nifty to watch!

    If too much stain has pooled in one spot, use a small piece of paper towel to wick off the excess easily. Check the miniature every few minutes, to see that you’re getting the results you want.

    Let the stain dry completely, until it is no longer tacky. This can take a full 24 hours for some miniatures, but we’ve managed to paint miniatures just an hour or so after staining.

    c. Now, go back and drybrush on a few last details. Drybrush teeth white (but leave those cracks filled in brown/black, so the details still stand out nicely). Drybrush chainmail with a nice metallic silver. And so on. Just pop out those last few details that you want to call attention to.

    d. Clear-coat with a dull/matte acrylic clear coat protector. This will stop the paint from chipping through extended use.

    /////////////

    “The Dip” is fast, simple, easy, and gets results! I can’t paint a miniature to save my life, but I’ve managed to paint up my descent miniatures quite nicely. Of course, for truly nice work, I hand them over to my wife for detailing. However, for the general monstrous-type miniatures, when I just want to paint them quickly-yet-prettily, this method can’t be beat.

    “Magic Wash” method (an alternative to “the dip”)
    Another method is to use “Magic Wash”, which is a mixture of 4 parts water to one part “Miracle Floor Wax”, then mixed with paint. This forms a paint wash, which you can use instead of “the dip”, but with a similar sort of aim. You can customize the hue, tint, and colour to your heart’s content, wash it over your figure, and it’ll seep into the cracks. Make your Wash colour nice and dark (darker than what you’re painting), and it’ll also harden up ever so slightly when it dries (that’s the plastic wax component of the Miracle Floor Wax) to form a mild protective coating on your miniature.

    Either method is quick and easy and cheap.


  • I’m always amazed at step #1.  SPRAYPAINT MY PEICES… are you nuts!?

    But this is the magic.  When it dries it shrinks and creates a flexible shell around your plastic figure.  You lose none of the detail.  This shell means you can bend the rifles (e.g., the Japanese are the worst offenders) and the paint doesn’t flake off.

    So now you can paint this flexible shell with acrylics and it sticks very very nicely.  Finally, the Minwax puts another protective shell around your acrylic and you can step on these figures and they are still o.k.

    My group is very rough on my figures but they weather the beating very nicely.

    Seeing all the hard work you’ve put into your figures you should give this method a try.  You won’t be disappointed.

    Enjoy!


  • Like I said previously I can’t take a digital photo to save my life, but here is some of my British 8th Army.  I mount them on washers so they have a nice feel and color code the washers.

    http://www.mediafire.com/imageview.php?quickkey=rxoy0mf9umx&thumb=5


  • ok where did you get the stand for that flag?

    what store and part number?

    also what washer you use? and where do you buy it?


  • Your favortie… Home Cheap-o!

    WolfCraft 1/2" RH Plugs.  25/pack.  #2957.

    • They might be discontinuing them. They had them on sale for $1 down from $1.77.

    I centerbore them with a dremel tool press (n.b., so they don’t split) and then tap in a number #10 wire braid (e.g., 1.5") for flags and bombers.  Fighters are mounted on a #17 - 1" braid.

    I use 1/4" washers - 100ct #19822.  They have a nice weight.  However, with AA50 I switched to just using pennies.  It’s cheaper ;-) A washer is $.0345 vs $.01 - though they  are a little bigger.

    Anyway, after it is assembled I spraypaint it all black with the Home Cheap-o $.99 enamal special and bada-bing-bada-boom nice shiney black flagpole/airplane stand.

    Flags are just printed on label paper.

    Enjoy!


  • Thanks for that info.


  • Hey, Dinosaur, if you’re looking for additional piece ideas, there’s a whole world of HO-scale infantry miniatures to work with, just in cheap plastic… for Chinese, for instance, Caesar Miniatures just came out with a set of WW2 Nationalist Chinese infantry that look pretty good. They’re in blue, and I’m no painter, but serendipitously, that’s a color that works for me… since you paint, that probably isn’t a problem for you.  For my A&A variants, I often use HO’s from companies like Airfix, Revell, ESCI, etc. for various types of elite units (like German paratroops or British Commandos) or minor nations (like the French, Italians & Chinese).  Yeah, I just couldn’t go with using a red Russian for the Chinese, either… I used them for elite Soviet “Red Guards” instead, so they would have an option that could go toe-to-toe with those German “SS Panzergrenadiers” (I sometimes use old-edition gray for standard infantry and new-edition black for those SS troopers).

    Anyway, if you’re interested in trying some HO sets and want to save a little research time, I’d be happy to give you some hints on what’s available and where you can find them.


  • :lol:

    Where can i go to get some painted pieces or have someone paint mine. Plus i would like a bigger revised board like 5 ft by 3 ft or something.


  • Looks real good imp but where would i get this printed out at?


  • put on disk and take to printers.


  • Two years ago, I changed most of my Axis and Allies pieces for CinC product, 1/700 airplanes and 1/72 soldier from different manufacturers.
    I painted the infantries, airplanes, tanks and warships with the real paint scheme and/or camouflage).
    Everything…… except artillery,subs and AA gun.

    My german, US and Russian tank are decorated with 1/285 decals from Microscale.
    I rebuilted most of the japanese,US and UK carrier.

    Al


  • I’ve given the pieces in my D Day and Bulge games a ‘makeover’, paint jobs for the Germans and US mainly, but the UK and Canadian infantry were a little more involved, using glue to extend the tropical shorts (!) into battledress and the shirts of the airborne guys into paratrooper smocks.  I did the US hardware in light Olive and the British in darker bronze green.  The allied armor got white star decals while the Germans got a coat of camo.

    My last project was to make the UK artillery pieces look more like British 25 pounder guns!  This was done by trimming the spade detail and bending the trail legs together; a small sliver of balsa wood was added underneath to represent the box spade and a towing eye added from a length of broken jewelry chain.  The whole thing is then glued to a brass trim washer which represents the quick-traverse turntable that was a characteristic of this gun.  Sounds a lot more complicated than it was to do! The US 105’s have the upper recoil cylinder (from a length of wire) added atop the barrel and a paint job -I have yet to tackle the job of putting gun shields on all those 88’s though……

    axis & allies D-Day UK Sherman & 25 pdr.jpg


  • Have any photos?


  • @Constantinople:

    Have any photos?

    Yes, I posted on of my “25 pounder” - here are some of the bad guys

    axis & allies D-Day German infantry SS & Para.jpg


  • Allied airpower and infantry

    axis & allies D-Day pieces B17 & Lancaster bombers.jpg
    axis & allies D-Day pieces P38 & Typhoon fighters.jpg
    axis & allies D-Day pieces UK & Canadian infantry.jpg


  • What did you use for the aircraft bases?

    What others used for aircraft bases?

    Thanks!!


  • The aircraft bases are a fender washer with a fishing line sinker weight glued on.  A small brad nail goes up throught the sinker and into a tiny hole drilled in the airplane.  Before glueing the plane on top, I sprayed them with the appropriate A&A base color - light olive for the US, tan for GB and gray for the Luftwaffe peices in the Bulge game.
    I can do roundels with paint and marker pens but US stars and German ‘outline’ crosses required after market decals!

    @Shakespeare:

    What did you use for the aircraft bases?

    What others used for aircraft bases?

    Thanks!!


  • Fishing line sinker, how clever!!

Suggested Topics

  • 83
  • 24
  • 15
  • 2
  • 13
  • 24
  • 2
  • 9
Axis & Allies Boardgaming Custom Painted Miniatures

48

Online

17.0k

Users

39.3k

Topics

1.7m

Posts