

Sure. The best online retailer for this sort of thing is Historical Board Gaming. go there and you will find every piece to almost every AA board game, even some Anniversary pieces. Of course, Ebay is a good way to acquire pieces as well.
Converting images for A&A Mini Modules
-
I have promised several people at this point that I’d post an image conversion guide so peopl can lend a hand in fleshing out the A&A Miniatures modules.
I typed one up for Cobalt and emailed it him way back, and he’s contributed greatly to the modules. Unfortunately, I can no long find those notes. So this thread will be the new repository for this information. It will start very thin, and I’ll keep updating with better descriptions, more tool-specific commentary, and sample images. But we’ve got to start somehwere!
-
Prerequisites
You are going to need an image editor with the following abilities:
(Basic)
Read JPEG images
Save images as Bitmaps
Cropping
Resizing
Flood Fill(Advanced)
“Select Similar” - the name will vary by product, but this feature allows you to select a pixel, say a random spot in the white background, and it will also select all other pixels that are of similar color.
Invert Selection
Grow/Shrink Selection - automatically enlarges or shrinks an image by some number or pixels.
Adjust Contrast, Highlights, or Colors
I use Paint Shop Pro 7. It’s wicked old but it works for me. I just checked and it looks like Corel now owns Paint Shop Pro, it used to be from a company called Jasc.
Gimp is an open-source, free image editor. I converted a Panhard with it to make sure it would do what we wanted, and it works fine! It can be found at http://www.gimp.org/
-
Step 1. Create the starting image
The first thing to do is to select the unit you want to convert, and then find a photo to start with. The gallery is the best place to find photos:
http://www.wizards.com/default.asp?x=ah/aam/gallery
Right-click on the photo in the webpage and select “Save Picture As…”. In the file browser dialog you navigate to where you want to save your image and, importantly, you need to change the “Save as Type” from JPEG to Bitmap.
JPEG files are really great for things like photos because they can make an otherwise massive image file much smaller by using compression. Similar to how MP3 files compress or strip away sound frequencies that people cant really hear anyway, JPEG compression takes advantage of the differences between how people percieve changes in color vs contrast or some such. Creating a JPEG removes some of the picture information, but it tries to do so in a way the the human eye cant notice (much). The problem is, if you edit and save a JPEG file over and over, the compression removes more and more of the original and eventually you wind up with a lot of “artifiacts” or yucky square blocks in your image.
So long story short, don’t use JPEGs or any other compressed image format. The source image should be a full color bitmap. Once you start editing you can likely save your work-in-progress in whatever format your image editor uses. When you have completed everything you will need to save a copy of it back as a bitmap though for use in MapView.
-
Step 2. Initial Cropping
Most of the newer gallery tank images will not need to go through this step, but always check. When converting an image, you really want to trim out extraneous background. For example, if the image has a soldier in the middle and then has three acres of background color (white) to his left and to his right, we want to trim that off.
In most image editors, there is a selection tool that lets click on the image and then drag a selection rectangle around part of the image. The goal is to creat as small of a rectangle as possible that entirely contains the unit. It often takes several attempts. Once you are happy with the result, you need to crop the image. In PSP it is under the menu Image -> Crop To Selection.
A quick note on saving your work-in-progress. It’s not a bad idea to save a seperate file for the various steps you are performing. That way if you really screw something up you dont have to start all the way back at the beginning. Let’s face it, working images is a lot of trial-and-error, so we might as well be prepared for it!
I almost forgot about the bases. Infantry units will have thier bases visible in the picture. You are going to want to get rid of that as best you can. What I usually do is start with the small (1-pixel) paint brush, with white as the active color, and very slowly and carfully outline the part of the unit that overlaps the base. Its actually not as hard as it sounds (I’ll include a picture as an example soon). Once that is done, its pretty easy to delete, erase, or otherwise fill in the rest of the base with white.
-
Step 3. Resize
This is the most trial-and-error step, especially for vehicles or units with odd poses or camera angles that have a different perspective (unit at sdie view VS at an angle). The goal is to resize the unit so it is consistantly sized to other units of its type.
All image programs have the ability to resize an image, though its surprisingly called a different things in different tools. (I recall having to hust around for it in Gimp).
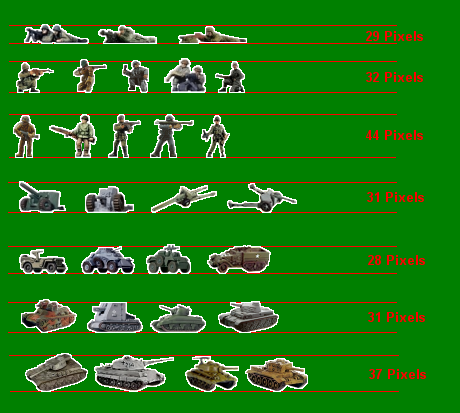
I have included a sample size chart. Not only does it help to give you an idea of how large to make your unit, it lets you see how it looks. After you apply a resize, copy-n-paste the unit right on to a scratch copy of the size chart to see how the unit stacks up.
After resizing the image to make the unit the appropriate size, you next need to change the image size to the standard size. In MapView, all of the images ned to be the same size, in the case of the A&A Minis modules I’ve decided to use a width of 80 pixels, and a height of 60 pixels. MapView masks out that extra unused space of small units. The changing of an image size without stretching/smooshing etc is ofetn referred to as setting the canvas size. You’ll want to set pure white as you background color when you resize the canvas (alternatively, you can use the flood-fill tool to fill in the newly created area with white). Also, try to center your unit in this 80x60 space. Just eyeball it as best you can.
A few things to note:
1. When you resize a unit, make him 2 pixels shorter than you intend to account for the border we will add later. So you can see in the chart that most soldiers are 44 pixels high. But you’d want to resize to 42 pixels high becasue we will add an extra pixel border later.
2. Tanks often have barrels, MGs, etc that stick up that will through off your resize efforts. The Chaffee image, for example, is actually almost as tall as a King Tiger if you measure to the MG on top. Instead, what I try to do is measure from the bottom of the tank tread to the top of the turret. This is usually around 28 pixels. So I’ll resize a similar tank and then measure to see if the resulting tread-to-turret is 28 pixels. I never get it right on the first try, so I hit undo and add or subtract from the resize hight and do it again.
3. Do take into account poses, and comparative sizes. A Tankette should not be as tall as a King Tiger, even if they are both tanks. Vehicles shot from a perspective-pose will need to be a bit taller to be visually the same. While a Sherman shot at profile will be 28 pixels high, one shot from a perspective angle will be 31 pixels high.
4. Sometimes protruding barrels etc make it such that when you resize the unit, its larger than 80x60. This was ftur of of the IS-2 and the King Tiger, as I recall. What do you do? I suggest trimming off the tip of the barrel a little before you resize. Its what I did.
5. All of these items are just guidelines, use your best judgement. At this point its better to get them done to 80% of what you’d want and get them into play. We can clean-up units later.
-
Step 4. Seperate background from foreground
At this point you should have an 80x60 image with a roughly white background and a correctlty-proportioned unit in the middle. I say roughly white because the background very likely conatins a dozen slightly-off-white colors mixed in. That’s because it can from a photo and was saved as a JPEG.
What we need to do now is to create a pure white background. I do this with a tool in Paint Shop Pro called the “Magic Wand” but I’ve also seen to called “Select Similar”. You configure the tool to select based on matching color (or RGB) and you specify a “tolerance” or “threshold” of, say, 20%. Then click on the background. This will select all the pixels that match the color of where you clicked PLUS those that are within 20% of that color. You should now have a selection of almost all of the background.
With that area still highlighted, look for any background pixels that may not have been included. You can add additional areas to that background select by holding SHIFT down and selecting more pixels with you Select Similar. Each additional selection you add while holding SHIFT gets merged in with the one that is active. Assuming you still have White as your background color you should be able to hit Delete and it should clear your selected areas leaving just that pure white. Alternatively, you can flood-fill white into the selection.
But your not done yet! What you will find is that the border between your nice new background and the unit contains some pixels that are half-way between in color. That blurred effect is is called anti-aliasing. The problem is that those areas where the unit color blends with white can make that 1 pixel border we will create later look like 2, 3 or 4 pixels in some spots.
Very carefully, with the background still selected, use your select similar tools and include in some of the anti-aliased pixles on a units edge. You are going to see a range of blurred pixels. Some that are almost white and some that are mostly colored. Just take the ones that are mostly white. Undo is your freind if you select too much. After including all of the border pixels that need to get removed, hit Delete or flood-fill the selection as you did before.
-
Step 5. Adjust contrast and/or colors (optional)
TODO, PUT TEXT HERE
-
Step 6. Create the outline
This step requires that the background (white) area be selected. If it is not, use the select similar to do so again.
Now, Invert the selection. There will be an menu option to do so. This will select all of the pxiels in the unit.
Next, “Grow the Selection”. In PSP this is done via the “Modify Selection” menu. Whatever the name, you are looking to enlarge the selection by 1 pixel. The selection should now look like it includes a little bit of the background. That little extra will be your 1-pixel white border!
Finally, invert the selection again (so you once again have the background selected) and flood-fill with our Mask color. This is the color that MapView will make transparent. You should now have a unit with a nice white border and a pale-yellow background.
This is the color code for the Mask in HTML format: FFFFC0
In RGB format its R=255, G=255, Blue=192 -
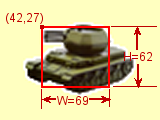
Step 7. Determine Click Region
Because all of the images used by MapView must be the same size (80 x 60 is what the A&A Mins modules use), the program supports the concept of a “click-region”. This is a setting associated with each unit that allows for a subset of the image to be designated as the part you can interact with (right click, drag-drop, etc). This region is a rectangle measured in pixels in the format of left, top, width, height.
The last step is to figure out what the click-region should be. The easiest way is to use the standard rectangle selection tool and select a subset of the image that is mostly filled with the unit. Most image editing software show these coordinates down in the status bar at the bottom as you drap your selection triangle.
This is often more of an art-form than a science since our units are rarely square. Try not to include too much background area in your click region, or it can get hard to select overlapping units.
A sample is included.
This is one of the most time-consuming steps if you have to go back and do it later, so I suggest doing this while you still have the unit in your image editor. Just create a text file and save the the click region coordinates for each unit as you go.
Suggested Topics

