Got in from shoveling and what do I find?
http://harrisgamedesign.com/phpBB3/viewtopic.php?f=44&t=17183
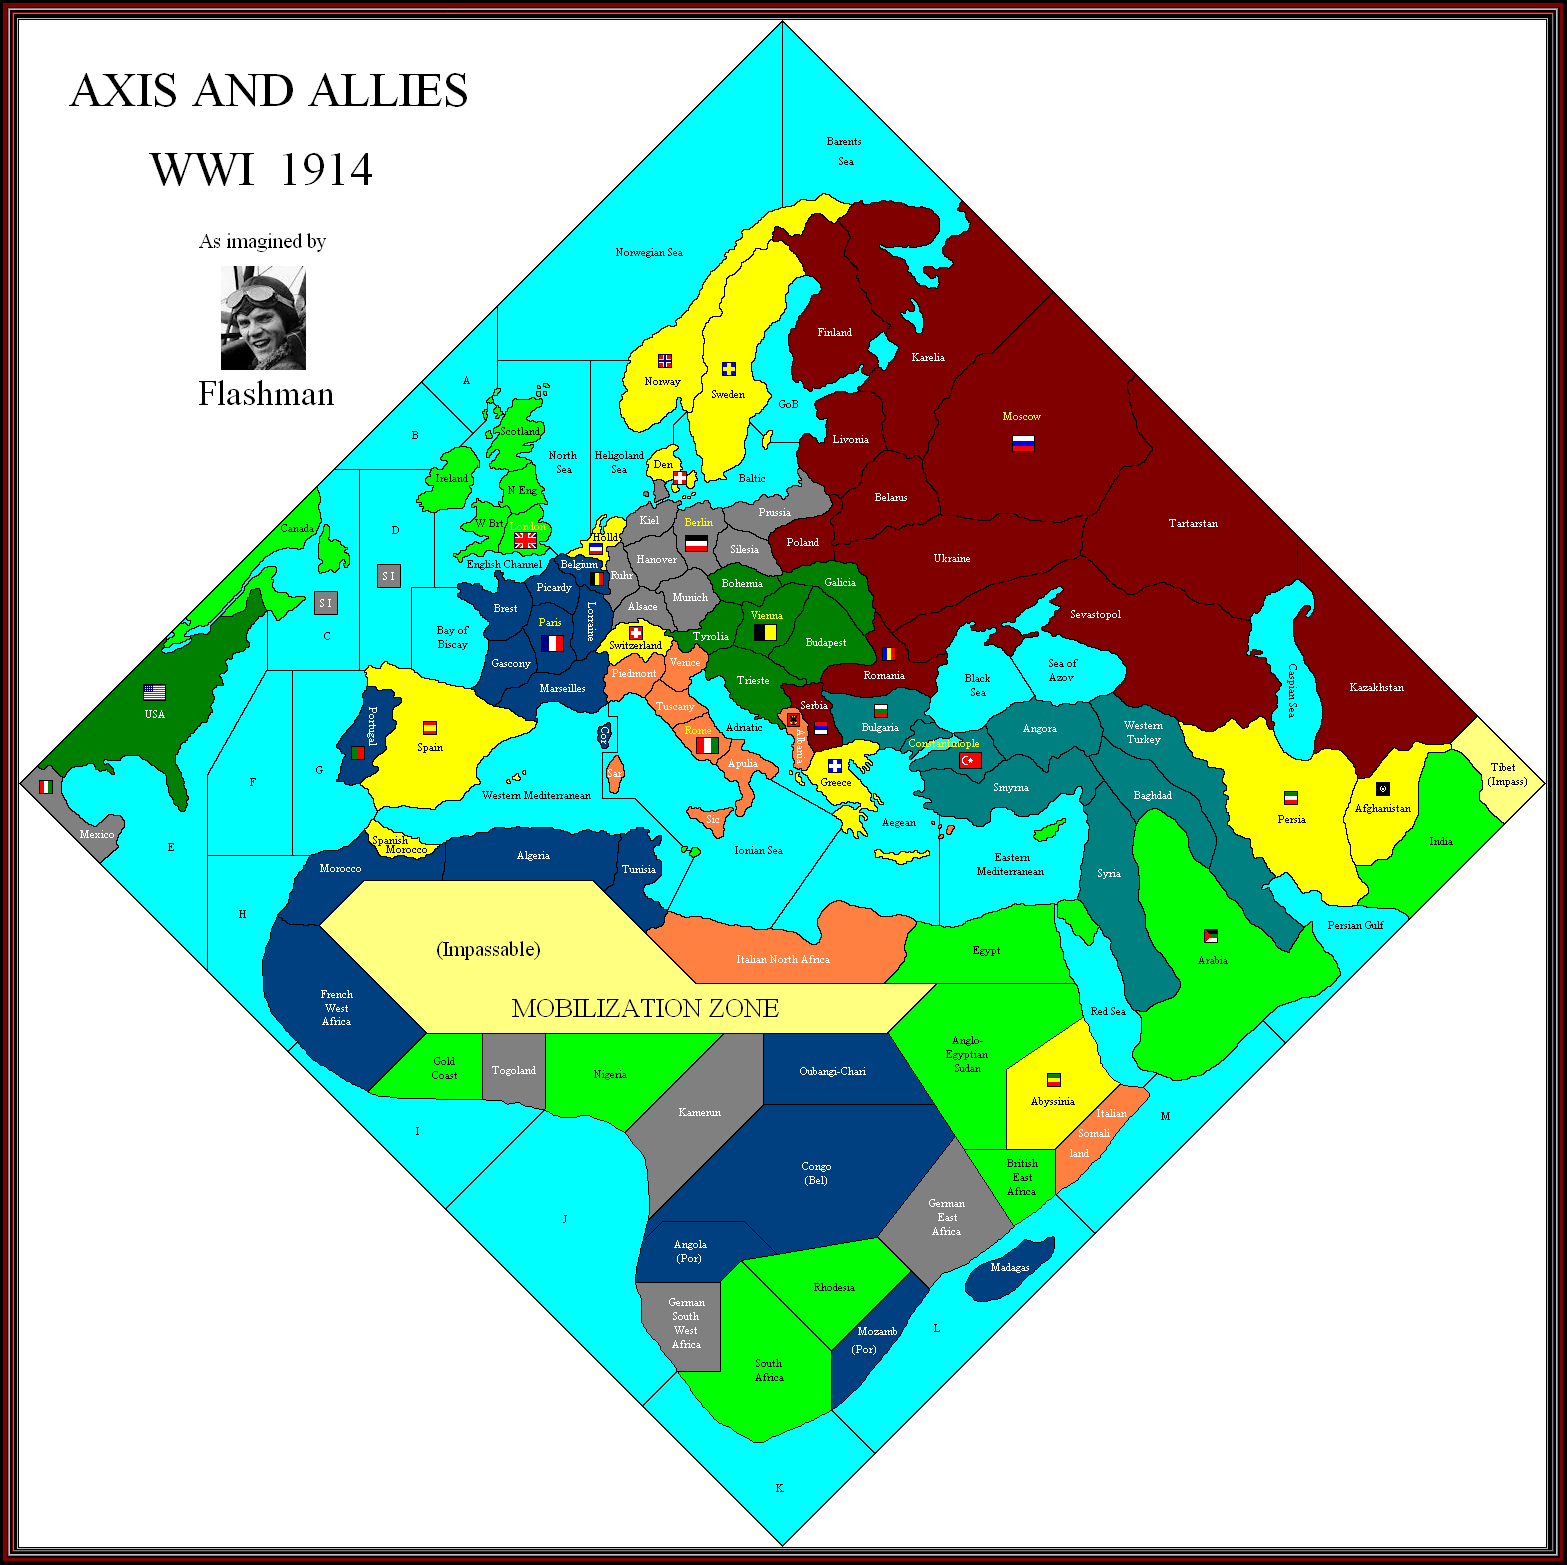
Axis & Allies 1914
Reports from the Front.
A walk through round one
Imperial Germany
You can’t talk about Imperial Germany without also talking about the Kaiser. I’m talking specifically about Wilhelm II. He was the last German Emperor and was the grandson of British Queen Victoria. It always amazes me how all these big shots were all related. It seems that the Kaiser’s big mouth may have done more to incite World War I than even he imagined. He was an out-right militarist, and his speeches and newspaper interviews promoted the idea of war. The following kind of sums up his point of view about the European balance of power at the time: “…For I no longer have any doubt that England, Russia and France have agreed among themselves—knowing that our treaty obligations compel us to support Austria—to use the Austro-Serb conflict as a pretext for waging a war of annihilation against us… Our dilemma over keeping faith with the old and honorable Emperor has been exploited to create a situation which gives England the excuse she has been seeking to annihilate us with a spurious appearance of justice on the pretext that she is helping France and maintaining the well-known Balance of Power in Europe, i.e., playing off all European States for her own benefit against usâ€. If that’s how the leader of Imperial Germany sees the world, then I guess the smart money would be on… We’re going to war.
The Schlieffen Plan, which basically spelled out how to avoid a two front war by implementing a quick victory against France and then moving against the slower-mobilizing Russians, was to provide the directives and policies of the Imperial Germany Army. The plan called for a rapid mobilization and the invasion of Belgium, the Netherlands, and Northern France. This thrust, in theory, should rapidly lead to the capture of Paris – it almost did.
Historically, things didn’t work out exactly as the big “S plan†suggested it would. Nonetheless, you can still have a blast playing Germany. I like trying out my own Schlieffen plan… I called it the Larry Plan (doesn’t have the same ring to it, does it?).
Often when playing the game, I see repeats of things that slowed or totally disrupted the real Schlieffen plan. For example, with only 3 infantry and 1 artillery, the Belgian forces often successfully resisted the Germany’s initial attack and forced them to settle for a contested situation in Belgium. This gives the British and French time to reinforce not only the territory of Belgium, but the whole of Europe itself.
The British reinforcements that we deal with in the game are call-backs to the memories of the BEF (British Expeditionary Force).At first, there weren’t too many of them. They had to be transported by sea across the Channel and were arriving piecemeal. That happens in the game, as well. The build-up of the BEF in Picardy, or Belgium, depending on Germany’s advances, is interesting to watch. The BEF usually are hanging on by their finger nails, but with a steady build-up of forces The BEF’s presence is usually felt soon enough.
As Germany’s first turn opens, several options are presented. It can invade Holland, Lorraine France, or of course Belgium, or any combination thereof. It could even invade Switzerland if it wanted to – but who needs the headache (maybe you do). It can also move into Poland.
Germany’s initial forces are pretty powerful. That’s one of the main reasons the Russian did not attack them on their first turn that I walked you through. It was not because of some rules that this country or that country had to attack another before this one could, and so on. It was more about Germany’s power and how Russia thought that it would be better to play a more defensive game in the north, against Germany, and a more offensive game in the south, against Austria.
I don’t think I should get too specific about the disposition of the German army in this write up. I mean, after all you don’t have game map (at the time of the writing), so my calling out names and numbers won’t make that much sense to you. Let me just say that Germany has the forces necessary to get into the likes of Belgium, Poland, Holland, and even parts of France. They also have the necessary forces to weather the counter attacks that will certainly be launched. Where Germany decides to brings the war is where the front lines will be established. As to how long these lines will remain in place, and who will dominate them… well, that’s up to how they are played by the powers’ controllers.
Let’s take a moment to look at one of Germany’s geopolitical situations, specific to the coasts of Belgium and Holland running along the North Sea. Being so close to Great Britain, it would stand to reason that the mighty British navy could drop amphibious assaulting forces behind the established front lines. I used to ask myself why they historically never actually did that. I don’t know if it was even attempted. A successful landing in this area could lead to major Allied forces not only cutting off reinforcements to the Germans’ current front lines, but could also threaten Berlin itself. Germany would, in effect, be flanked. So what’s stopping the Allies from doing exactly that? Actually, there are a couple of things preventing this kind of attack by the Allies. First, and perhaps foremost, is the Imperial Germany Navy (represented here with one dreadnought and 2 cruisers), and secondly, the great abundance of German naval mine fields. I might as well tell you now - all sea zones with a naval base symbol are considered mined by the power originally controlling the navy base.
Any enemy ship that moves into or through such a sea zone may strike a mine. One die is rolled for each enemy ship that has moved into such a sea zone. Each ship will be called out one at a time, and one die is rolled. A roll of 1 will mean the removal of the ship (except dreadnoughts, which need two hits). This combination of enemy ships and mine fields can be very intimidating, but it can be overcome. Whether to attempt such an operation will be up to you.
One can’t really talk about the German navy without talking about its ever-present fleet of submarines. Subs are, as usual in an Axis & Allies game, capable of moving undetected. Germany begins the game with no less than 4 submarines. None of the other powers have even one. One way for the German player to exploit this obvious advantage, and the rules help him or her right along, is to declare that Germany will begin unrestricted submarine warfare. This can be done at any time during the game. Once this is declared, Germany will be considered to be conducting submarine attacks against both the United States’ and the British Empire’s shipping routes. During the US and British player’s’ Collect Income phases, the German player will roll one die for each German submarine in certain sea zones (there are 3 of them, and they are sea zones 2, 7, and 8- strategically located, I assure you.). For each roll of 1 or 2, the attacked power will deduct 1 IPC from the income it normally collects during the phase. You might ask why Germany would not immediately and always conduct Unrestricted Submarine Warfare. Well… following Germany’s declared Unrestricted Submarine Warfare the United States will immediately enter the war! That might be reason enough to force the German player to wait a few turns before turning the subs loose.
With all this talk about ships, I probably should cast some light on how naval battles are conducted. I was going to wait for the British Empire write up and start the relevant paragraphs off with the words… “Rule, Britannia! Britannia, rule the waves!â€, but I just can’t hold myself back any longer!
Here are the numbers:
Battleships attack at 4, defend at 4, move 2, and cost 12. They also have to be hit twice to sink.
Cruiser attack at 3, defend at 3, move 3, and cost 9.
Submarines attack at 2, defend at 2, and cost 6.
Transports can’t attack nor defend. They move 2 and cost 6. They can carry any two land units and/or fighters.
When you have warships (not transports) in a sea zone containing enemy ships, you can elect to attack them. I should point out that transports must be chosen last as casualties, after all warships have been sunk or have submerged. Unlike a land battle, a sea battle can go on for multiple rounds of combat for as long as the attacker wants to continue. As usual in most A&A games, when it comes to submarines the attacker can roll an attack or can submerge. This is followed by the defender rolling for his or her ships. After both sides have rolled, the casualties are removed. The attacker can either press or break-off the attack.
Whenever a submarine, attacking or defending, has the ability to roll a combat die, it can elect to submerge instead. If it does so, it is placed on its side, indicating that it has used its ability to submerge and is withdrawing from the battle. They can still be sunk while withdrawing if the enemy rolls a hit.
Enough about ships - let’s get back to the subject at hand…
Germany has two armies located in the east, and both can be moved into Russian-defended Poland. This force, 12 infantry and 3 artillery, will be resisted by a Russian army consisting of 6 Infantry and 2 artillery. The question is… How many units does Germany want to actually commit to the Eastern Front and how many of these units could or should be moved to the Western Front, as per the Schlieffen Plan. This same question can be asked of the German aircraft that begins the game in Berlin. If this aircraft is sent to the Eastern Front, it will be guaranteed air supremacy. This same aircraft can be most useful on the Western Front as well. This is just one more decision the controlling player must make.
A word about aircraft - they can move two spaces. When moving two spaces, it doesn’t matter what the status of the first space is. It can be a sea zone, a friendly or contested territory, or even a hostile territory. However, a fighter must end its move in a territory containing land units belonging to its power. That, by definition, can include a contested territory.
Speaking of making decisions, what did Germany purchase and place in the Mobilization Zone at the beginning of its turn? I think I skipped right past that important moment. It had 35 IPC to spend. It purchased 7 infantry, 2 artillery, and another aircraft. Pretty sophisticated purchases!
German has 4 colonies in Africa: Togoland, Kamerun, South West Africa, and German East Africa. These units find themselves in a small but deadly struggle for Africa. The German units in Africa seem to be only interested in holding their ground, for at least this turn. That might be because It’s so hard for the Fatherland to supply them over the British warships infesting the worlds sea lanes.
So what does Germany end up doing this turn? The quick answer is… From Kiel it moves 3 infantry and 4 artillery into Holland. Neutral Holland, generating 2 IPCs, resists this invasion with 3 infantry and 1 artillery. The Dutch units are represented by British pieces (this is decided by the Allies). It should be noted that if Holland ends up being controlled by the Allies, the ally who originally mobilized in Holland would most like gain Holland’s 2 IPCs if the territory ends up in his or her control. From the Ruhr, German moves 7 infantry and 3 artillery into neutral but aligned Belgium. Belgium, having a small French roundel, indicating that it is an ally specifically of France, has French pieces placed on it representing newly mobilized Belgian forces. From Alsace, 7 German infantry and 3 artillery cross over into the French territory of Lorraine. There they are resisted by 6 French infantry supported by 2 artillery units.
From deep in Germany, additional units are moved from Hanover and Munich towards the west. The large German military presence in Berlin is split into two groups. One is last seen boarding trains heading east. The other was seen moving to Kiel. The newly formed German air unit, also located in Berlin, is moved to, and participates in, the attack on Holland. Prussia and Silesia become staging grounds for attacking Poland! Together they thrust 12 infantry and 3 artillery against a defending Russian army of 6 infantry and 2 artillery. Two German submarines located in the middle of the Atlantic are moved to the sea zone touching Canada (sea zone 2). There they will attack a British cruiser and transport. It should be noted that some German units simply did not move. For example the German fleet did not venture out… The battle of Jutland will have to wait.
As usual, each of the newly contested territories will have a single round of combat rolled. The participating units will remain in place on the map, and dice will represent them on the battle board. Depending on whether the infantry receive artillery support, they will be placed in either the boxes labeled “Attacking Infantry” or “Infantry with Artillery Support”. The box that they end up in will indicate the number that each die rolled must be in order to score a hit…
This process is about to be conducted in Belgium, Lorraine, Poland, and Holland. I saved Holland for last because in the battle for Holland the Germans have introduced for the first time the use of aircraft. Germany, having the only aircraft in the battle, automatically gains air supremacy. All four of the Germany artillery attacking Holland are promoted to the “Artillery With Air Supremacy Support” box, which means they will score hits with all die rolls of 4 or less! This single German air unit will also have the great honor and pleasure of rolling one die. If the fighter (or fighters) rolls a 1, scoring a hit, it has symbolically strafed or attacked the Dutch forces and will require a Dutch unit be eliminated. Now I’m about to do something that’s going to send at least 2 or 3 or you over the edge… I’m not going to tell you how these battles end up. This whole thing is getting just too long…Set it up and roll your own dice!
I will tell you this, however. Germany’s IPC income has gone up 5 IPCs (they captured Poland and Holland). France’s income has gone down 2 IPCs… It seems that Lorraine is now a contested territory . The initial battle for Lorraine went terribly wrong for the Germans, but not to worry, a counter attack/reinforcement army wisely positioned in Alsace earlier will assure that there will be a rapid follow up attack on Lorraine on the next turn. Oh, and Belgium? Belgium held by a narrow margin! I told you it would. Oh yeah… that double submarine attack against the Brits off Canada. Both the cruiser and the transport were sunk. They did manage to sink one of the German subs, however.
With the placement of Germany’s newly mobilized forces, purchased at the beginning of the turn, Germany now collects its income of 40 IPCs.
France is next…